# How To Add Checkbox In Contact Form 7 Without Code?
Here’s a simple and straightforward way to add a checkbox field to a Contact Form 7 form. You don’t need to write any CSS or HTML code for this.
Author: Abhijit Rawool
Source: https://abhijitrawool.com/how-to-add-checkbox-in-contact-form-7/
Published: 2020-10-14T08:29:58Z
Updated: 2020-10-14T09:46:26Z
Contact Form 7 is a great plugin, but it isn’t straightforward to use many times. Especially when you want to add checkboxes to your form. So…
**Given below are the steps to add a checkbox field in Contact Form 7:**
1. **Edit the form on which you want to add the checkbox field.**
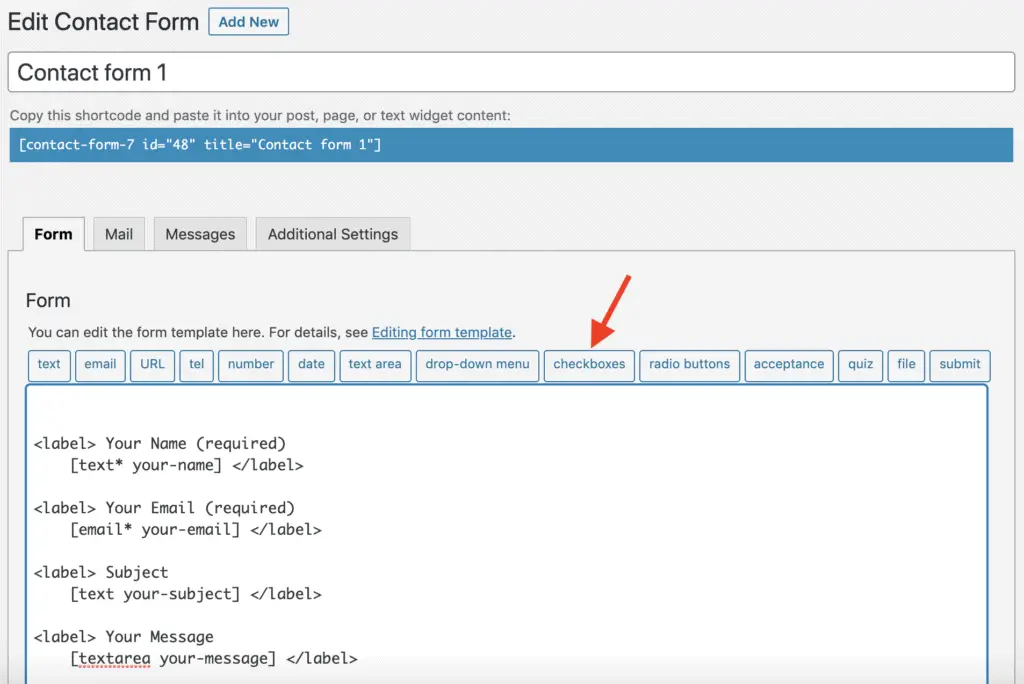
2. **Click the “checkboxes” button on the Form tab.**
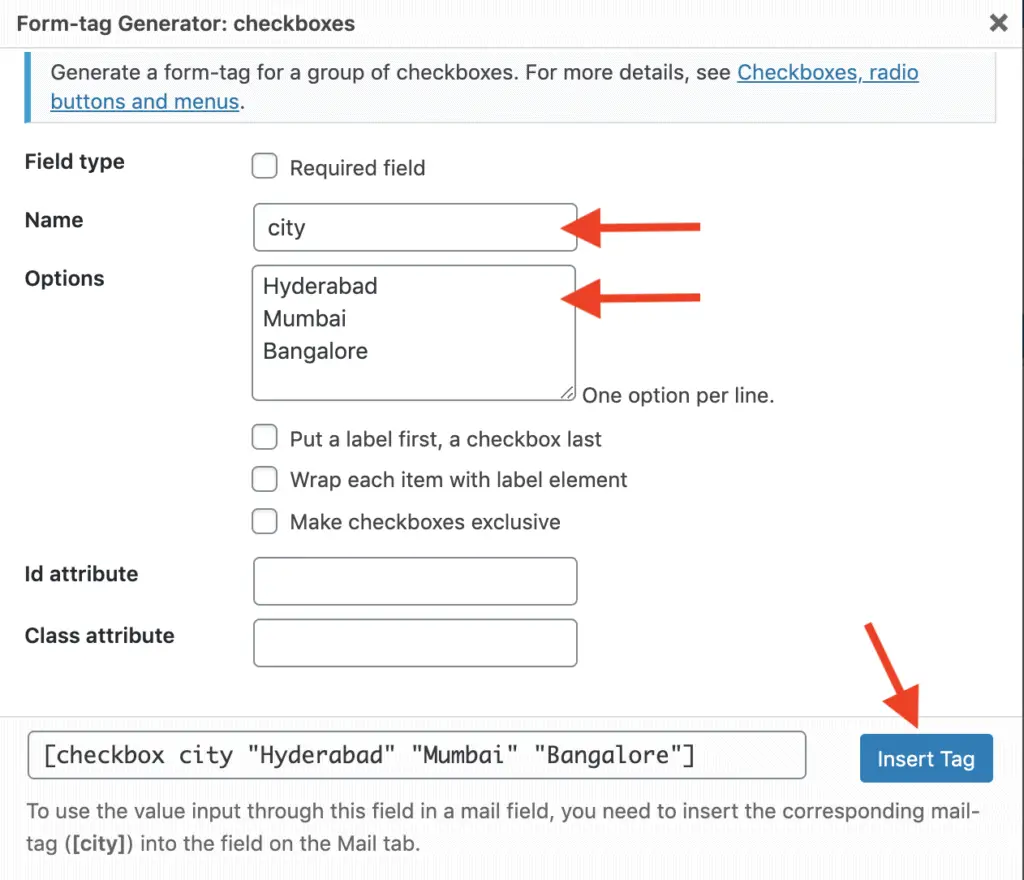
3. **In the Form-tag Generator popup, give a name to the checkbox field in the Name field. Then, enter the checkbox options in the Options field.**
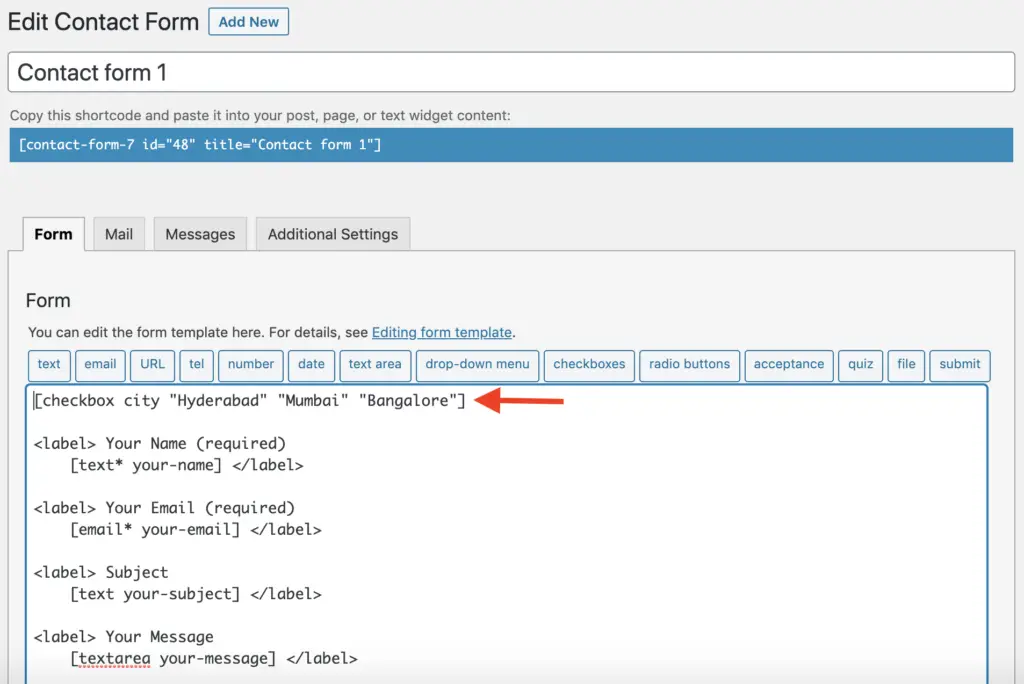
4. **Click the Insert tag button to add the checkbox field along with the options to the form.**
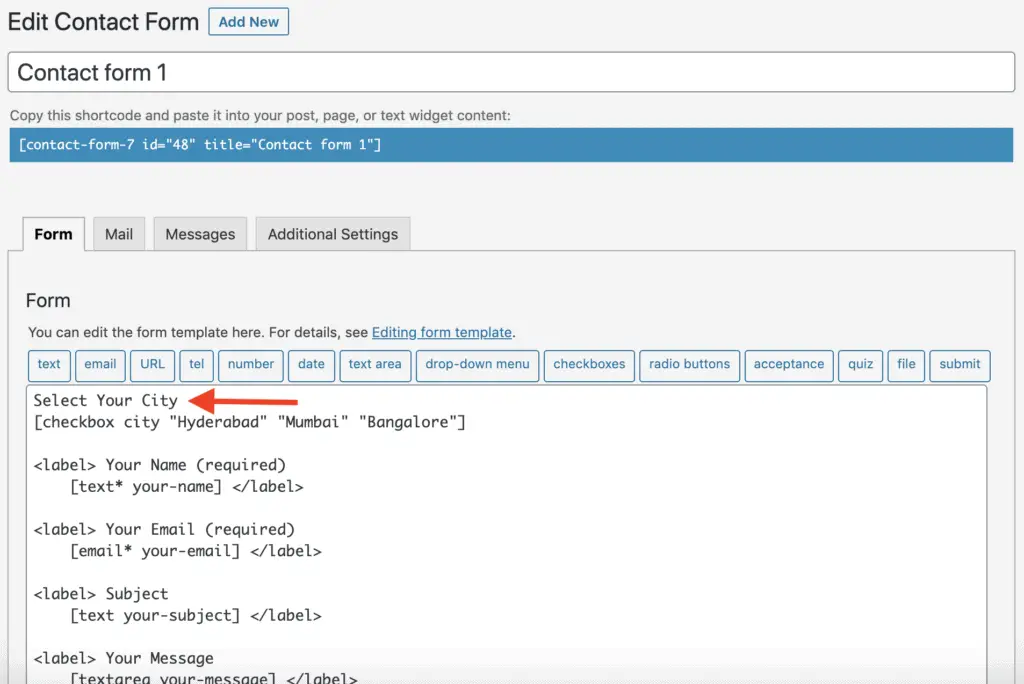
5. **Give a label to the newly added checkbox field.**
6. **Save the form.**
Let’s take a closer look at each of these steps now.
## How To Add A Checkbox Field In A Contact Form 7 Form?
First, create or edit the Contact Form 7 form to which you want to add the checkbox field.
Then, on the Form tab, click the “checkboxes” button.
[
](/wp-content/uploads/2020/10/contact-form-7-checkboxes-button.png)
The Form-tag Generator popup will display. Give a name to the checkbox field in the Name field, and enter all the checkbox options in the Options field.
[
](/wp-content/uploads/2020/10/contact-form-7-checkbox-form-tag-generator.png)
Now, click on the Insert Tag button to add the checkbox field to the form.
[
](/wp-content/uploads/2020/10/contact-form-7-checkboxes-form-tag.png)
Once the form-tag is inserted, you will notice that there is no label created for the newly added checkbox field.
To give a label to this field, enter the label name before the checkbox form-tag. For example, in the below image, you can see that I have added “Select Your City” as the label for my checkbox field.
[
](/wp-content/uploads/2020/10/contact-form-7-checkboxes-field-label.png)
Save your changes.
And that’s it!
That is how you add checkboxes to Contact Form 7.
Alright! What can you do next?
## Next Steps…
There are a lot of things that you can do with the Contact Form 7 plugin.
Given below are some tutorials that will help you make full use of the Contact Form 7 plugin:
- [2 Simple Methods To Style Contact Form 7 Without Code](/style-contact-form-7/)
- [How To Add A Hidden Field In Contact Form 7? (With Default Value)](/how-to-add-a-hidden-field-in-contact-form-7/)
- [How To Add Radio Buttons In Contact Form 7? (Without Code)](/how-to-add-radio-buttons-in-contact-form-7/)
- [How To Add Background Image In Contact Form 7 Without CSS](/how-to-add-background-image-in-contact-form-7/)
- [How To Add cc and bcc Fields In Contact Form 7? (Simplest Way)](/how-to-add-cc-and-bcc-fields-in-contact-form-7/)
- [How To Add Placeholder In Contact Form 7? (In 2 Easy Steps)](/how-to-add-placeholder-in-contact-form-7/)
- [How To Add Contact Form 7 Form In Elementor Without Any Plugin](/how-to-add-contact-form-7-form-in-elementor/)
## Video Tutorial
[Download Website Builders’ Toolbox](/toolbox/)
## Final Thoughts
I hope you liked this small little tutorial.
And if you found this tutorial helpful, then please share it with your friends. I will really appreciate it.
 ](/wp-content/uploads/2020/10/contact-form-7-checkboxes-button.png)
The Form-tag Generator popup will display. Give a name to the checkbox field in the Name field, and enter all the checkbox options in the Options field.
[
 ](/wp-content/uploads/2020/10/contact-form-7-checkbox-form-tag-generator.png)
Now, click on the Insert Tag button to add the checkbox field to the form.
[
 ](/wp-content/uploads/2020/10/contact-form-7-checkboxes-form-tag.png)
Once the form-tag is inserted, you will notice that there is no label created for the newly added checkbox field.
To give a label to this field, enter the label name before the checkbox form-tag. For example, in the below image, you can see that I have added “Select Your City” as the label for my checkbox field.
[
 ](/wp-content/uploads/2020/10/contact-form-7-checkboxes-field-label.png)
Save your changes.
And that’s it!
That is how you add checkboxes to Contact Form 7.
Alright! What can you do next?
## Next Steps…
There are a lot of things that you can do with the Contact Form 7 plugin.
Given below are some tutorials that will help you make full use of the Contact Form 7 plugin:
- [2 Simple Methods To Style Contact Form 7 Without Code](/style-contact-form-7/)
- [How To Add A Hidden Field In Contact Form 7? (With Default Value)](/how-to-add-a-hidden-field-in-contact-form-7/)
- [How To Add Radio Buttons In Contact Form 7? (Without Code)](/how-to-add-radio-buttons-in-contact-form-7/)
- [How To Add Background Image In Contact Form 7 Without CSS](/how-to-add-background-image-in-contact-form-7/)
- [How To Add cc and bcc Fields In Contact Form 7? (Simplest Way)](/how-to-add-cc-and-bcc-fields-in-contact-form-7/)
- [How To Add Placeholder In Contact Form 7? (In 2 Easy Steps)](/how-to-add-placeholder-in-contact-form-7/)
- [How To Add Contact Form 7 Form In Elementor Without Any Plugin](/how-to-add-contact-form-7-form-in-elementor/)
## Video Tutorial
[Download Website Builders’ Toolbox](/toolbox/)
## Final Thoughts
I hope you liked this small little tutorial.
And if you found this tutorial helpful, then please share it with your friends. I will really appreciate it.