Creating a WordPress website for a restaurant can get tedious and laborious because it needs to look great and should stand out from its competition.
This is the reason why Web Design Agencies charge a lot of money to make a restaurant website.
But what these design agencies don’t tell you is that even you can make a great-looking website at a fraction of the cost.
And that is exactly what you are going to learn in this guide on creating a restaurant website using WordPress.
You will not only learn how to make such a website, but you will also learn how to make it in a specific way so that you don’t have to hire a developer to maintain it for years to come.
Sounds great, isn’t it?
Okay, so let’s begin…
But let’s answer the most important question first…
How Much Does It Cost To Make A WordPress Website For A Restaurant?
If you go to a Web Design Agency, then you will easily be charged upwards of $2000. And that too with an additional annual recurring fee to maintain your website every year.
But if you decide to make your restaurant website by yourself, then…
It will cost you approximately $60/year to make a WordPress website for a restaurant.
That’s very cheap, isn’t it?
Hang on a second…
Since the cost is so low, does it mean that you are going to create a shabby looking website?
No!
In fact, this guide will walk you through all the steps needed to create a clean, professional, and a beautiful restaurant website.
Sounds good?
Great!
So here’s the cost breakup of all the things that you will need to build a restaurant website:
- You will need to buy a domain name for your website, for example, myrestaurant.com. This will cost you around $12/year.
- Then you will need to buy a web hosting account where you will install your WordPress website. This will cost you around $48/year. Make sure you buy hosting for multiple years at a time to reduce your costs.
Other than these two costs, there are no other costs involved.
Rest of the tools needed to create your restaurant website are totally free.
I hope I have got your attention by now and you are all pumped up to read through the rest of this guide.
Alright, let’s get cracking then…
Overview Of The Steps Needed To Create A Restaurant Website Using WordPress
There are 3 steps involved in creating a restaurant website:
There are no other steps needed.
Okay, so let’s go through each of these steps now…
STEP 1: Get Domain Name
A domain name is basically the web URL where people will find your website, for example, myrestaurant.com.
Don’t think too much about picking a domain name.
I guess you already run a restaurant or you are creating a website for someone who owns a restaurant. In either case, you can just take the name of the restaurant and use it as the domain name.
Now, what if that domain name is already taken by someone else?
In that case, I would just say, be creative with your domain name. You can use modifiers like “restaurant”, “the”, etc. in your domain name to make it unique.
Just try to name your domain as close as possible to the name of your restaurant.
One other thing that you might want to consider is to get a country-specific top-level domain. For example, .ca, .au, .in, etc.
So instead of naming your domain, myrestaurant.com, you can name it, myrestaurant.ca if your restaurant is located in Canada.
Using a country-specific top-level domain can really open up a lot of possibilities for your domain name.
Here’s a complete list of country-specific top-level domains.
Don’t get stuck in picking your domain name though.
You can spend days, weeks, and months in picking a domain name. This will keep you away from launching your website.
So I would suggest that you pick a domain name as soon as possible and get going with your website.
Now, once you have decided on a domain name, it is time to buy that domain name from a Domain Registrar.
A Domain Registrar is a company that helps you to register a domain so that no one else can use that domain name.
There are thousands of Domain Registrars. But I recommend that you register your domain name through Namecheap.
I use Namecheap to register all my domain names and I am using it for more than 10+ years now without any complaints.
I like Namecheap a lot, especially because it does not have any hidden costs in subsequent years when the time comes to renew your domain registration.
Many Domain Registrars will sell you a domain name at a substantially reduced price for the first year and then charge you a lot second year onwards when it is time to renew your domain registration.
Namecheap doesn’t do any such shady things, and that is why I recommend using Namecheap.
If you need help in registering a domain name, then read this detailed guide on how to register a domain name.
By the end of reading that guide, you should have a domain registered.
Alright, onto the next step now…
STEP 2: Get Web Hosting
A Web Host is basically a company that rents out its servers to people who want to place their website on them so that people all around the world can access that website.
Typically, you will not rent out an entire server when you are just starting out. You will just take a small space on the server on rent where you will install your website. And you will be able to manage this website from your web hosting account.
There are thousands of web hosting companies from whom you can buy a web hosting plan. Each web hosting company will have its own limits on the amount of space that it will rent out, the bandwidth that it will provide, etc.
You can go crazy trying to compare all these limits between various web hosting companies.
But there is no need to do that because no matter how hard you try to get the best deal, it is very difficult to find one because nothing as such exist.
Instead of trying to find the best deal, I would recommend that you look at the reputation of the web hosting company that they have built over the years.
And there are two web hosting companies that stand out from others, BigScoots and Kinsta.
I have used both and I love both of them. Both these web hosting companies offer great value for money services. Right from server speed to customer care, everything is great.
I would recommend that you buy a web hosting plan from one of these companies.
Kinsta is costlier than BigScoots because it is a true Managed WordPress Hosting company, unlike BigScoots which provides hosting for multiple platforms.
So depending upon your budget, buy a hosting plan from either BigScoots or Kinsta.
And if you need help in setting up your web hosting, then read this detailed guide on how to host a WordPress website.
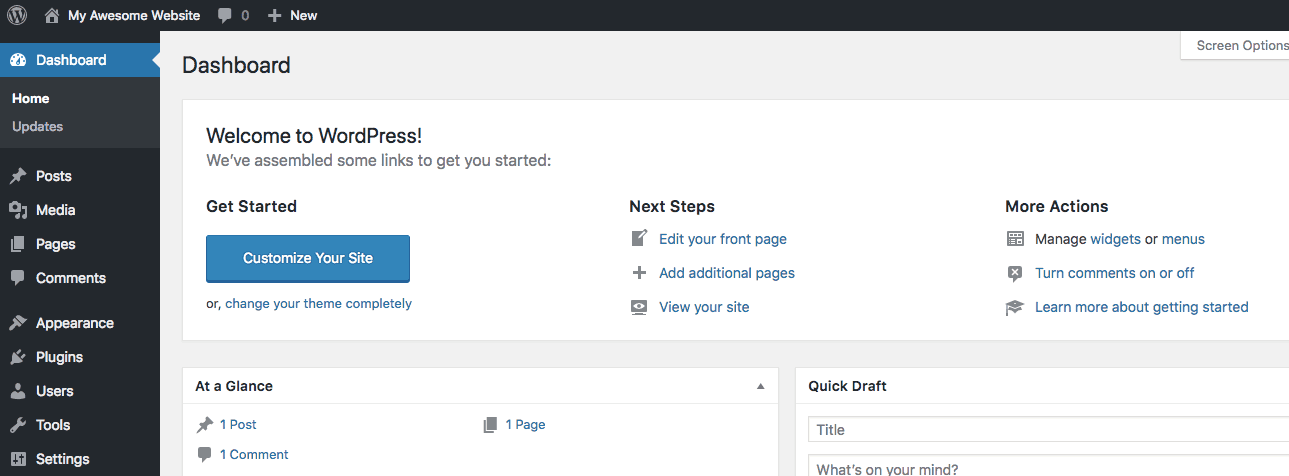
By the end of following all the steps from this guide, you should be able to log in to your WordPress Admin Panel which will look something like this…
If you are not able to log in to your WordPress panel, then cross-check all the steps mentioned in the above guide or contact your web hosting company.
Great! Now let’s start creating your website…
STEP 3: Create Your Restaurant Website
I have broken this step into 4 small sub-steps so that you find it easier to create your restaurant WordPress website.
These 4 sub-steps are:
- Set Up WordPress Settings
- Install and Activate Astra Theme
- Install and Activate Astra Starter Sites Plugin
- Import Astra’s Italian Restaurant Starter Site
Let’s take a look at each of these steps now.
STEP 3.1: Set Up WordPress Settings
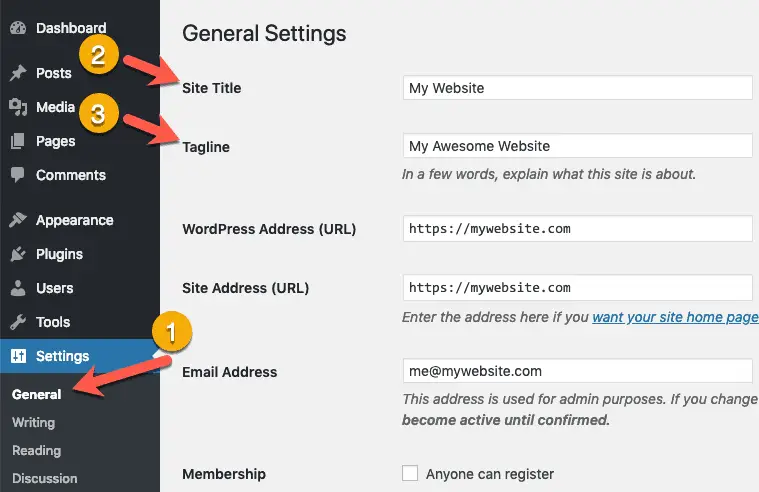
Log in to your WordPress Admin panel and then go to Settings > General. Here set up the Site Title and Tagline for your website.
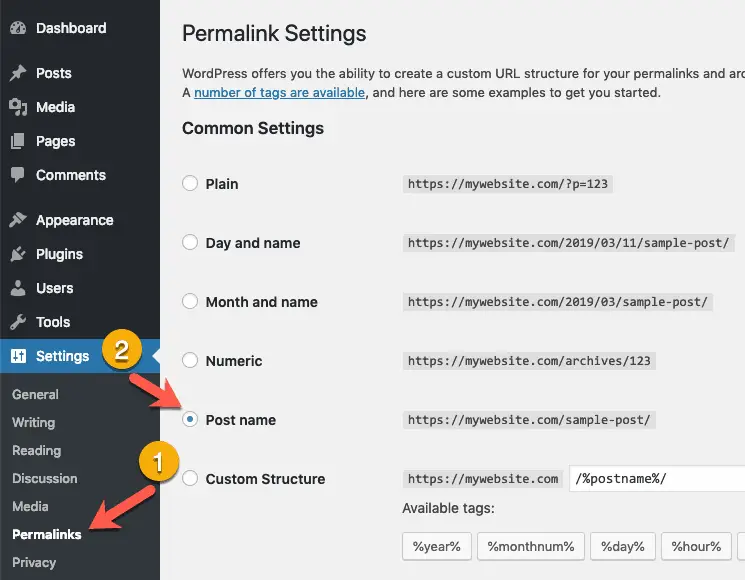
Now go to Settings > Permalinks and make sure that “Post name” is selected. If it is not selected, then select it and save the settings.
Now it’s time for the next step…
STEP 3.2: Install and Activate Astra Theme
Astra is a free theme and you can install it directly from your WordPress Admin Panel.
This is not the average free theme that you usually get on WordPress Themes Repository.
It is a great theme, and it is being actively developed by Brainstorm Force, the company behind this theme.
So it’s safe to use this theme because it is unlikely that a big company like Brainstorm Force will stop supporting this theme overnight. After all, their entire business model is built around this theme.
So go ahead and install the Astra theme.
If you need help, then follow these step-by-step instructions to install the Astra theme.
NOTE: You will notice that clicking the above link will take you to a mega guide on how to make a website. But, because you want to create a restaurant website, you should follow this guide and not that one.
Okay, now it’s time for the next step…
STEP 3.3: Install and Activate Astra Starter Sites Plugin
The team behind Astra theme has created a lot of starter websites that anyone can directly import into their WordPress installation to create a great looking website in a couple of minutes.
You can check out all of the starter websites on Astra’s website.
You are going to import the Italian Restaurant Starter Site.
Take a look at this starter website that you are going to import…
Now to import this website into your WordPress installation, you will need the Astra Starter Sites Plugin.
This is a free plugin.
So you can install and activate it directly from your WordPress Admin Panel.
If you need help, then follow these step-by-step instructions to install and activate the Astra Starter Sites Plugin.
Great! Now let’s go the last step…
STEP: 3.4: Import Astra’s Italian Restaurant Starter Site
Once you have installed and activated the Astra Starter Sites Plugin, click the See Library link on the Plugins page to see all the Starter Sites…

You will be taken to a page to select the Page Builder. Here, select Beaver Builder in the dropdown field and click the Next button.

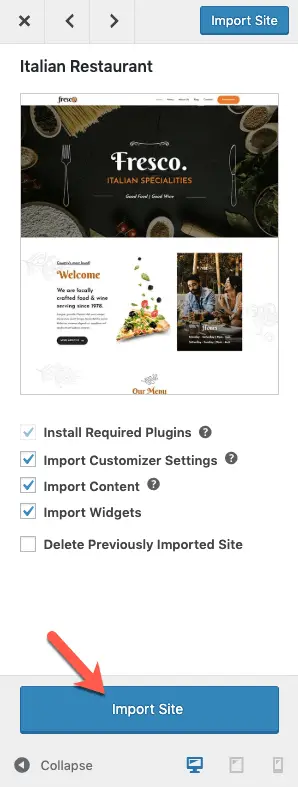
Now scroll down and click on the Italian Restaurant Starter Site.

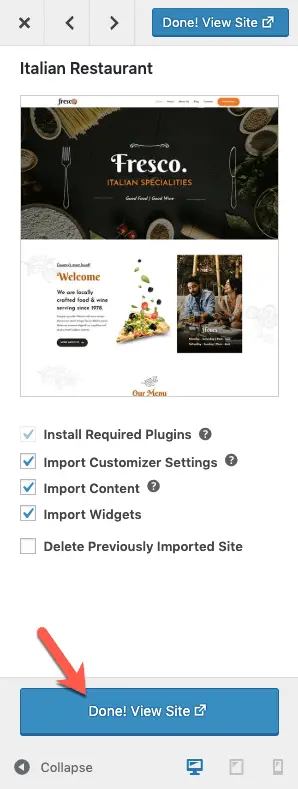
At this point, you should see the preview of the Italian Restaurant Starter Site with a panel on the left side displaying the list of things needed to import this website. Click the Import Site button in this panel to import Astra’s Italian Restaurant website into your WordPress installation.
Now it might take a few minutes to import the site. So please be patient. Once the site is imported, you will see the View Site button. Click it to view your restaurant website.
And that’s it!
Congratulations!
You have successfully built a great looking restaurant website using WordPress.
Now all that’s left to do is to edit this website to put your restaurant name on it, change the logo, menu, etc.
So let’s do that now…
Edit Your Restaurant Website To Make It Your Own
The very first thing that you should do is change the text and images on your website without fail. You don’t want to make your website look similar to other restaurant’s website which could have also imported the same Astra Starter Site.
To change the text and images on a page, go to that page and click the Beaver Builder link in the top admin bar.

Once you click that link, Beaver Builder will get activated. Beaver Builder is the page builder plugin using which you can simply drag-and-drop various design elements on the page as well as edit the text and images.
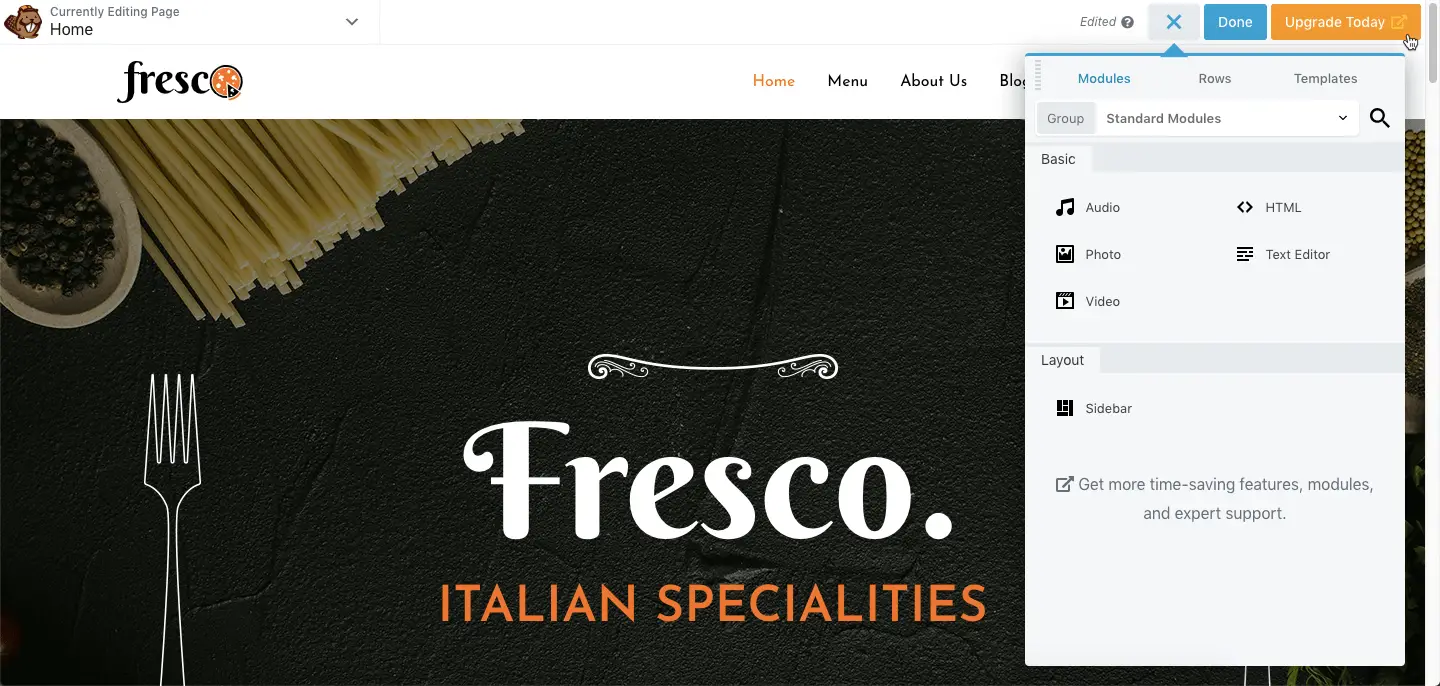
Beaver Builder is a paid plugin. But it also has a free version called Beaver Builder Lite. When you imported Astra’s Italian Restaurant website, Beaver Builder Lite plugin got installed along with Ultimate Addons for Beaver Builder Lite plugin. Both these plugins together give you a lot of design elements to design your pages.
Now, if you are finding it difficult to edit your website using these plugins, then refer the Beaver Builder Knowledge Base and also the Ultimate Addons for Beaver Builder Knowledge Base.
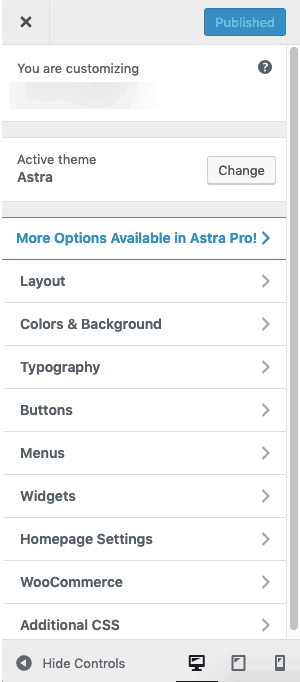
However, one thing that you might notice is that you cannot edit the Header, Footer, Menu, etc. of your website.
To edit these site-wide settings, click the Customize link in the top admin bar…

This will open up the WordPress Customizer panel where you can set up these settings.
Great!
Now what?
What’s Next?
When you imported Astra’s Italian Restaurant Starter Site, you installed a bunch of free plugins.
Ideally, you can keep using these free plugins without purchasing their premium versions.
But I would recommend that you get the premium versions of some of these plugins. Specifically these plugins:
These premium versions of the plugins will help you to further design the various aspects of your website.
For example, Ultimate Addons for Beaver Builder comes with a great Business Hours module using which you can design a great business hours section on your website. Similarly, the premium version of Beaver Builder also comes with a bunch of modules that are not available in the free version. And Astra Pro plugin will give you more control over the various site-wide settings.
So getting the premium versions of these plugins makes sense.
Okay, but what about optimization?
Let’s talk about this now…
How To Optimize Your Restaurant Website?
There are two things to consider in optimization:
- Search Engine Optimization, and
- Image Optimization
To optimize your website for Search Engines like Google, Bing, etc. you can use the free version of Yoast SEO plugin.
This plugin is the most popular SEO plugin in the WordPress ecosystem.
So spend some time setting it up.
And to optimize the images on your website, I would recommend ShortPixel plugin.
It’s a great plugin to compress and optimize images.
It has a free version and a paid version. So depending on the number of images that you are going to deal with on your website, get the free or the paid version of ShortPixel.
Okay great, but what about Site Speed and Security?
How To Secure and Speed Up Your Restaurant Website?
I know there are a lot of people who recommend using dedicated plugins to Secure and Speed up a website.
I am of the opposite opinion.
I really don’t think you should spend additional money on buying plugins for securing and speeding up your website.
In my experience, as long as you choose a good web hosting company, you should not bother about Site Speed and Security. That is why I recommended BigScoots and Kinsta earlier.
Both these web hosting companies, take care of security and site speed for you. So you don’t have to worry about it at all.
Alright!
Let’s Wrap Up…
I hope this guide has helped you to understand how to create a WordPress website for a Restaurant.
And I further hope that you will take action and build out your restaurant website.
But if you get stuck or have questions, then just let me know in the comments below. I will do whatever I can to help you.
If you are interested in learning more about creating restaurant websites, then here are some interesting articles:
- 7 Great Reasons Why A Restaurant Needs A Website
- 150 Innovative Restaurant Domain Name Ideas
- How Much Does A Restaurant Website Cost? (Actual Facts & Figures)
- 15 Best Restaurant Website Color Palettes That Will Wow Everyone!
Also, please share this guide with your friends or anyone you know who can benefit from it. I will really appreciate that.