This is the most comprehensive tutorial on how to make a website on the planet.
The best part?
I am going to show you how to make a website without writing a single line of code so that you can make your own website right now without having to learn how to code or hire a developer.
In short, if you want to learn how to create a website for your business, for your personal use, or just for your kids, then you will love this tutorial.
Let’s get started.
Why I Wrote This Massive Tutorial?
Hey there, I am Abhijit Rawool.
Unlike most people who build websites that later forces them to learn coding for making the smallest design changes to their website, I build websites that you can create and maintain all by yourself for years to come without writing a single line of code.
The reason I have written this big tutorial is because I was tired of reading “How to Make a Website” tutorials on the internet that built websites in such a way that it would require you to learn coding (PHP, CSS, HTML, etc.) or hire a developer if you wanted to make any design changes to your website.
My aim with this tutorial is to show you specific techniques to build a website which will help you to create and maintain your website on your own without having to learn coding and without having to hire someone else.
In fact, I have used the same techniques to build this very website that you are reading right now.
And in this tutorial I am going to show you how to make your own website without learning to write code or spend a ton of money on getting a website made from someone else.
Overview of How To Make A Website
You need to carry out the following six steps to make a website:
- Register a Domain Name
- Choose a Website Platform
- Select a Web Host
- Pick Your Website Building Tools
- Define Your Website Branding
- Build Your Website
Let’s start with Step 1. But before that…
NOTE: Before proceeding further, check out the below guides to see if you are interested in making one of these websites:
- WordPress Website For Artists
- WordPress Website For Photographers
- WordPress Website For A Restaurant
- WordPress Website For eCommerce
- WordPress Website For IT Company
Table of Contents
This is an extremely long tutorial. So here is a list of all the topics covered in this tutorial so that you can easily jump around between topics as you read this tutorial and try to follow along.
If you are building your first website, then I would recommend that you start from the top and read all of the steps in the sequence that I have written them. This will give you a good understanding of how to create your own website.
Alright! With that said, here’s a list of everything that is covered in this tutorial.
- Step 1 – Register a Domain Name
- Step 2 – Choose a Website Platform
- Step 3 – Select a Web Host
- Step 4 – Pick Your Website Building Tools
- Step 5 – Define Your Website Branding
- Step 6 – Build Your Website
- Step 6.1 – Set Up WordPress General Settings
- Step 6.2 – Set Up Permalink Settings
- Step 6.3 – Install Astra Theme
- Step 6.4 – Install Page Builder Plugin
- Step 6.5 – Create Home, About, Contact and Blog Pages
- Step 6.6 – Set Up Reading Settings
- Step 6.7 – Create a Menu
- Step 6.8 – Set Up Customizer Settings
- Step 6.9A – Design Home, About, and Contact Pages Using Beaver Builder Plugin
- Step 6.9B – Design Home, About, and Contact Pages Using Elementor Plugin
- Step 6.10 – Design The Blog Page
- A Big Congrats To You!
- What Next?
Okay! Let’s get started with Step 1…
Step 1 – Register a Domain Name
A Domain is nothing but the web address where people will find your website, for example, myawesomesite.com
In your case, it could be the name of your business or your name itself, like what I have abhijitrawool.com. Or it could be something totally different.
It doesn’t even need to be a “.com” domain. You can even choose something like “.net” or “.org” or something else. But I will advise that you stick with “.com”.
Why?
Because it is easier to remember and more importantly because people are used to type .com into their web browser while visiting a website.
Alright, take your time and decide on a domain name. This is your first exercise as well.
Exercise 1: Choose a domain name that you like.
Now that you have chosen your domain name, let’s register the domain so that no one else gets it.
There are hundreds if not thousands of places where you can register your domain. These are called Domain Registrars.
Some Domain Registrars only offer Domain Registration services while others also offer Web Hosting services. We will cover Web Hosting in a later step. For now, just know that there are some Domain Registrars that offer both services: Domain Registrations and Web Hosting.
Some popular Domain Registrars are GoDaddy, Namecheap, 1and1, Hover, etc.
Whichever Domain Registrar you choose, just keep this in mind:
You Will Not Host Your Website Where You Register Your Domain!
This is extremely crucial.
Why?
Because as with everything in life, you should not keep all your eggs in the same basket.
By keeping your Domain Registrar and Web Host separate, you will reduce your risk in case you need to change your web host at some point in time.
I prefer to register all my domains with Namecheap. I have been using them since long and highly recommend them. This is your second exercise.
Exercise 2: Register your domain name with Namecheap.
If you need help in registering a domain name, then read this detailed tutorial on how to register a domain name.
Step 2 – Choose a Website Platform
Great! Now that you have a domain, you will need to choose a platform on which you will build your website.
But…
What do I mean by a Platform?
A Platform is nothing but a tool or a service using which you will create your website.
There are two types of platforms:
- Hosted For You Platforms and
- Self Hosted Platforms
Let’s take a look at both these types of platforms.
Hosted For You Platforms
These are platforms like Squarespace, Wix, Weebly, etc.
What you need to understand is that, a Hosted For You Platform is completely managed by the company which has created it. You don’t have to worry about any technology, everything is taken care for you. You just need to concentrate on building your website.
But this also means that you and everyone else who is making a website using such a platform are bound by that company’s Terms and Conditions. Also, there are very few chances of doing any customizations to make your website look and function the way you want to. You are limited to the features that the platform offers.
If the company that is providing you the platform goes out of business, you will have to rebuild your website on some other platform by exporting your content out of the old platform and importing it into another platform. This might not be as easy as it sounds.
Now, let’s look at Self Hosted Platforms.
Self Hosted Platforms
These are platforms like WordPress, Joomla, Drupal, etc.
Unlike Hosted For You platforms, Self Hosted platforms are completely hosted by you.
This means you are not bound by someone else’s Terms and Conditions.
Yes, you will still need to take care of setting up the technology but it is not as scary as it sounds. We will see how to do this in the steps to follow.
Since you are in total control of everything, you can do as many customizations as you need; to make your website look and function as you want. You are not limited by anything.
Also, most of the popular Self Hosted platforms are Open Source.
This means that they are free for you to use and even if the Open Source Community behind these platforms stops further development of the platform, you can just hire a developer and keep your website up and running.
I have always used a Self Hosted platform for all of my websites and I recommend that you do it too.
Now the question is…
Which Self Hosted Platform Should You Choose? WordPress, Joomla or Drupal?
In short, WordPress currently powers more than 25% of world’s websites and it has a massive community behind it which keeps developing WordPress. New features get added very frequently, and it is patched with security updates whenever required.
Also, there are tons of plugins and themes available for WordPress using which you can create extremely complex websites.
I would say, just start with WordPress.
If you are not familiar with WordPress, then here is a short introduction to what is WordPress and if you are still not convinced then here are 27 reasons why you should use WordPress.
From this point forward in this tutorial, we will be using WordPress for making a website.
With that out of the way, let’s move on to the next step.
Step 3 – Select a Web Host
This is where most of the people go horribly wrong and then curse WordPress for all the problems that they face.
What I mean by that?
You will find thousands of companies offering web hosting services, right from a couple of dollars a month to few hundred dollars a month.
This means, you will get what you pay for.
If you choose cheap hosting services, then you will get a server that will just not have enough resources to run your website properly. Right from slow loading website to your website going down frequently, you will face all sorts of problems.
So choose your web host intelligently.
Until now, I have found only two web hosts worth recommending, Kinsta and BigScoots.
Kinsta is a Fully Managed WordPress Hosting provider. This means, it will take care of keeping your WordPress installation updated with the latest updates and protect it from hackers.
You don’t have to worry about managing any server, securing your website, maintaining your WordPress installation, or anything related to technology as such. See? I told you, Self Hosting a platform is not as scary as it sounds.
Depending upon your budget, you can sign up for one of the plans that Kinsta offers.
Yes Kinsta is a bit costlier than other Web Hosts. But then again, you get what you pay for.
So Kinsta will always give you a better Managed WordPress Hosting experience than anyone else.
But, not everything in life has to be costly. If you don’t have the budget to afford Kinsta right now, then BigScoots is a great low-cost option.
I have used BigScoots for years and still use them for some of my websites. So I have first-hand experience with them.
BigScoots’s Support team goes above and beyond to help their customers. That is why I have no problems what-so-ever to recommend BigScoots.
Other than Kinsta and BigScoots, don’t bother to choose any other web host. I have used many web hosts over the years (and I really mean many) and not found a single one that is better than Kinsta or BigScoots.
So please don’t use any other web host and then curse WordPress when things start to go wrong while updating and maintaining WordPress.
Go ahead and buy one of the plans from Kinsta or BigScoots. This is your exercise number 3.
Exercise 3: Get a web hosting plan from Kinsta or from BigScoots.
Once you have bought a web hosting plan from Kinsta or BigScoots, read this step-by-step tutorial on how to host a WordPress site.
It will show you how to correctly set up your web hosting for your website. Most importantly, this tutorial will show you how to point your domain to your web host by making some DNS changes and set up SSL for your website. So don’t skip reading this tutorial.
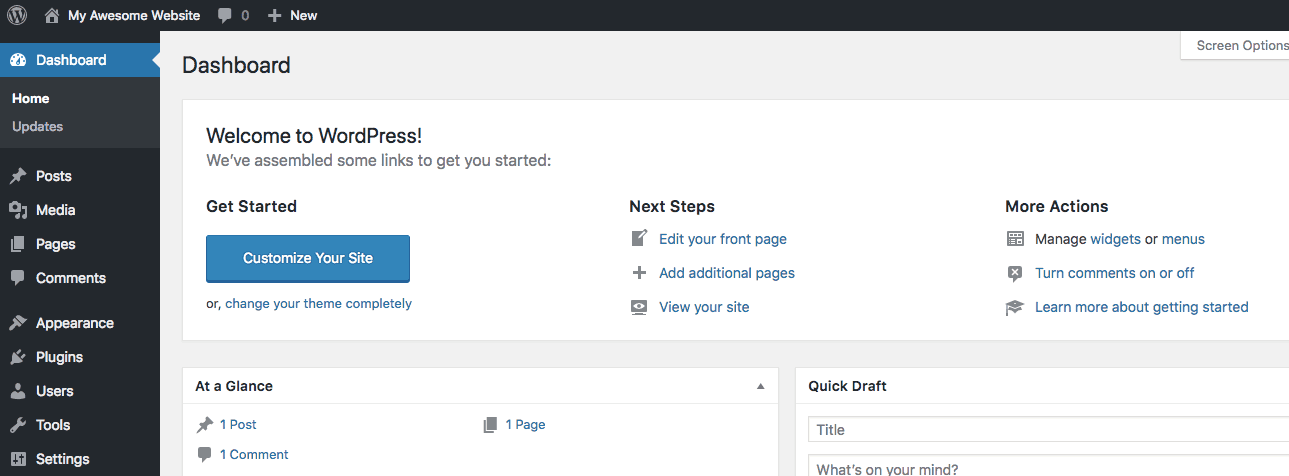
At this point, you should have a working WordPress website and you should be able to login to your WordPress Admin Panel as shown in the below image.
If you are not able to log in to your WordPress Admin Panel at this point, then stop reading this tutorial and follow all the steps that I have outlined in the how to host a WordPress site tutorial. If needed, get help from Kinsta or BigScoots Support teams.
Alright! Now that you are able to log in to your WordPress Admin Panel, it is time to pick the tools that you will need to build your website.
Step 4 – Pick Your Website Building Tools
There are only two tools that you need to pick for creating any WordPress website:
- A WordPress Theme and
- A WordPress Page Builder Plugin
Let’s pick each of them now.
Step 4.1 – Select a WordPress Theme
WordPress Theme is the one that gives structure and base design elements to your website.
It is the one that controls the overall layout of any WordPress website, like the Website Header, Footer, Menus, Sidebar, etc.
It also controls the design elements of the website like the fonts and base colors.
That is why it is important that the WordPress Theme which you choose should be flexible enough to let you do whatever you want to with your website.
In short, it should not force you to write code for changing some basic elements of your website, This is the reason why I stay away from some well-known premium themes and the thousands of free WordPress themes that are available in the WordPress Themes Repository.
Over the years, I have used and tested a lot of themes and the one that I have found the most flexible and easy-to-use is the Astra Theme.
Astra theme is free and you can install it directly from the WordPress Themes Repository over here.
It also has a premium pro plugin called Astra Pro that adds a lot of useful features to the Astra theme, like Transparent Headers, Sticky Headers, Blog Layout, more control over Website Colors and Fonts, etc.
If you are really serious about your website, then I would highly recommend getting the Astra Pro Plugin in addition to the Astra Theme.
If you are not so serious about your website and don’t care much about generating leads from your website or selling your products and services from your website, then the free Astra Theme will suffice.
For the sake of this tutorial, I am going to use the free version of Astra Theme.
Now that we have selected a WordPress theme, let’s select a Page Builder plugin.
Step 4.2 – Choose a WordPress Page Builder Plugin
A Page Builder plugin is nothing but a tool to design a WordPress page as you want by simply dragging-and-dropping various elements on the page, like a Button, Photo Slideshow, Gallery, a Map, etc.
Until a few years back, using a Page Builder plugin used to cause a lot of compatibility issues with other plugins and themes. It used to be a nightmare to make the page builder plugins work with all other parts of a WordPress website.
If that was not enough, the page builder plugins in those days used to lock your content inside them. What I mean by that is, if you ever uninstalled those plugins, you would lose all the content that you had written using those plugins. This was the biggest nightmare.
This all changed with the launch of Beaver Builder and Elementor.
These two WordPress plugins made it possible for a normal person like you and me to create web pages that previously could only be created by using code or by hiring a developer.
Check out the demo video of Beaver Builder on Beaver Builder’s Home Page and the demo video of Elementor on Elementor’s Home Page to understand why these page builder plugins are so important.
By using Beaver Builder or Elementor, you can design a website any way you want to without touching a single line of code.
So it is essential that you choose one of these two as your page builder plugin for your website.
However, the big question is which one should you choose.
If you go to Beaver Builder website and Elementor website to look at the features of each of these plugins, then you will find that Elementor has a lot of features than Beaver Builder. And I really mean a lot of features.
While Elementor has a lot of features, Beaver Builder is a much more stable and secure page builder plugin. It is not a plugin that will break your website any time.
If you want a more detailed comparison between these two plugins, then read my Beaver Builder vs Elementor comparison.
If you are still confused about which one you should choose, then I would recommend that you choose Beaver Builder to create your website.
The stability and security of Beaver Builder are worth a lot in the long run. I am saying this from personal experience.
I have been using Beaver Builder for a number of years now to know how stable and secure it is. You can also read my Beaver Builder review to know more about why you should choose Beaver Builder.
However, if you choose to use Elementor, then it is perfectly fine too. Elementor is also a great page builder plugin with a great development team behind it. So don’t let my views stop you from using Elementor. You can read my Elementor Review to see how feature packed this plugin is.
That is why in this tutorial I will show you how to build your website using both Beaver Builder and Elementor so that you get the maximum out of this tutorial.
Exercise 4: Choose either Beaver Builder or Elementor as your page builder plugin.
Alright! I know you are itching to get started but there is one more step before you start creating your website.
Step 5 – Define Your Website Branding
Before you start creating your own website, you need to choose your website Fonts and Colors and create a Logo for your website.
If you proceed without choosing your website fonts and colors, then your website will end up looking unprofessional. You don’t want that.
The secret to creating a professional-looking website is to carefully select your fonts and colors and then use them everywhere as your Brand Fonts and Colors.
Your logo should also use your brand fonts and colors to give a professional and cohesive look and feel to your website.
So let’s get started with Fonts, Colors and Logo.
Step 5.1 – How To Choose Fonts For Your Website
I would highly recommend that you choose just two fonts for your website.
Why?
Because, unless you are a designer, you will find it extremely difficult to match and pair various fonts together.
Selecting just two fonts removes the intimidation in selecting fonts and makes it easy to pair the two fonts together.
I know you must be wondering where will you use these two fonts.
You will use one font for all the headings on your website, like the H1, H2, H3, etc. Do you see the “How To Choose Fonts For Your Website” heading at the top of this section? It is a H3 heading. That is what I mean by headings.
As for the second font, you will use it for the text on your website. For example, the font that you are reading right now is the text font.
Okay! So how do you actually choose these two fonts?
Go to Google Fonts website and look through all the available fonts.

You will find hundreds of fonts on this website.
Look through some of them and select the one that you like. Once you find a font that you like, click the font name to see its details.
For this tutorial, let’s choose Roboto font for the Headings.
On Google Fonts website, click Roboto to see its details.
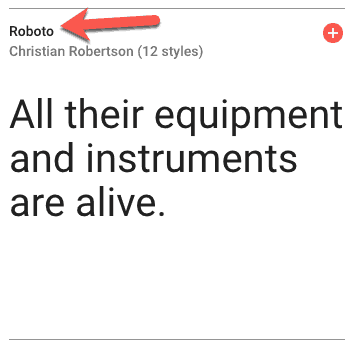
If you don’t see the Roboto font, just search for it using the search box available on Google Fonts website.
If you scroll down on the details page of Roboto font, you will see that Open Sans font is one of the recommended fonts to be paired with Roboto.
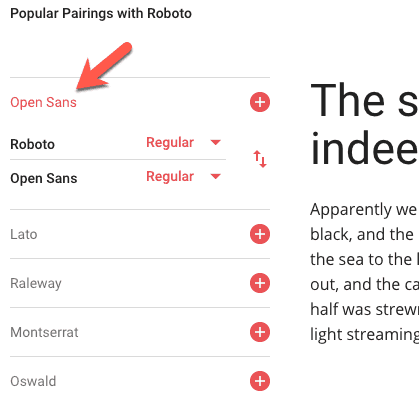
For this tutorial, let’s choose Open Sans as the second font for the website. Let’s use it as the Text Font in this tutorial.
Follow this same process and you should have two fonts selected in no time for your website. One for the Headings and one for the Text of your website.
Exercise 5: Choose two fonts for your website.
Now let’s choose colors for your website.
Step 5.2 – How To Choose Colors For Your Website
At a minimum, you will need to select two colors for your website.
The first color will be used as the Accent Color which is basically the color of the hyperlinks and buttons on your website. And the second color will be used as the Text Color.
I always like to use Black as the text color for my websites because it is the one that makes it very easy to read the text. So I would suggest that you do the same.
Now, that leaves us with the task of selecting the Accent color.
For selecting the Accent color, just choose the color that you like the most.
I like Blue color. So for this tutorial, let’s choose Blue color as the Accent color.
Which color do you like? Pick that color.
Don’t waste too much time in choosing the colors because you can always change them later.
Now that you have picked the colors, you will need to find their hex codes so that you can use them on your website.
Don’t be frightened. A hex code is not exactly a code. It is just an alpha-numeric representation of a color.
The hex code of Black color is #000000.
To get the hex code of your Accent color (Blue color in this tutorial), go to HTML Color Codes website. On this website, adjust the color slider and picker till you get a shade of your Accent color that you like. Then make a note of the hex code.
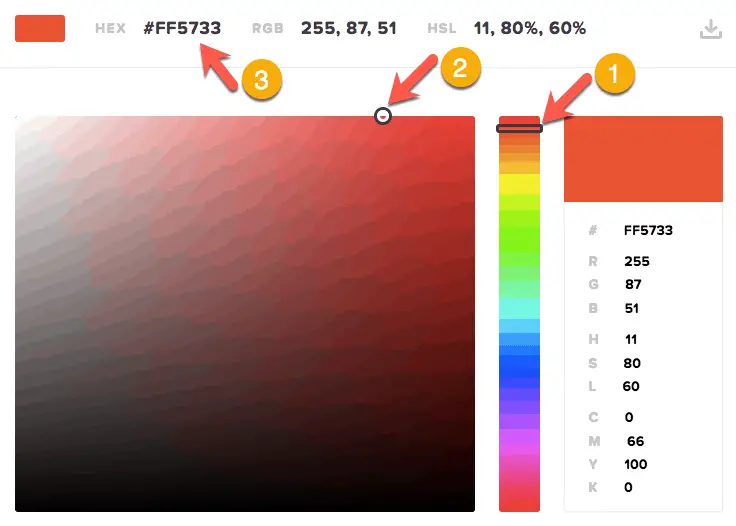
The hex code that I am going to use for the Blue Accent color in this tutorial is #0274be.
Exercise 6: Choose two colors for your website.
Okay! Now that you have your brand colors sorted out, it is time to create a logo.
Step 5.3 – How To Create A Logo For Your Website
If you already run a business, then I guess you will have a logo.
You can use that same logo on your website too. Just make sure that the fonts and colors of your existing logo match the fonts and colors that you just selected.
If you don’t have a logo, then I would recommend that you get one created by a designer.
You can get a logo made from 99Designs or from Fiverr.
Exercise 7: Get a logo made from 99Designs or Fiverr.
Congrats! You now have all of your branding elements, fonts, colors and logo in place.
This course goes into great detail about how you can fully brand your website to make it look more professional than your competition.
Alright! Now let’s get down to the last step of making a website and the one which you might be eagerly waiting to start…
Step 6 – Build Your Website
Here are the exact steps that you will need to follow to create a WordPress website:
- Step 6.1 – Set Up WordPress General Settings
- Step 6.2 – Set Up Permalink Settings
- Step 6.3 – Install Astra Theme
- Step 6.4 – Install Page Builder Plugin
- Step 6.5 – Create Home, About, Contact and Blog Pages
- Step 6.6 – Set Up Reading Settings
- Step 6.7 – Create a Menu
- Step 6.8 – Set Up Customizer Settings
- Step 6.9A – Design Home, About, and Contact Pages Using Beaver Builder Plugin
- Designing Home Page Using Beaver Builder
- Designing About Page Using Beaver Builder
- Designing Contact Page Using Beaver Builder
- Step 6.9B – Design Home, About, and Contact Pages Using Elementor Plugin
- Designing Home Page Using Elementor
- Designing About Page Using Elementor
- Designing Contact Page Using Elementor
- Step 6.10 – Design The Blog Page
Alright! We still have a lot of things to cover, so let’s get started.
Step 6.1 – Set Up WordPress General Settings
Let’s first properly set the Title and Tagline for your website.
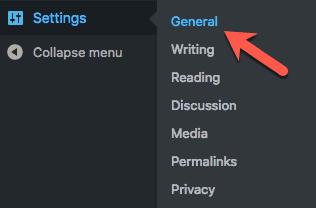
To do this, login to your WordPress Admin Panel and go to “General” settings under “Settings” menu on the left-hand side.
On the “General Settings” page, set the “Title” and “Tagline” for your website and save your changes.
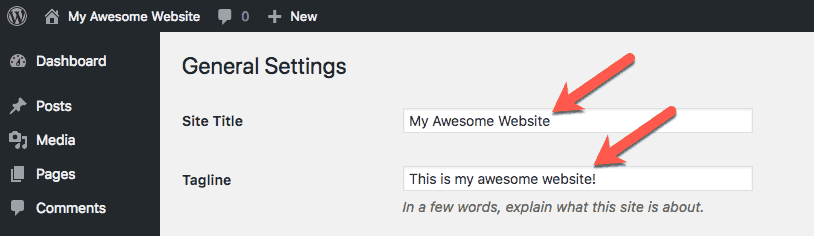
You can also change other settings as per your liking.
Exercise 8: Set up WordPress General Settings of your website.
Step 6.2 – Set Up Permalink Settings
Now, let’s set the Permalink or the URL structure for the pages of your website.
This is very important because otherwise, your website pages will end up having weird looking URLs.
To set the proper Permalinks, go to “Permalinks” settings under “Settings” menu.
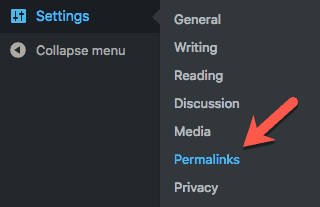
And then on the “Permalinks Settings” page, select “Post name” option and save your changes.
Exercise 9: Set up WordPress Permalink Settings of your website.
Now let’s install the Astra Theme that we talked about earlier.
Step 6.3 – Install Astra Theme
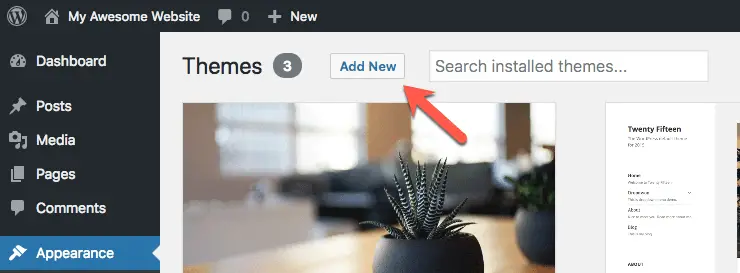
To install Astra Theme, go to “Themes” page under “Appearance” menu.
Click “Add New” button on the top of Themes page.
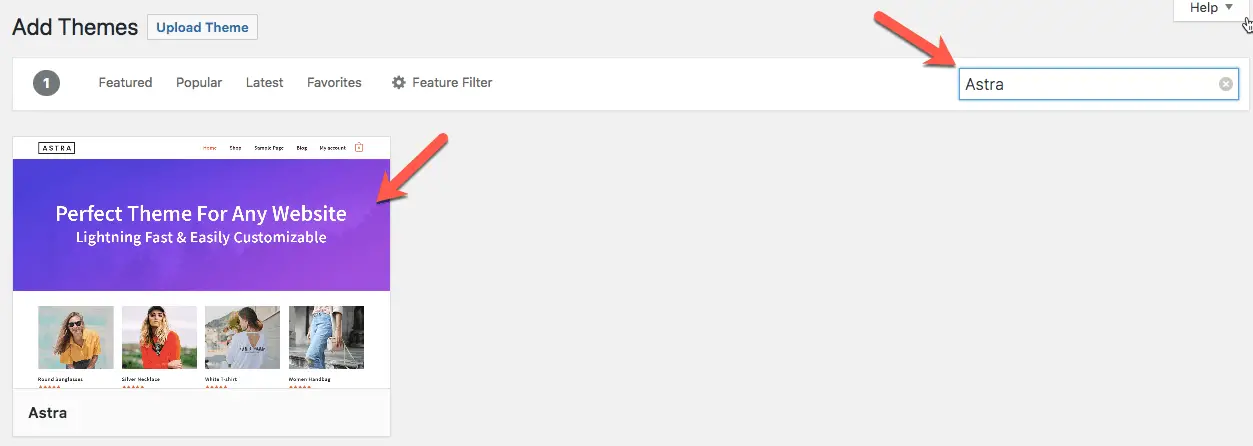
On the “Add Themes” page, search for Astra theme.
Hover your mouse on the theme name and click the “Install” button to install the Astra Theme.
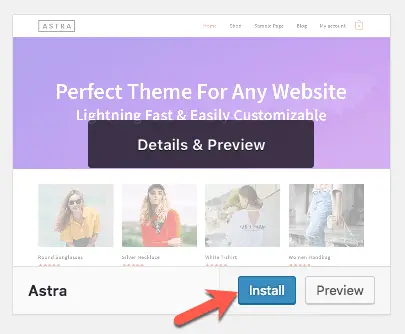
Once the theme is installed, click the “Activate” button to activate the theme.
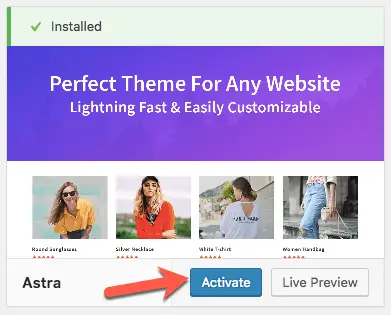
At this point, you can delete the rest of the themes that WordPress comes with by default.
Exercise 10: Install Astra Theme on your website.
Now, it’s time to install the Page Builder plugin.
Step 6.4 – Install Page Builder Plugin
I hope you have already made a decision on whether to use Beaver Builder or to use Elementor.
Given below are the steps to install both of these plugins. Depending on which plugin you have selected to build your website, follow the installation steps of that plugin.
Install Beaver Builder Plugin
If you have decided to use Beaver Builder, then you should have already purchased the Standard Version of Beaver Builder. If not, then now is a good time to purchase Beaver Builder plugin.
Once you purchase Beaver Builder plugin, you will get the License Key and a zip file that you can upload on your WordPress website to install the Beaver Builder plugin. Make a note of the License key and download the zip file to your computer after your purchase.
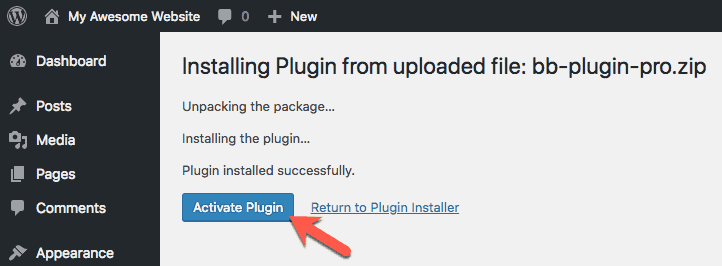
Now go back to your WordPress Admin Panel and click on “Plugins” from the left side menu. You will be taken to “Plugins” page where you need to click the “Add New” button to upload the Beaver Builder zip file that you just downloaded.
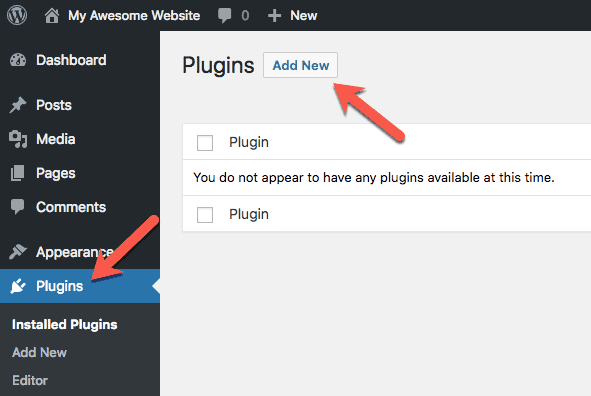
On clicking the “Add New” button, you will be taken to the “Add Plugins” page. Here, you need to click the “Upload Plugin” button.
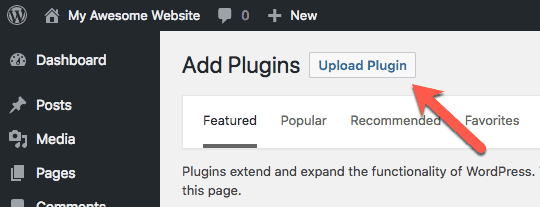
Then browse and select the Beaver Builder zip file from your computer to upload it and then click the “Install Now” button to install it.
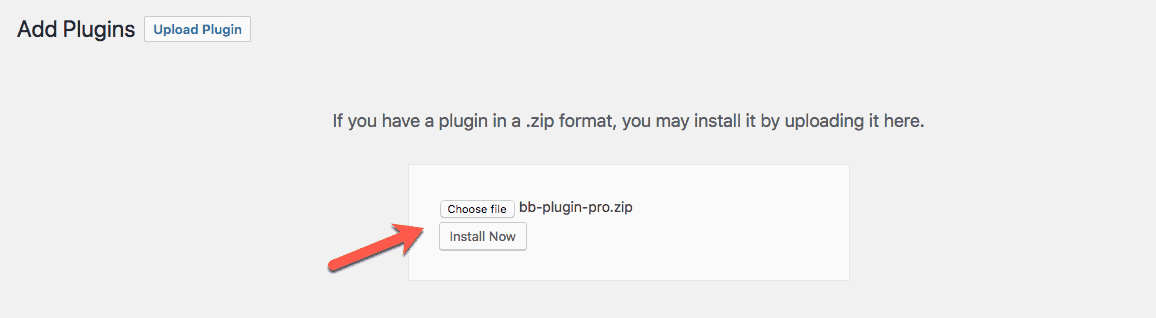
Once Beaver Builder plugin is successfully installed, click the “Activate Plugin” button to activate the Beaver Builder plugin.
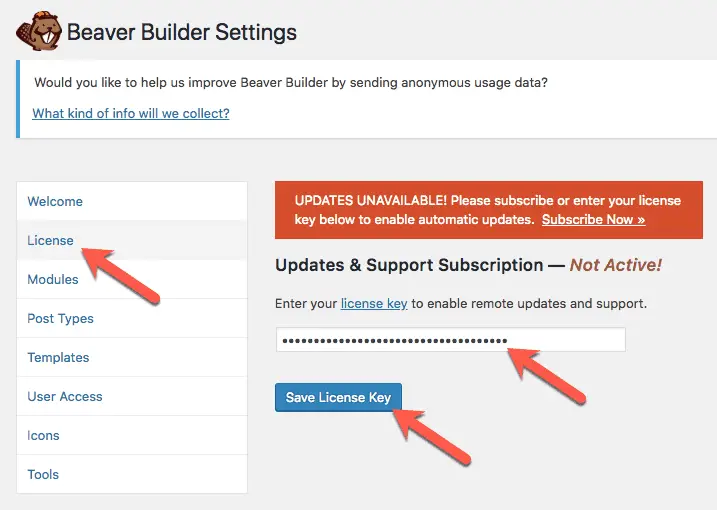
You will now be taken to the “Beaver Builder Settings” page. Here, click the “License” tab to enter your Beaver Builder License Key and save it. This is essential to keep your Beaver Builder plugin up-to-date.
Exercise 11: Install Beaver Builder Plugin on your website.
Okay, that completes the Beaver Builder plugin setup. Now, let’s take a look at setting up Elementor plugin.
Install Elementor Plugin
You will need to carry out the below steps only if you chose to use Elementor instead of Beaver Builder plugin.
If you chose Beaver Builder, then ignore this step and go to the next step. But if you chose to use Elementor, then follow the below steps.
To install Elementor plugin, click on “Plugins” from the left side menu in your WordPress Admin Panel and click the “Add New” button.
For this tutorial, you can use the free version of Elementor since we will not need any of the premium features of Elementor. But while building your main website, I recommend that you buy Elementor Pro version since you will get support from Elementor team in case you need it anytime.
On the “Add Plugins” page, search for Elementor plugin and install it.
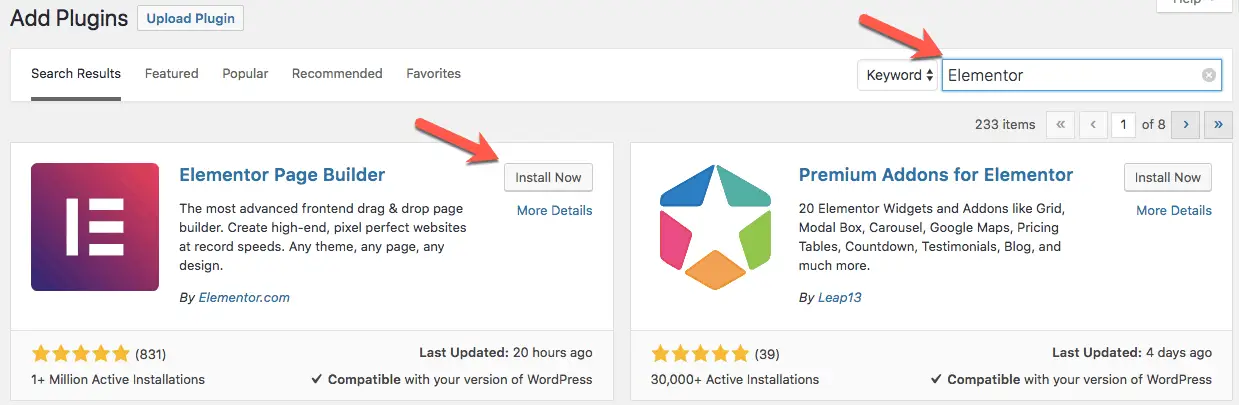
Once installed, click “Activate” button to activate “Elementor” plugin.

That’s it! Elementor should now be active on your website.
Exercise 11: Install Elementor Plugin on your website.
If you purchased Elementor Pro, then you would get a License Key and a zip file similar to the one described above for Beaver Builder.
To upload and activate Elementor Pro, follow the same steps that are described above for Beaver Builder.
Note that Elementor Pro is an addon on top of the Elementor plugin. So you need to first install and activate the Elementor plugin as described above and then upload and activate the Elementor Pro plugin.
Great! Now that you have the page builder plugin active, let’s create your website pages.
Step 6.5 – Create Home, About, Contact and Blog Pages
No, we are not going to completely build out all of these pages just yet.
For now, we will just create these pages. We will not add content to these pages or design them in any way. We will do that in a later step.
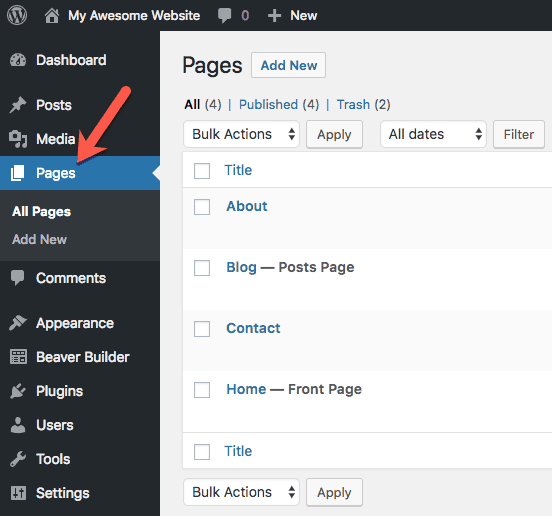
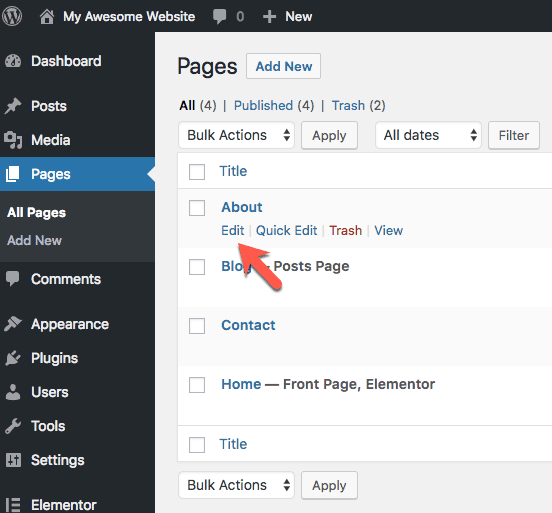
To create these pages, click “Pages” from the left side menu in the WordPress Admin Panel and then click “Add New” button.
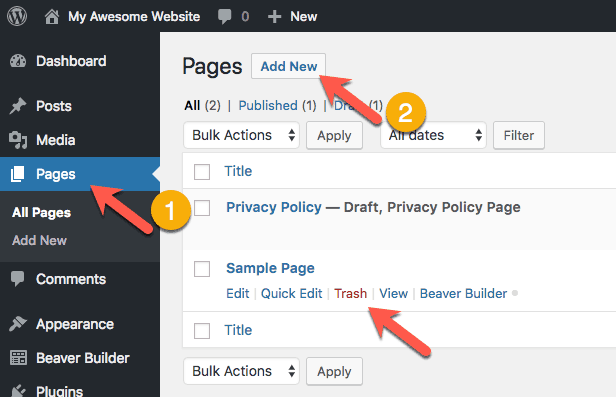
If you want, you can delete the “Sample Page” and “Privacy Policy” page that WordPress creates by default since these are just sample pages.
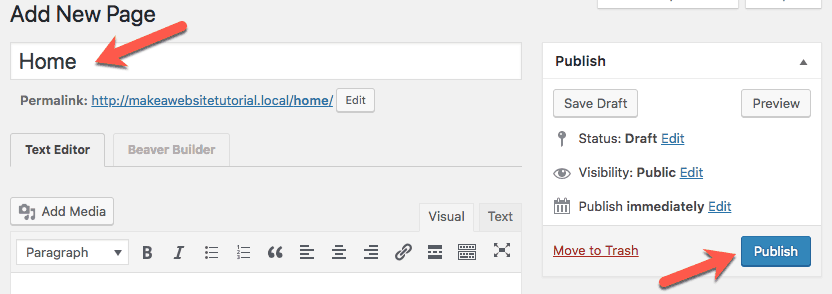
Now, on clicking the “Add New” button, you will be taken to “Add New Page” page. Here, enter “Home” as the page name and click the “Publish” button to create your Home page.
Repeat this process to create your “About”, “Contact” and “Blog” pages. Create Blog page only if you want to write a blog on your website. If you do not plan to write a blog, then there is no need to create the Blog page.
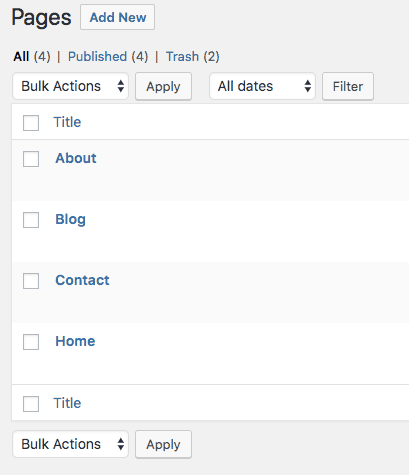
After creating all the pages, you should see all of them on the “Pages” page.
Exercise 12: Create Home, About, Contact and Blog pages on your website.
Now it is time to set the Reading settings of WordPress.
Step 6.6 – Set Up Reading Settings
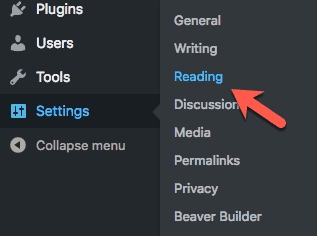
To set Reading settings, click “Reading” under “Settings” menu in your WordPress Admin Panel.
On the “Reading Settings” page, set the Home page that you just created in the “Homepage” field and set the Blog page in the “Posts page” field. You can keep the “Posts page” field blank if you do not intend to write a blog on your website.
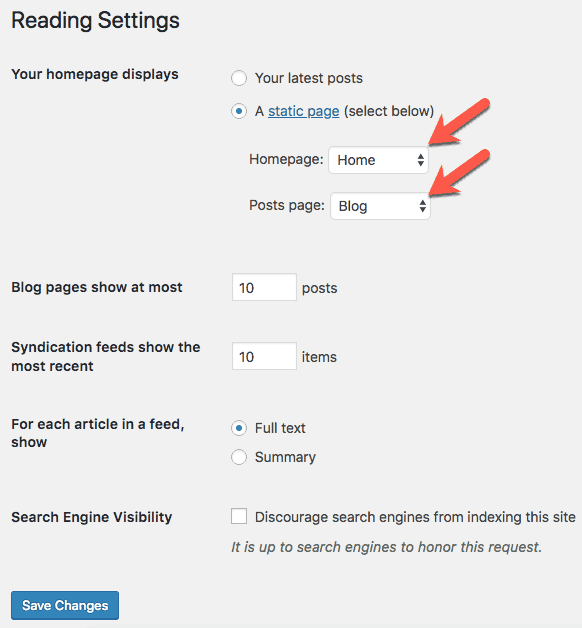
Don’t forget to save your changes by clicking the “Save Changes” button.
Exercise 13: Set up WordPress Reading Settings of your website.
Now, let’s create the Menu for your website.
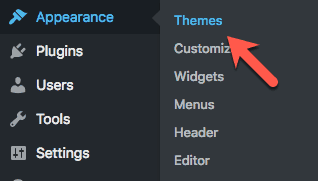
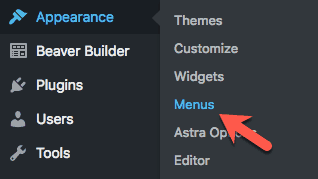
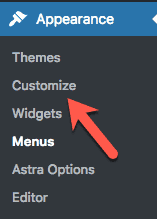
Step 6.7 – Create a Menu
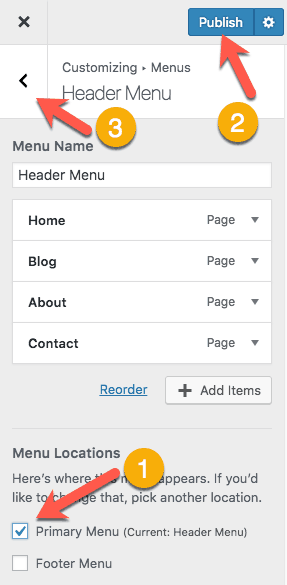
To create a menu for your website, go to “Menus” under “Appearance” menu in your WordPress Admin Panel.
To create the menu to display in the header of your website, enter a name for the menu in the “Menu Name” field on the “Menus” page and click the “Create Menu” button,
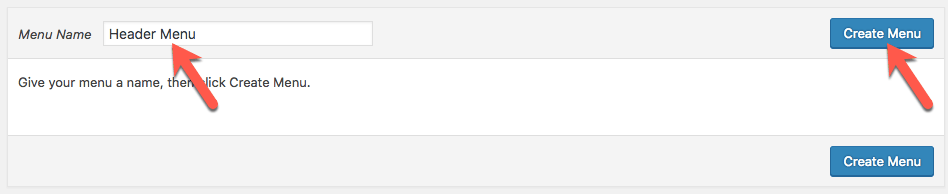
In the above example, I have entered “Header Menu” as the name of the menu. You can give any name that you want.
Now that the menu is created, select the pages that need to be displayed in the menu from the “Pages” section on the left side and click the “Add to Menu” button.
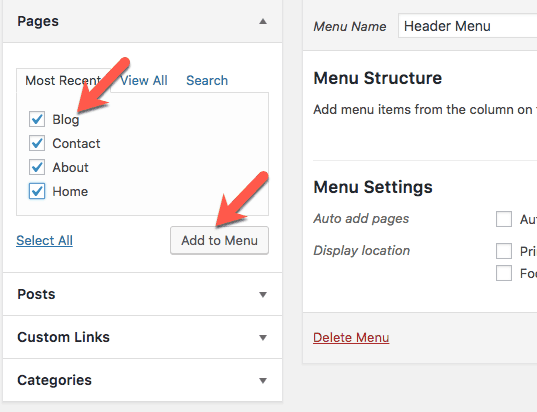
Arrange the menu structure by dragging-and-dropping the added pages in the proper order that you want to display on your website.
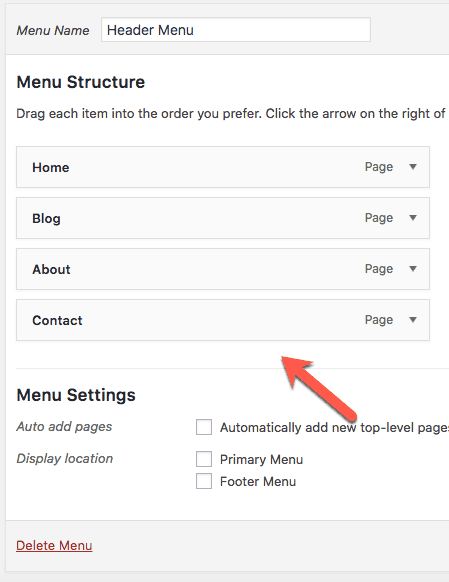
Save the menu to complete your menu creation process.
Exercise 14: Create a Menu for your website.
Okay, now it is time to set your brand fonts, colors and logo for your website using the Customizer settings.
Step 6.8 – Set Up Customizer Settings
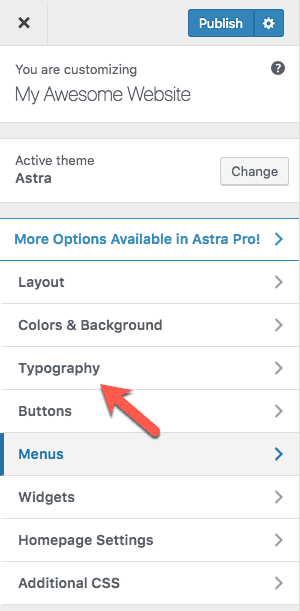
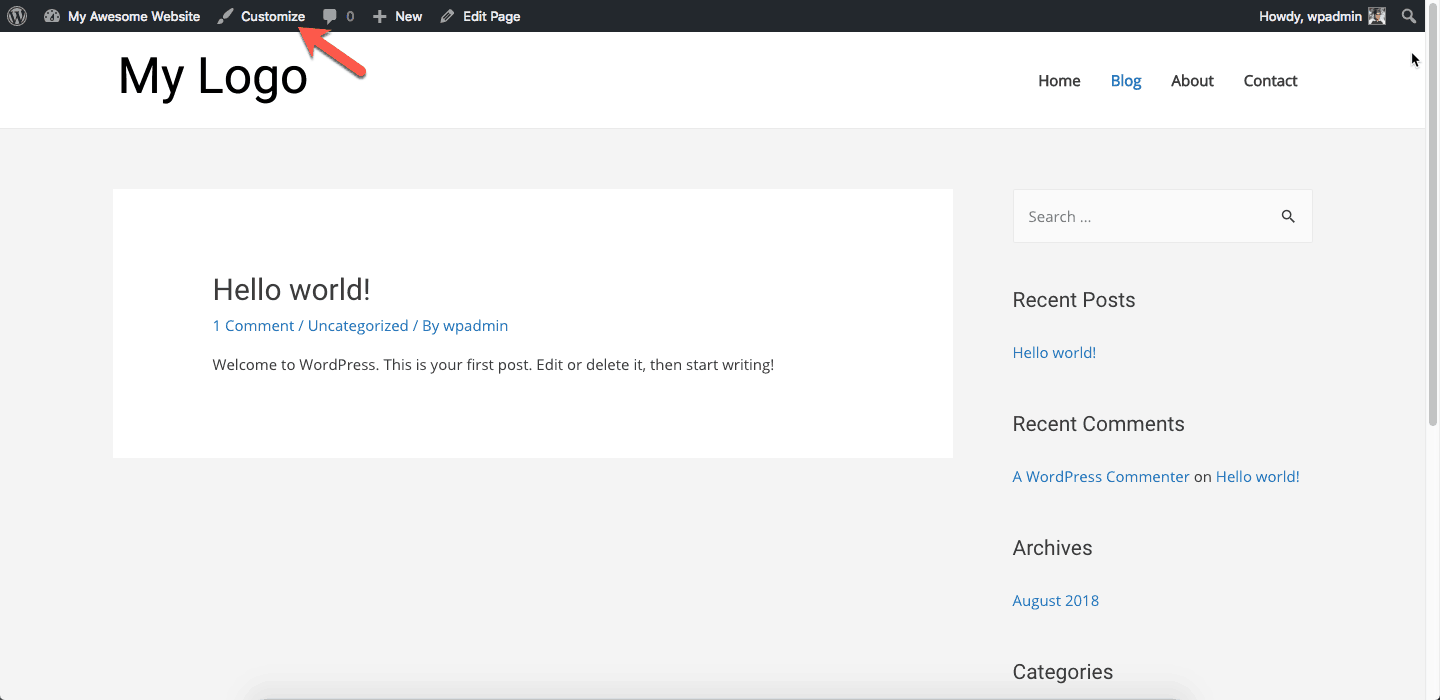
To set your brand elements, click “Customize” under “Appearance” menu.
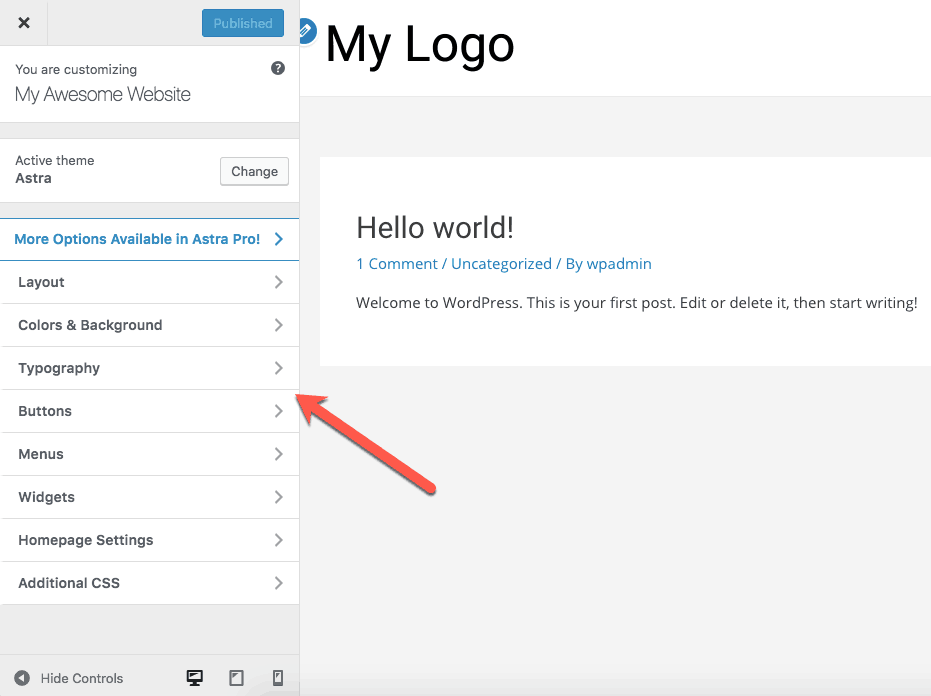
On clicking “Customize”, you will be taken to the frond-end of your website with the Customizer Panel open on the left-hand side.
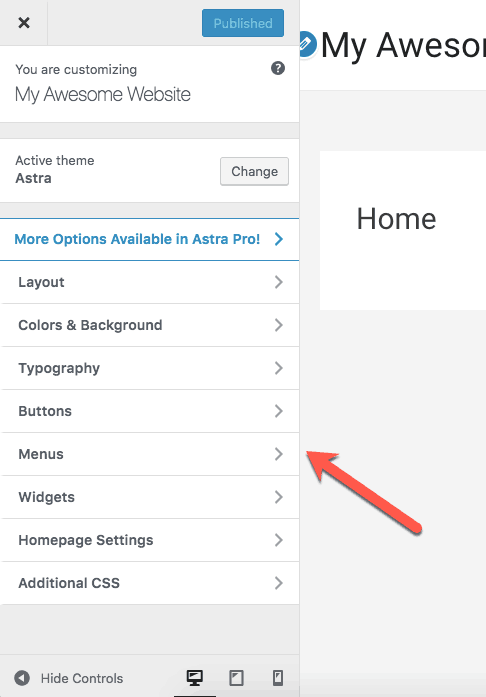
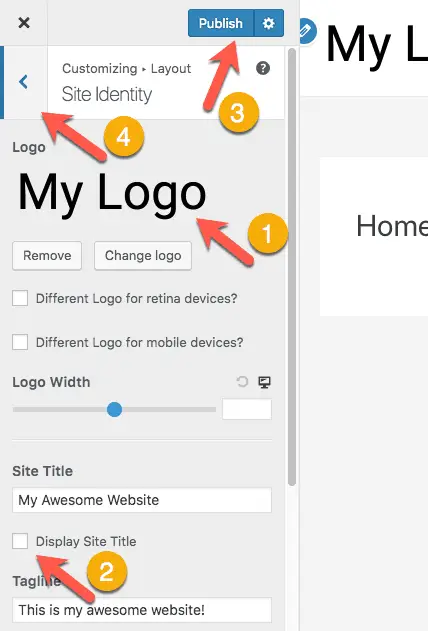
In this Customizer Panel, click on “Layout”, then on “Header” and then on “Site Identity” to go to the Site Identity settings. Here, upload the logo that you created earlier, deselect the “Display Site Title” checkbox and click the “Publish” button.
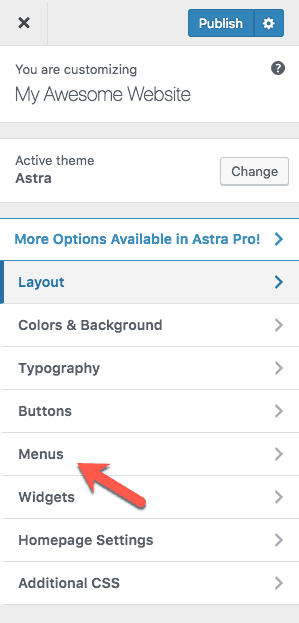
You can also play with other settings over here. Once you are done, click the back button till you come back to the main Customizer settings Panel. Select “Menus” over here.
Then select “Header Menus” to go to the Header Menu settings. Here, you will notice that the menu you created earlier is already available. Check mark the “Primary Menu” checkbox and Publish the changes.
This will set your menu as the header menu of your website.

Now, it is time to set your brand fonts and colors.
Go back to the main Customizer settings panel by clicking the back button and then select “Typography”.
Then select “Base Typography” to go to the Base Typography settings. Here, set the Text Font that you selected earlier from Google Fonts website as the “Body & Content Font Family” and set the Heading Font that you selected earlier as the “Heading Font Family”.
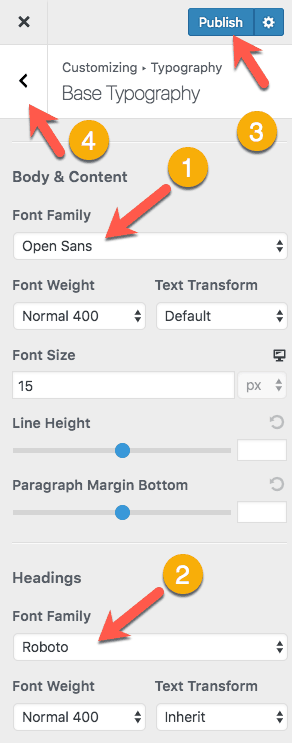
In the above example, I have set “Open Sans” as the body font and “Roboto” as the heading font.
After setting the fonts, click the “Publish” button and then click the back button to go back to the main Customizer settings panel.
Now let’s set up your brand colors.
Select “Colors & Background”.
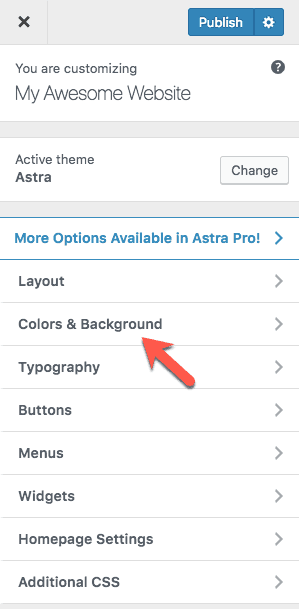
Then select “Base Colors” to go to the Base Colors settings. Here, you can set the Theme Color, Link Color and Text Color of your website.
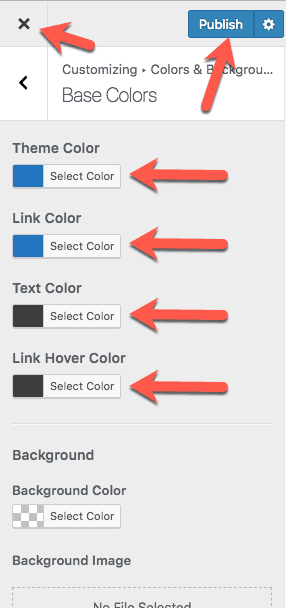
Note that Theme Color is basically the base color that will be set for all theme elements like buttons, selected text background, etc.
You can set a different color for your links if you want to.
I would recommend that you keep Theme Color and Link Color the same. It looks weird when the links and buttons are of different colors. Besides that, we chose just one Accent color earlier.
Set the Accent Color as the Theme Color and the Link Color. Additionally, you can also set it as the Link Hover color. And set the Text Color to Black.
Use the hex codes, #0274be and #000000, that you noted earlier to set the colors.
Click the “Publish” button once you are done setting the colors and then click the “Close” icon to close the Customizer. You will be taken back to the WordPress Admin Panel.
Note that I haven’t set the Footer of the website in this tutorial. However, you can set up the Footer by exploring the settings under “Layout” and “Colors & Background” options in the Customizer Panel.
Exercise 15: Set up WordPress Customizer Settings of your website.
Phew! Those were a lot of settings to set. So now, let’s do some interesting work.
Now, let’s design the Home, About, Contact and Blog pages one-by-one. The steps to design these pages will vary depending on whether you chose Beaver Builder as your page builder or Elementor.
Don’t worry, this tutorial will show you how to design all these pages using both Beaver Builder and Elementor.
We will design the Home, About, and Contact pages using Beaver Builder or Elementor and the Blog page using Astra Theme.
Alright! Let’s see how to design all of these pages.
Step 6.9A – Design Home, About, and Contact Pages Using Beaver Builder Plugin
If you have selected Beaver Builder as your page builder then follow the below steps to design your Home, About and Contact pages.
Click “Pages” in the left side menu of the WordPress Admin Panel to start designing your pages.
Let’s start with the Home page first.
Designing Home Page Using Beaver Builder
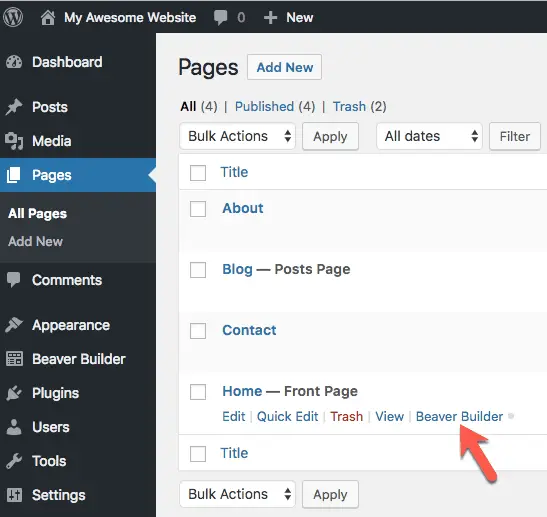
On the “Pages” page, hover your mouse on the “Home” page link and click “Beaver Builder” link to start designing the Home page using Beaver Builder.
You will be taken to the front-end of your website where you will see a Welcome dialog asking to take a tour of Beaver Builder.
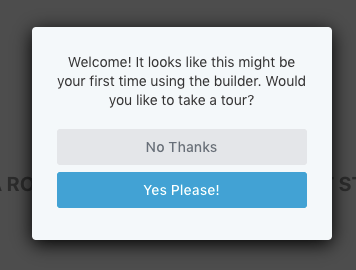
I am going to click “No Thanks” button, but you can take a tour of the Beaver Builder interface if you want to.
On clicking the “No Thanks” button or after finishing the tour, you will see the Beaver Builder Panel on the right-hand side. You can see all the modules that come with Beaver Builder in this Panel. However, we are not going to use these modules right now because building a page that way will take a lot of time, Instead, we will use one of the pre-designed templates of Beaver Builder for designing the Home page.

Click the “Templates” tab to use one of the existing template to build your Home page.
On the “Templates” tab, you can see all the templates that Beaver Builder provides you for the various pages of your website like the Home page, About page, etc. For this tutorial we are going to use these templates to build each of our website pages.
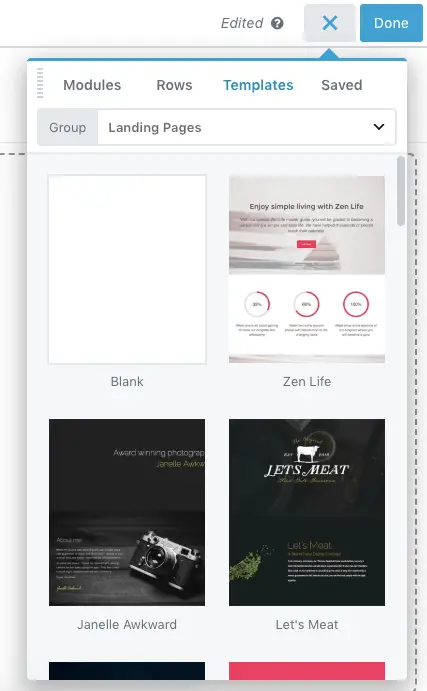
Don’t worry, you can change absolutely everything on the page even if you use a template. Using a template just speeds up the page design process.
For this tutorial, I am going to use the “Probiz” template that Beaver Builder provides for building the Home page. I like this template for creating websites for small businesses. You can see this template by scrolling down a little on the “Templates” tab.
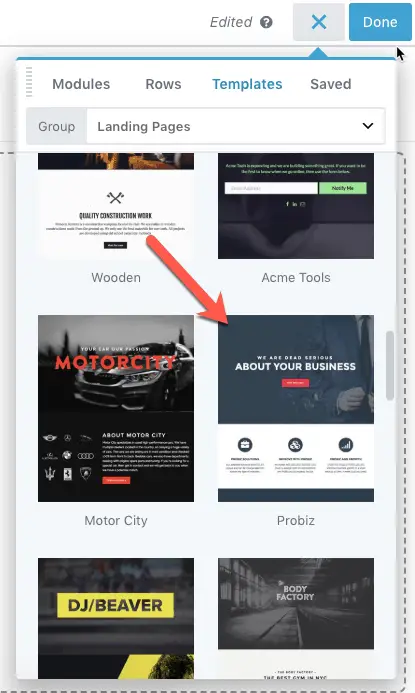
You can select any template that you like. You can view the demo of each of the templates of Beaver Builder on the official Beaver Builder Landing Page Templates page.
Once you have finalized the template that you are going to use for your Home page, click on it in the “Templates” tab. I am going to click on “Probiz” template.
Beaver Builder will now apply the template to your Home page.
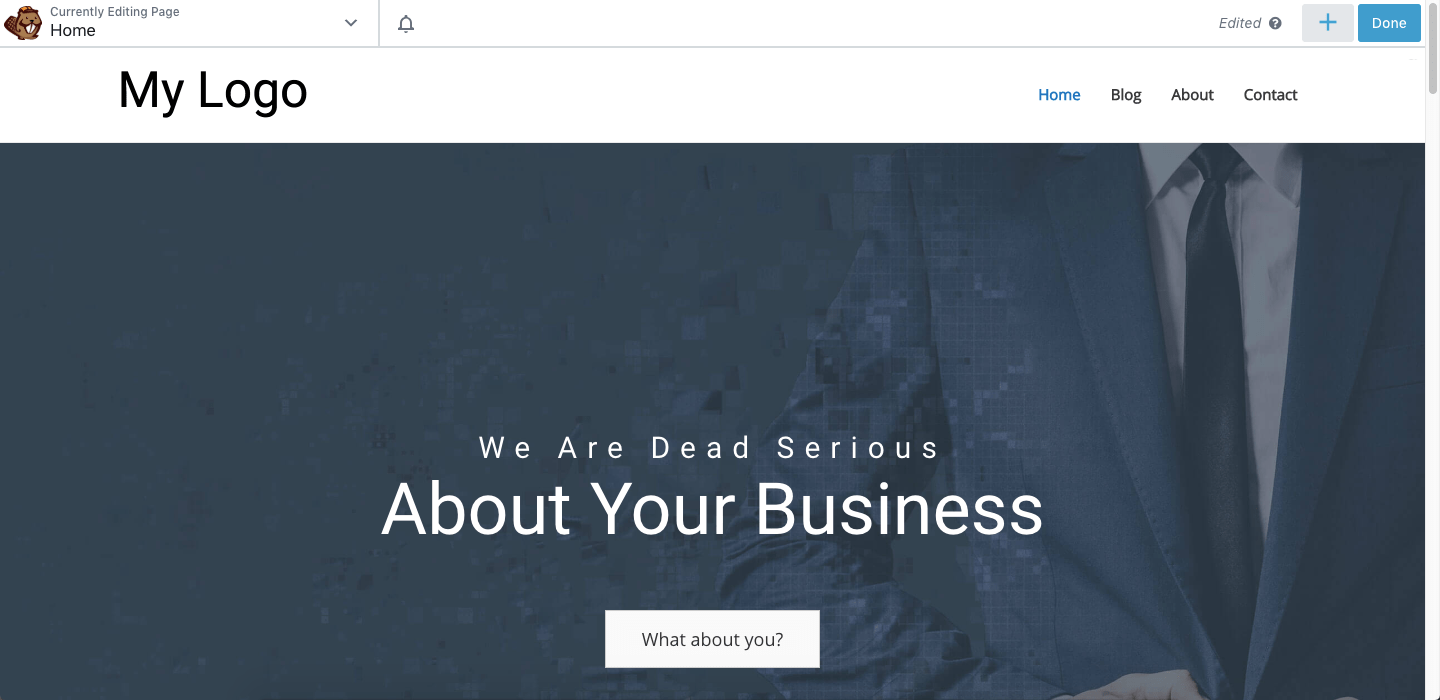
You can now start editing the text and images in each of the sections of this page by clicking on them.
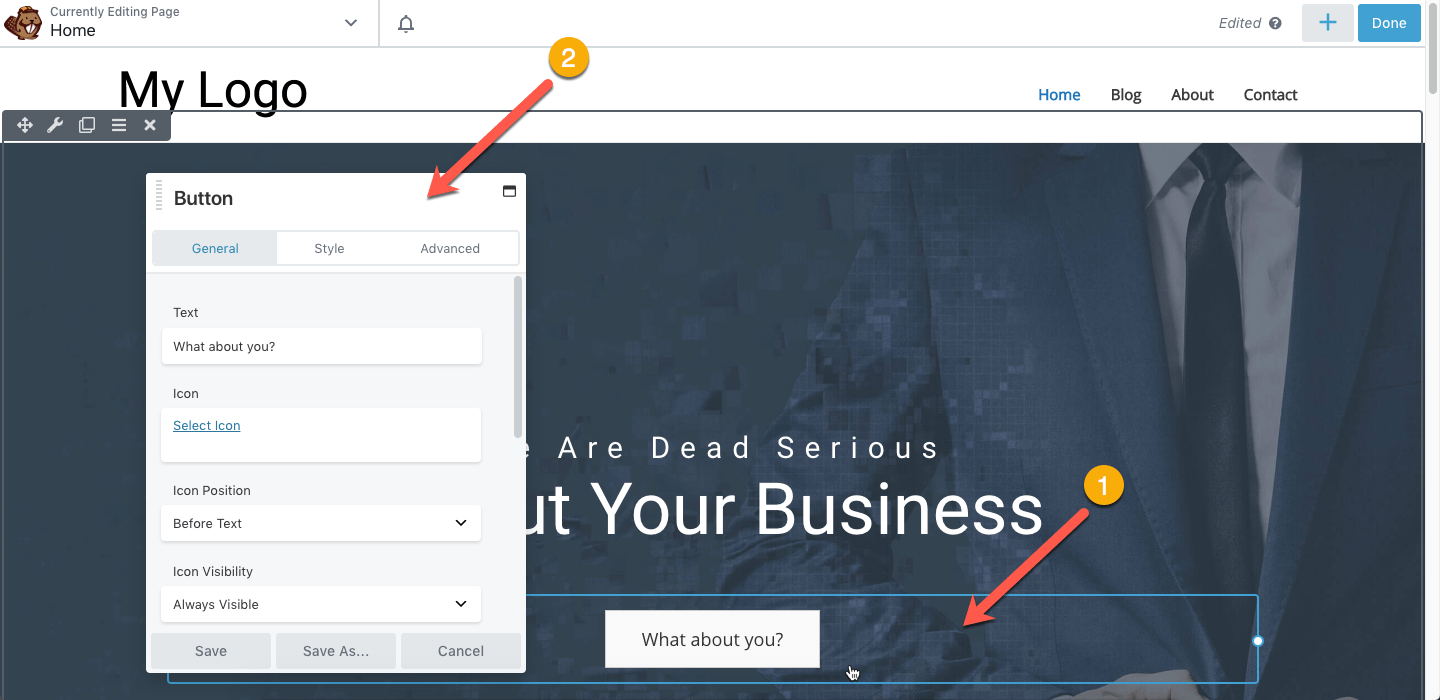
In the above image you can see that I clicked the Button on the page to bring up the Settings Panel of the Button Module of Beaver Builder. I can now edit the various settings of the button using the Settings Panel.
You can even drag-and-drop other modules on the page from the Beaver Builder Panel on the right side, like the Photo module, Video module, Gallery module, etc.
If you need help in understanding how to work with the various other Beaver Builder Modules to build your pages, then refer the Beaver Builder Knowledge Base.
I am not going to edit each and every section of the Home page in this tutorial because it will take some time for me to completely design the Home page the way I want it to look. But you should spend some time designing the Home page.
Since this is the first time you are using Beaver Builder, it might take some time for you to get used to Beaver Builder’s interface.
Once you are done building the Home page, click the “Done” button on the top right corner.
Then click the “Publish” button to publish your Home page.

You can even click the “Save Draft” button to save your changes periodically in case you are not completely done with building your Home page. I usually prefer to publish the changes frequently while designing the pages.
Great! Now you have a professional looking Home page that you can edit any time you want by just dragging-and-dropping various elements on it. No need to write any code.
Congrats!
Exercise 16: Design Home Page of your website using Beaver Builder.
Let’s now build your About page.
Designing About Page Using Beaver Builder
Click the name of your website in the top left corner of the WordPress Admin bar to go back to the WordPress Admin Panel of your website.

Then click “Pages” in the left side menu and hover your mouse on the About page to click the Beaver Builder link, similar to how you did it for the Home page.

You will again be taken to the front-end of your website with the Beaver Builder Panel open. This time, click on the “Templates” tab and then click on the “Group” drop-down field to select “Content Pages”.
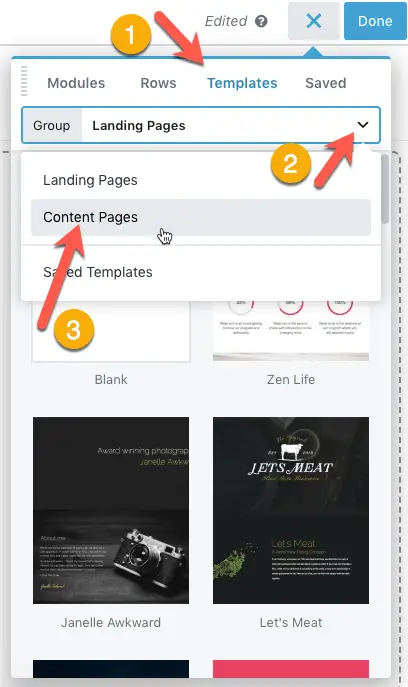
You need to select “Content Pages” because Beaver Builder categorizes the templates for the About, Contact, Blog, etc. pages as Content Pages.
To see a demo of all the available Content Pages, visit this official Beaver Builder Content Page Templates page.
On selecting “Content Pages” in the “Group” drop-down menu, you will see a lot of templates for building the About, Contact, Blog, etc. pages. I selected one of the “About Us” template.
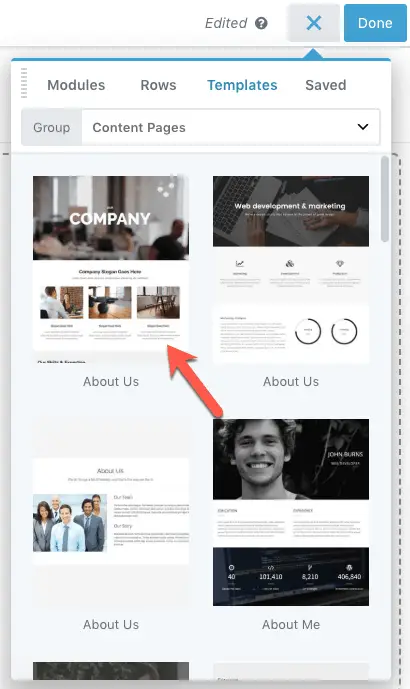
Take your time and select the About page template that you like.
Once you click the template in the Beaver Builder Panel, it will get applied to the About page. You can now edit the various parts of the About page or drag-and-drop new Beaver Builder modules on the page. For the purposes of this tutorial, I am going to leave the page as it is.
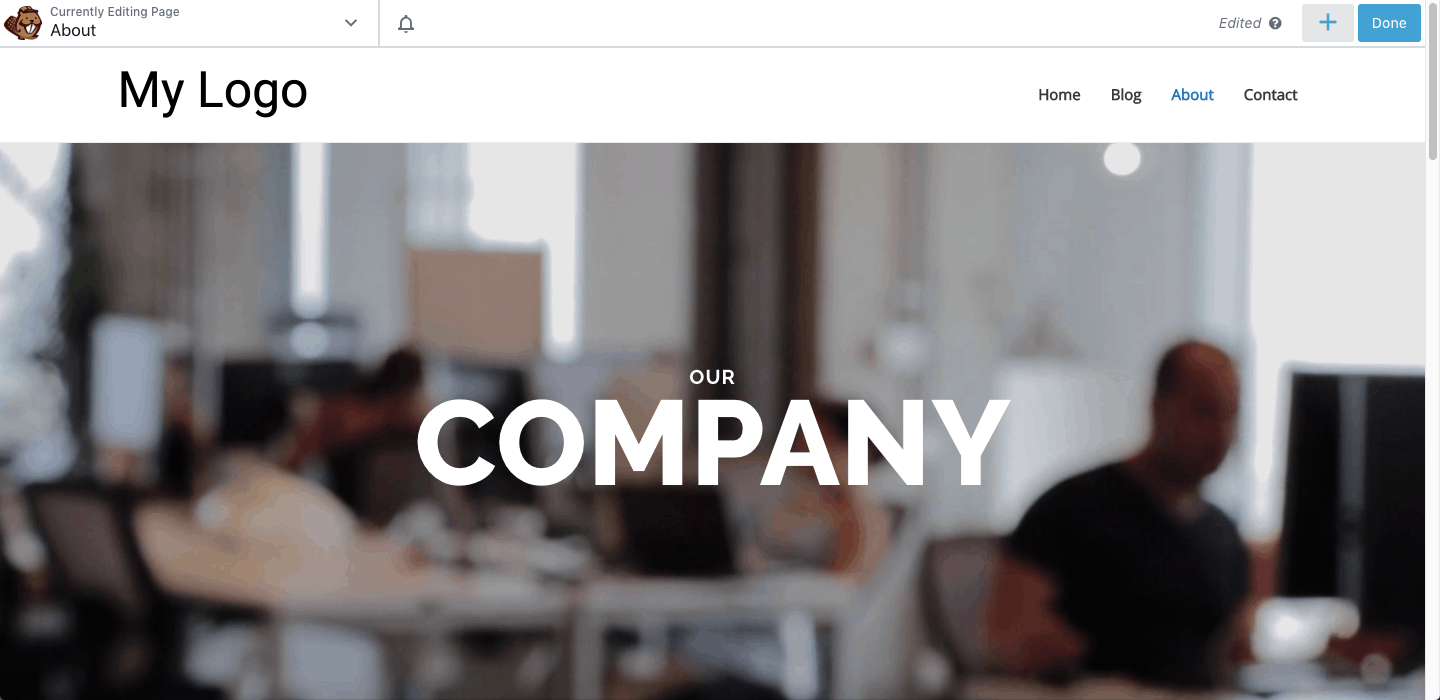
Once you are done with building your About page, click the “Done” button in the upper right corner and then click the “Publish” button to publish your About page, similar to how you did it for the Home page.
Congrats!
You now have a professional looking About page. A page that you can easily edit without writing any code!
Exercise 17: Design About Page of your website using Beaver Builder.
Now, it’s time to build your Contact page.
Designing Contact Page Using Beaver Builder
Again, repeat the same process that you carried out for building the About page.
Go back to the WordPress Admin Panel by clicking the name of your website on the upper left corner of the WordPress Admin Panel and then click “Pages” in the left side menu to edit the Contact page.
Hover your mouse over the Contact page and click the “Beaver Builder” link. You will again be taken to the front-end of your website with the Beaver Builder Panel open.
Select “Templates” tab in the Beaver Builder Panel and then select “Content Pages” in the “Group” drop-down field, similar to how you did it for the About page.
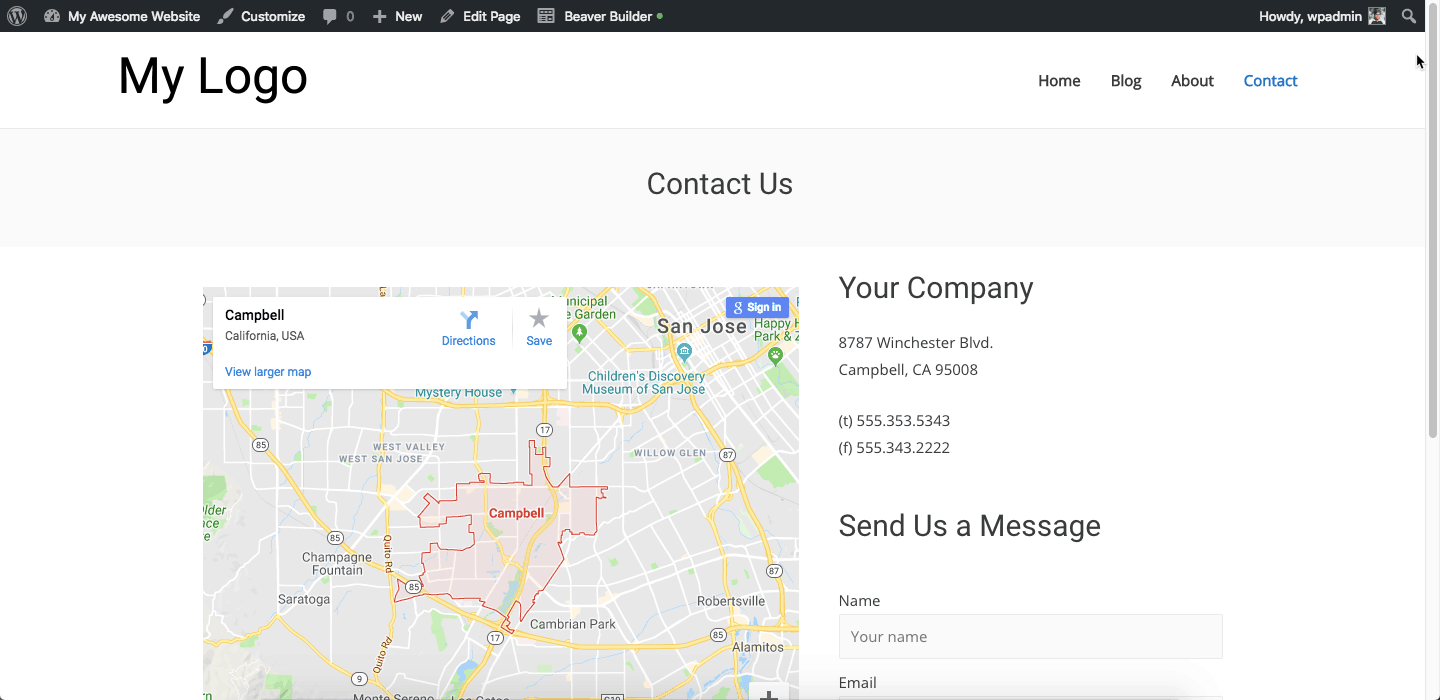
This time select one of the templates for the Contact page. You will have to scroll down a bit to see all the Contact page templates. I selected one of the Contact page templates that I liked.
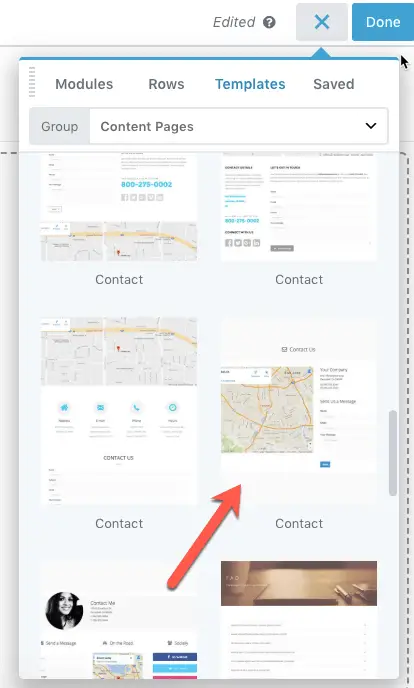
Take your time and select the Contact page template that you want. Refer the Beaver Builder Content Page Templates page to see the demo of the Contact page templates.
Once you click the Contact page template in the Beaver Builder Panel, it will get applied to the page and you can then edit everything that you want. Once you are done with editing the Contact page, click the “Done” button on the upper right corner and then click the “Publish” button to publish your Contact page.
Once again, Congrats!
Now, you have a professional looking Contact page as well.
Exercise 18: Design Contact Page of your website using Beaver Builder.
Okay! Now, if you selected Elementor to build your website then follow Step 6.9B below. Else, directly go to Step 6.10 to design the blog page of your website.
Step 6.9B – Design Home, About, and Contact Pages Using Elementor Plugin
If you chose Elementor as your page builder plugin then follow the below steps to design your Home, About and Contact pages.
In the WordPress Admin Panel, click “Pages” in the left side menu to start designing your pages.
Let’s start with the Home page first.
Designing Home Page Using Elementor
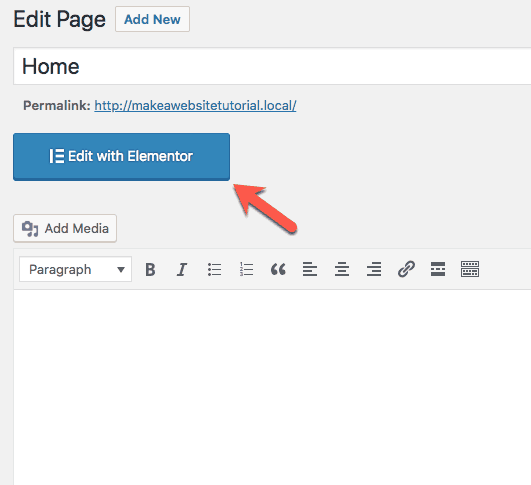
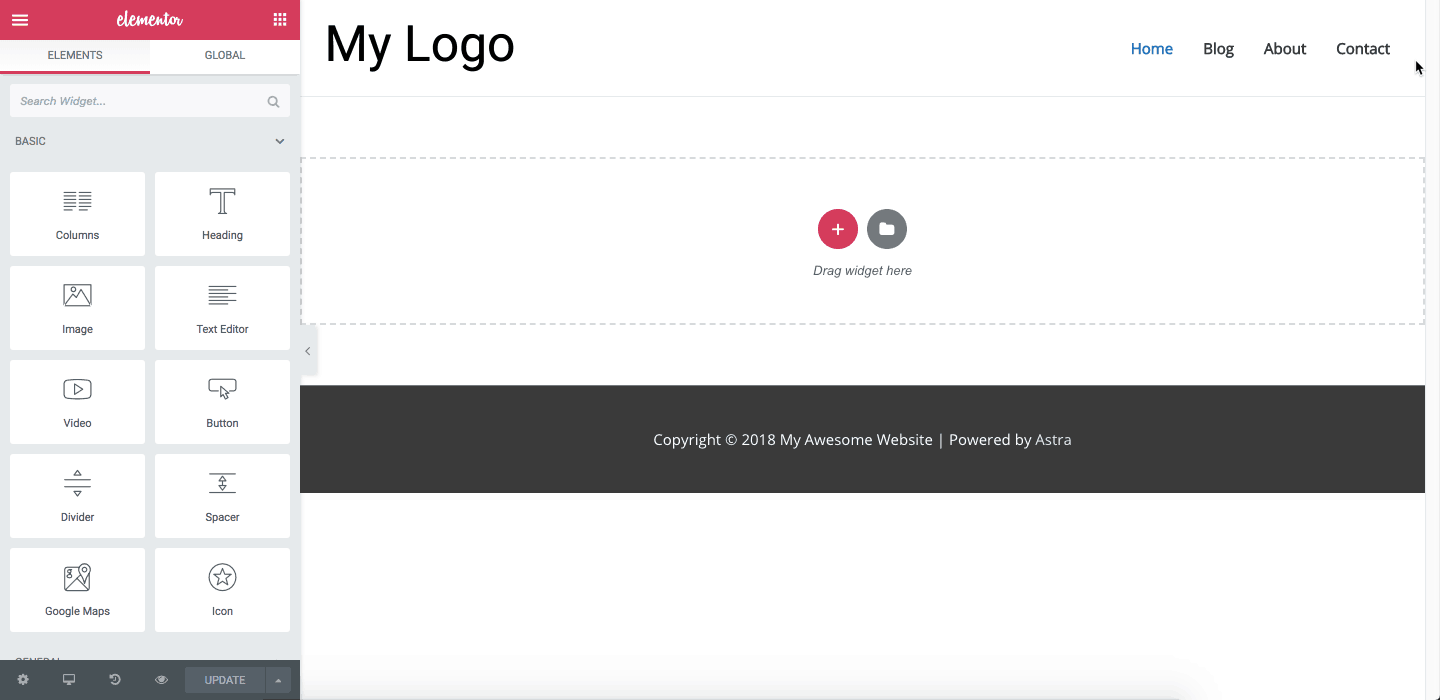
On the “Pages” page, hover your mouse on the “Home” page link and click the “Edit” link.
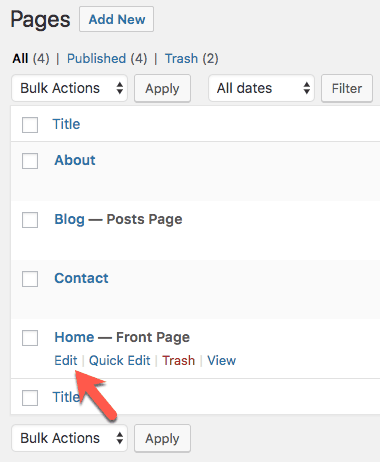
You will be taken to “Edit Page” page. Click “Edit with Elementor” button on the page.
Now you will be taken to the front-end of your website with Elementor active. You will see the Elementor Panel on the left-hand side.
Before you start using Elementor, it is better to set the Default Colors and Fonts in Elementor settings similar to how you set it in WordPress Customizer for the Astra Theme. You need to do this because by default Elementor does not pick up the colors and fonts of the theme.
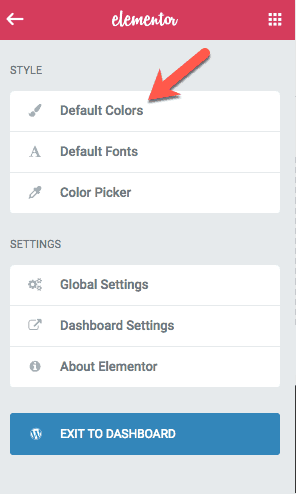
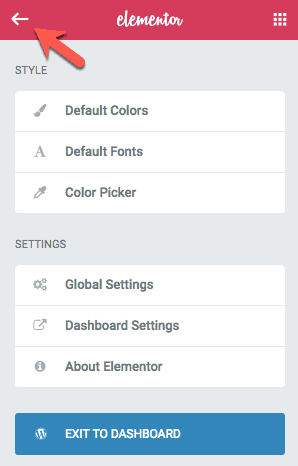
To set the default colors and fonts in Elementor, click the little hamburger menu icon on upper left of Elementor Panel.
Now, click on “Default Colors” and set the Accent and Text colors that you chose earlier in this tutorial.
I had selected #0274be as the Accent color (Blue color) and #000000 as the Text color (Black color). So I have set them as the default colors. You should set the colors that you have selected.
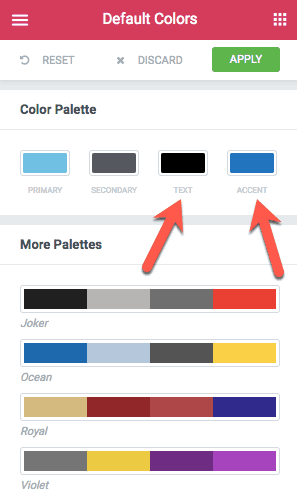
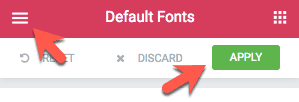
Once you are done setting the colors, click the “Apply” button and then click the Hamburger menu icon to go back.
Now, click “Default Fonts” to set the default fonts in Elementor.
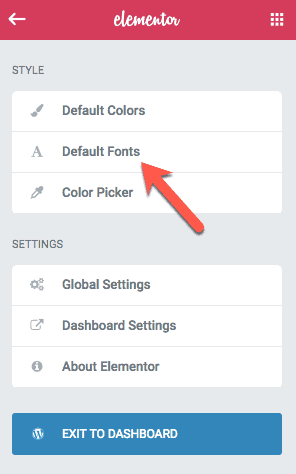
For this tutorial, we had selected “Roboto” for the Headings and “Open Sans” for the Text. So I have set these two fonts in the “Primary Headline”, “Secondary Headline”, “Body Text”, and “Accent Text” sections as shown below.
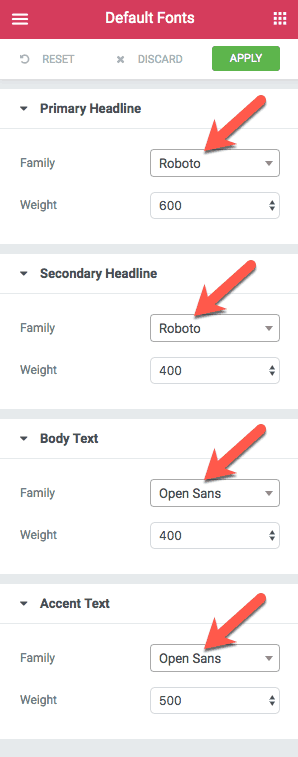
You should set the fonts that you have chosen as your brand fonts.
Once you are done setting the fonts, click the “Apply” button and then click the Hamburger menu icon to go back.
Now click the back icon to come back to the main Elementor Panel.
Alright! Now, let’s start designing your Home page.
We will use the pre-designed Elementor templates to build all of our pages because they all look professional and more importantly because they will save you a lot of time.
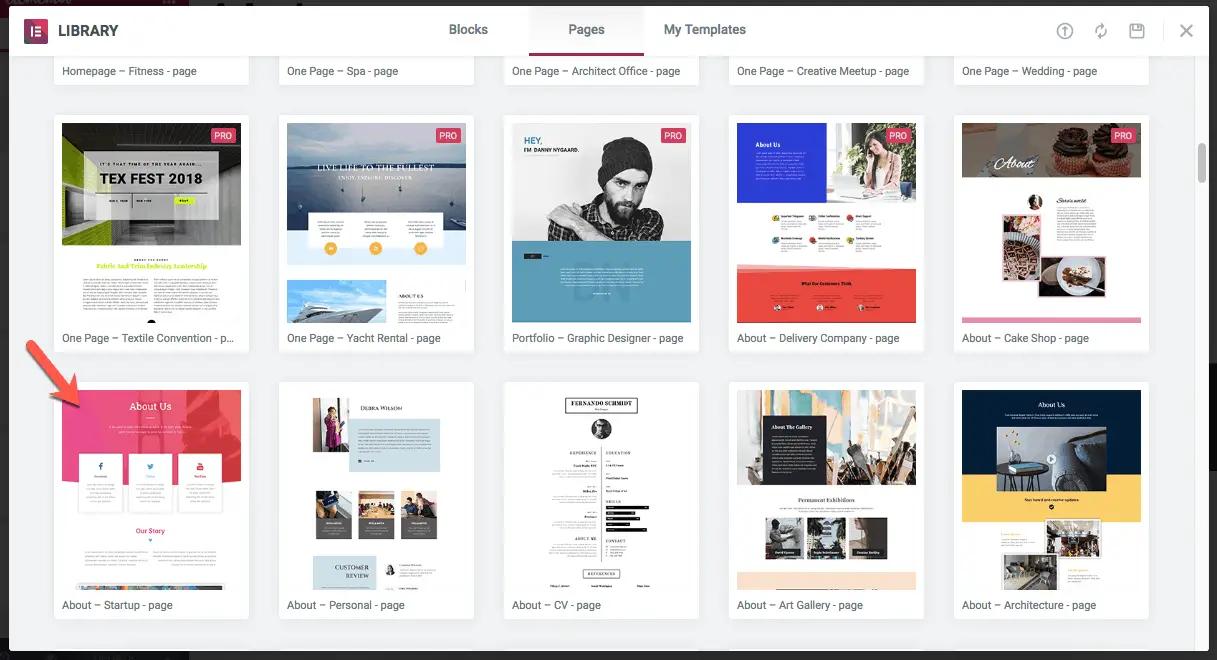
Click the “Add Template” icon to select and add a template to the Home page.
You will be taken to Elementor Library where you will find a lot of templates to choose from. Elementor has a lot of templates as compared to Beaver Builder. So take your time to go through all of them.
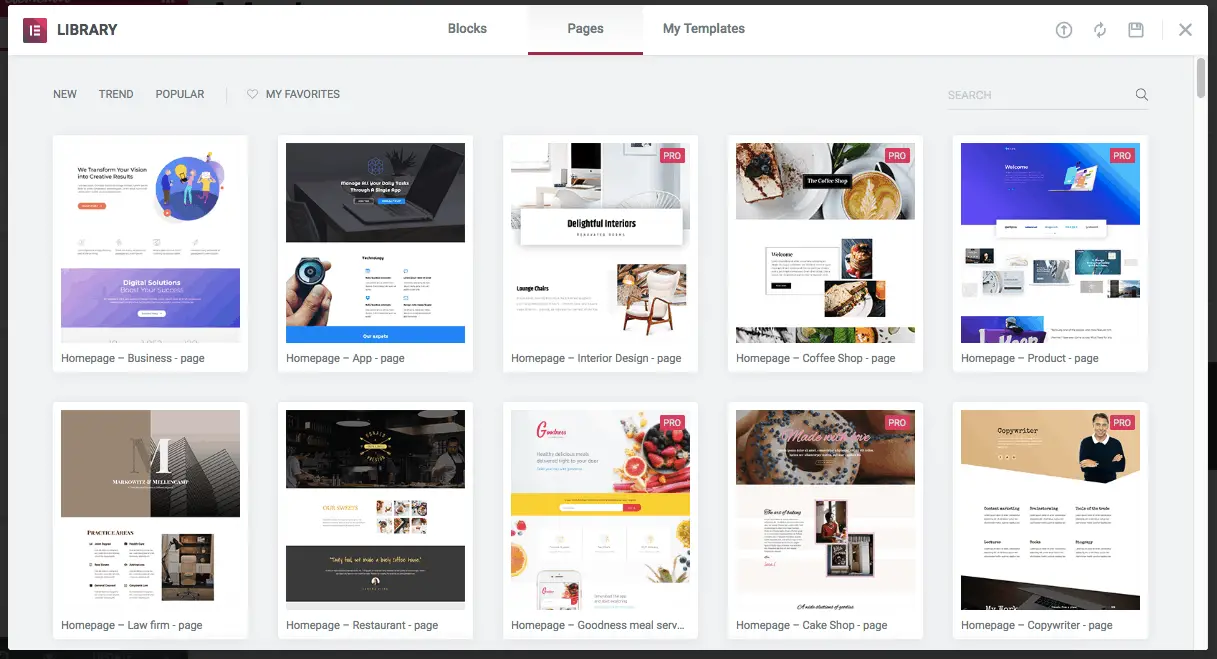
Some templates will be marked as “Pro” which means they are only available in Elementor Pro version. Elementor Pro is worth its price for the templates alone.
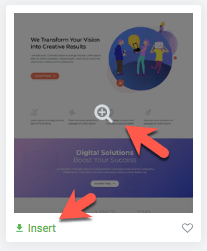
You can preview any template by hovering over it and clicking the zoom icon. Or you can visit Elementor’s Library on its website.
Once you pick a template, click the “Insert” link to insert the template on the page. I selected the “Homepage – Business – page” template.
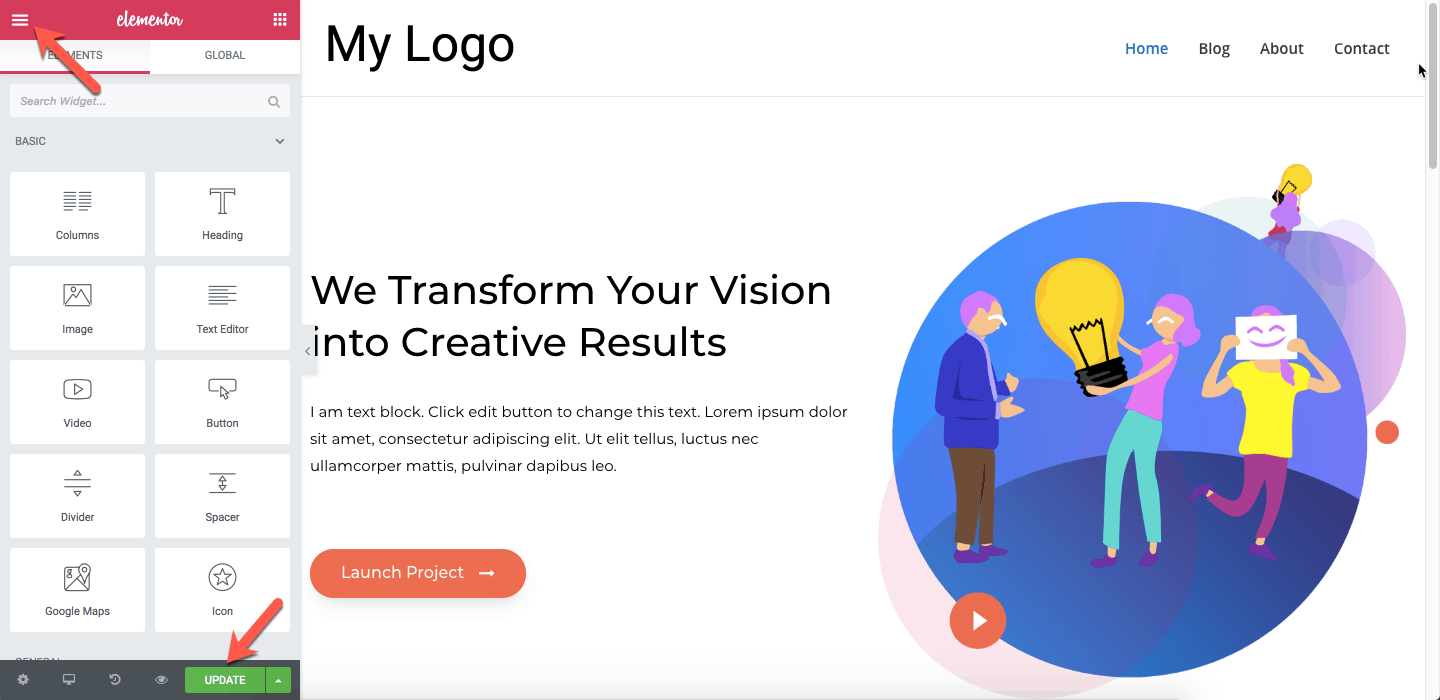
You can now edit your Home page any way you like. Don’t forget to explore all the modules that Elementor provides. You can simply drag-and-drop any module on the page to use it.
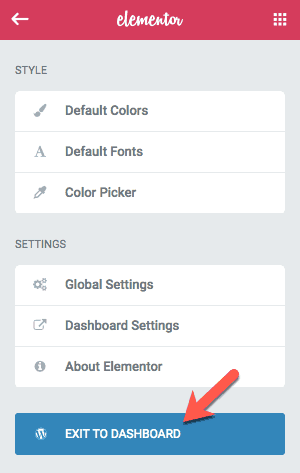
Once you are done editing the Home page, click the “Update” button and then click the Hamburger menu icon to exit Elementor.
Then click the “Exit to Dashboard” button to go back to WordPress Admin Panel.
That’s it! Congrats!
You now have a professional looking Home page that you can edit whenever you want to without any code.
Exercise 16: Design Home Page of your website using Elementor.
Let’s now design the About page.
Designing About Page Using Elementor
Now that you are back in the WordPress Admin Panel, again click “Pages” from the left side menu, hover over About page link and click the “Edit” link.
On the “Edit Page” page, click the “Edit with Elementor” button. You will again be taken to the front-end of your website with Elementor active. Click the “Add Template” icon to visit the Elementor Library again.
Scroll down a little to see all templates for About pages.
I have picked the “About – Startup – page” template. You can choose whichever you think is good.
Once you insert the selected template on the page, you will get a professional looking About page.
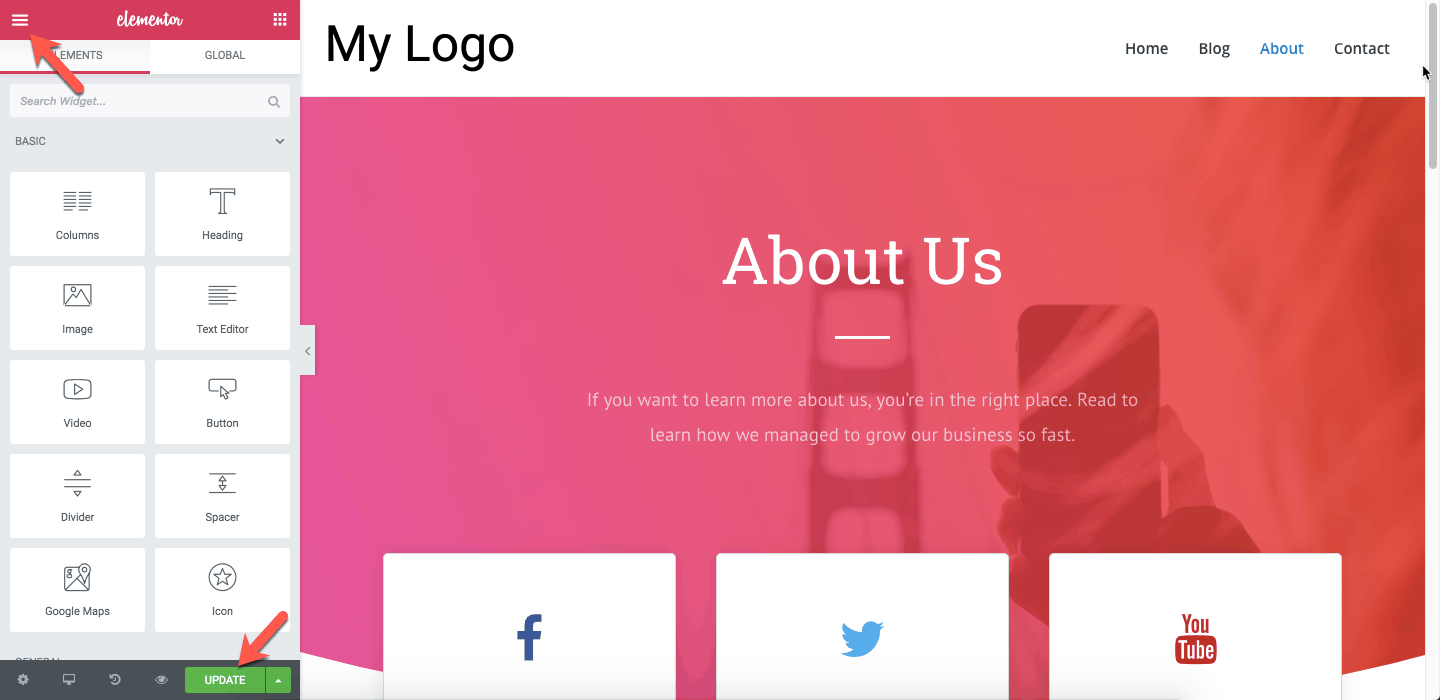
Edit that page to your liking and when done, click the “Update” button to save all your changes. Then click the Hamburger menu icon on the top-left to exit Elementor.
Click the “Exit to Dashboard” button to go back to WordPress Admin Panel.

Congrats once again!
You now have a great looking About page too. And you can change its design whenever you want to by simply dragging-and-dropping various elements on the page.
Exercise 17: Design About Page of your website using Elementor.
Now let’s design the Contact page.
Designing Contact Page Using Elementor
The process to design the Contact page is the same as that for Home and About pages.
Click “Pages” in the left side menu of the WordPress Admin Panel. Then edit the Contact page and click the “Edit with Elementor” button to go to the front-end of your website to design the Contact page.
Bring up the Elementor Library by clicking the “Add Template” icon. Then choose one of the pre-designed Contact page templates.

I chose the “Contact – Corporate – page” template. You can choose a different one that you like.
Insert the template that you like on the About page and then edit the contents as per your liking.
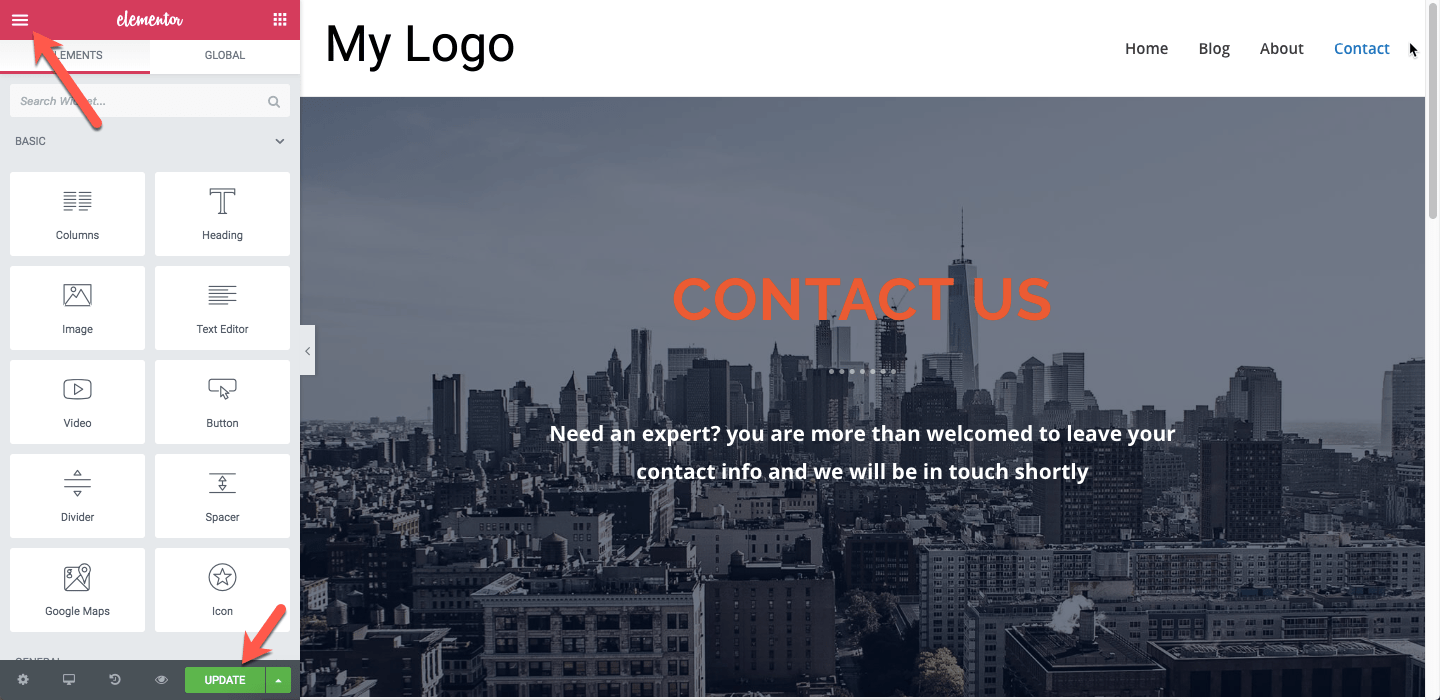
Once you are done with editing, click the “Update” button to save your changes and then click the Hamburger menu to exit out of Elementor and come back to WordPress Admin Panel.
Congrats! You now have a great looking Contact page too.
Exercise 18: Design Contact Page of your website using Elementor.
Now it’s time to design the Blog page.
Step 6.10 – Design The Blog Page
Let’s now build the last page of this tutorial, your Blog page.
We will not be building the Blog page using Beaver Builder or Elementor because it can be easily controlled using the Astra Theme settings.
Go to the WordPress Admin Panel and then go to the “Pages” page.
Hover your mouse on the “Blog” page and click the “View” link.
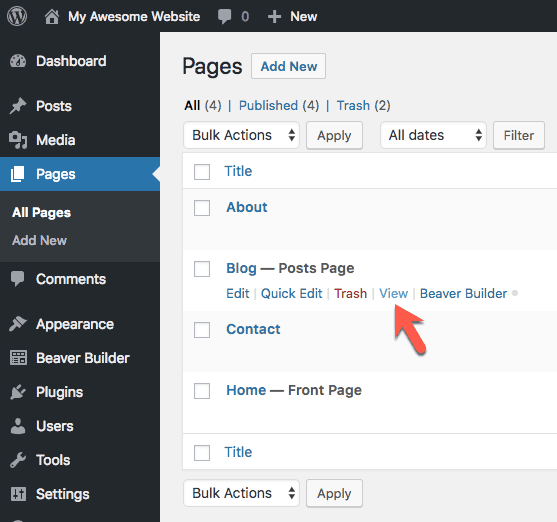
You will be taken to the front-end of your website, where you can see the blog page of your website. By default Astra Theme comes with a good looking Blog page. But in case you want to change the look and feel of it, click the “Customize” link in the top WordPress Admin bar.
You can play around with the settings for the Layout, Colors, Typography, Widgets, etc. to change the look and feel of the blog page.
Exercise 19: Design Blog Page of your website using Astra Theme.
If you want more control over the layout of your Blog page then get the Astra Pro plugin which comes with a lot of settings to control the blog page look and feel.
Alright!
A Big Congrats To You!
You have now built a professional looking website for yourself.
And you have done it without writing any code.
More importantly, you have built a website that you can now edit whenever you want to by simply dragging-and-dropping the various modules of Beaver Builder or Elementor and configuring their settings.
You no longer need to learn code or depend on a developer to make changes to your website.
You can fully control your website on your own.
I hope you realize the importance of this.
Not many people can claim to make changes to their website on their own. But you are not one of them now.
Using Beaver Builder or Elementor along with Astra theme and Astra Pro plugin, you can control every aspect of your website on your own.
And if you get stuck anywhere in this process, just ask your questions in the Comments section below. I will be happy to answer them.
Now, the million dollar question…
What Next?
Making a website is just the first step in your online journey.
Now that your website is built, it is time to improve it.
It is time to…
- Optimize your website for Search Engines through SEO,
- Set up analytics to track the visitors coming to your website,
- Set up Social Media Marketing to promote your website on various Social Media channels,
- Set up Lead Generation Systems to generate leads for your business,
- Set up Payment System to sell your products and services online,
- …and a whole lot more…
Here is a list of plugins that will help you implement most of these:
- Yoast SEO – For making your website Search Engine friendly.
- MonsterInsights – For integrating your website with Google Analytics.
- WooCommerce – For selling your products online.
- Ultimate Addons for Beaver Builder – For adding additional Modules, Sections and Templates to Beaver Builder.
- Ultimate Addons for Elementor – For adding additional Modules to Elementor.
- Schema Pro – For adding schema markup to your website.
For a complete list of plugins and services that you can use to further enhance your website, download my Website Builders’ Toolbox.
I will be writing separate detailed tutorials for each of these aspects of website creation one-by-one. If you want to get notified when I publish these tutorials, then download the Website Builders’ Toolbox so that you also get subscribed to my newsletter. Don’t worry, I don’t spam and you can unsubscribe at any time you want.
Download Website Builders’ Toolbox.
Also, if you liked this how to make a website tutorial, then please do me a favor and share this tutorial with your friends on Facebook, Twitter and Pinterest by clicking the sharing buttons. I would really appreciate that.
good info i never believe such simple language .
Glad you liked the info. Yes, true. It is hard to believe. You will need to try out Astra theme and Beaver Builder or Elementor plugins to believe how easy it is make a website with these working together.
Thank you for this thorough, detailed post! It was extremely helpful.
You are welcome Heidi.
Abhijit I sent you a contribution last year but now I need SPECIFIC info regarding Landing Pages (Squeeze pages). I discovered these recently and I think you might recommend to you readers to investigate this approach before generating FULL website if they just need leads to follow up (which is what I need) as a consultant.
I want to build multiple(dozens) of squeeze pages with different keywords on each to attract different prospects. I want only 2 pages stripped but dramatic attention getters. I would like to use a template like an ASTRA STARTER SITE just to modify drag+drop.
ELEMENTOR PRO / ASTRA PRO / ????? or
Can you discuss this with me and show me or point me to where i can get an in depth guide (tutorial), will it piss off Google.
I think this would be a wonderful companion topic to this website tutorial. Many people do need a full website just to get leads Local and Global, and the squeeze page can link to their website if they want to?
MANY THANKS Larry Feb 23, 2020 Cheers
That is a good suggestion Larry. I will plan on writing about Landing Pages. In most cases, if you just want to create landing pages, then creating a website is unnecessary and a lot of work. Instead, you can use tools like Leadpages or ConvertKit that comes with pre-built landing pages to generate leads. Ideally, I would pick ConvertKit because it also comes with email marketing service coupled with landing pages and popups. The only reason I would not use ConvertKit is when I need to heavily customize the landing pages.