Want to make a WordPress website for an IT company?
You are in the right place!
This detailed guide will show you all the steps needed to make a WordPress website for an IT company.
In all, there are 6 steps involved in making such a WordPress website.
And we will talk about each of these steps in detail in this guide.
So let’s begin…
But before that, let’s talk about the cost of building such a website…
Cost Of Building A WordPress Website For An IT Company
Usually, there are only three costs involved in making any WordPress website:
- Cost of the Domain,
- Cost of Web Hosting, and
- Cost of Themes and Plugins.
If you completely follow the method that you will learn in this guide to build a WordPress website, then you will just need to bear the cost of the domain and the cost of web hosting.
You won’t have to spend anything on themes and plugins. This guide will show you some high-quality theme and plugins that are absolutely free to use.
Great!
So the only costs that remain are that of the domain which will be approximately $12 a year and the cost of web hosting which will be approximately $48 a year.
This means that you will be able to build your website for around $60 a year.
Pretty cheap, isn’t it?
Alright!
With that out of the way, let’s start building the website…
Steps To Build A WordPress Website For An IT Company
There are only 6 steps involved in building a WordPress Website for an IT Company. These steps are:
- Buy A Domain
- Buy Web Hosting And Install WordPress
- Set Up WordPress Settings
- Install WordPress Theme
- Install WordPress Plugins
- Import A Ready-Made Site
Let’s take a detailed look at each of these steps.
STEP 1: Buy A Domain
I guess I don’t have to tell you what a domain is and that you will need to buy a domain name for making your website.
So I will skip this part.
However, I would still like to point out that you should register your domain name at a good domain registrar.
Don’t fall for those companies offering to register a domain for $1 or for free.
Such companies will charge you a lot the next year when the time comes to renew your domain.
I highly recommend that you register your domain through Namecheap.
I have used Namecheap for a number of years now and have found it to be an excellent domain registrar with no hidden charges.
If you need help in registering a domain, then check out this detailed guide on registering a domain name.
Alright! Let’s move on to the next step now…
STEP 2: Buy Web Hosting And Install WordPress
I am guessing again that I don’t have to tell you what a Web Host is and that you will need to buy web hosting for hosting your website.
So I will again skip this part and get right to the part that matters.
There are thousands of Web Hosting companies on Planet Earth!
It has become a daunting task to choose a hosting company nowadays.
Every company has something or the other to offer.
So how do you even compare all these Web Hosting offers?
Well…
You don’t!
Comparing Web Hosting offers is a sheer waste of time because no matter how hard you try to get the best deal, you will never be able to read all the fine prints of the offer.
No company will offer you unlimited everything no matter what they mention in their advertising.
So instead of trying to compare offers, I would recommend that you check the reputation of the Web Hosts.
That will give you a good indication of how reliable that Web Host is.
From my experiences, I would recommend that you go with either BigScoots or Kinsta as your Web Host.
Both of these are reputed Web Hosting companies, and they offer good value for the money that you will spend with them.
Here is a detailed guide on hosting a WordPress website on BigScoots and Kinsta.
Spend some time and go through this guide because it will show you everything you need to do for setting up your Web Hosting account and installing WordPress.
Once WordPress is installed, you should be able to login to your WordPress Admin Panel which should look something like this…
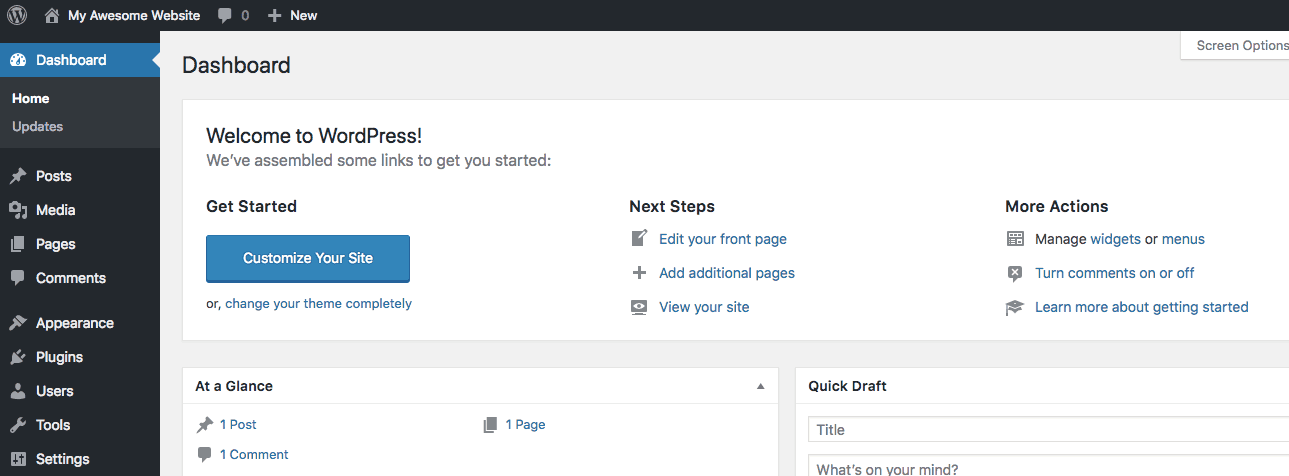
Okay! Now that you are able to login to your WordPress Admin Panel, it is time for the next step…
STEP 3: Set Up WordPress Settings
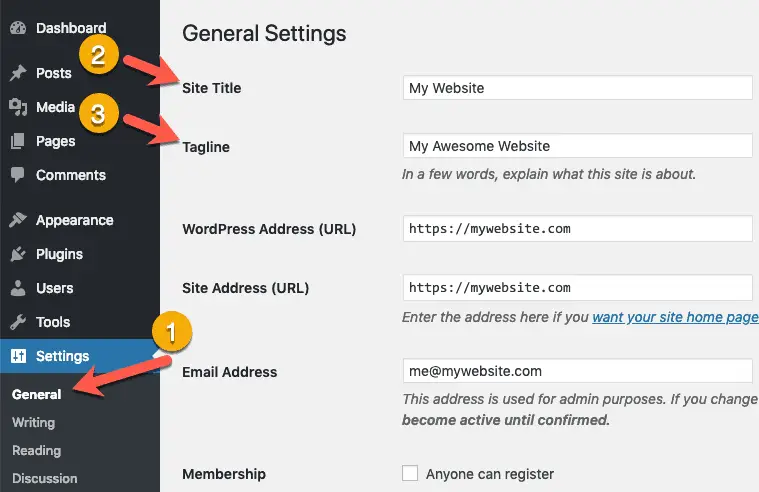
There are a couple of essential WordPress settings that you need to set up.
First, go to Settings > General and set the Site Title and Tagline for your website.
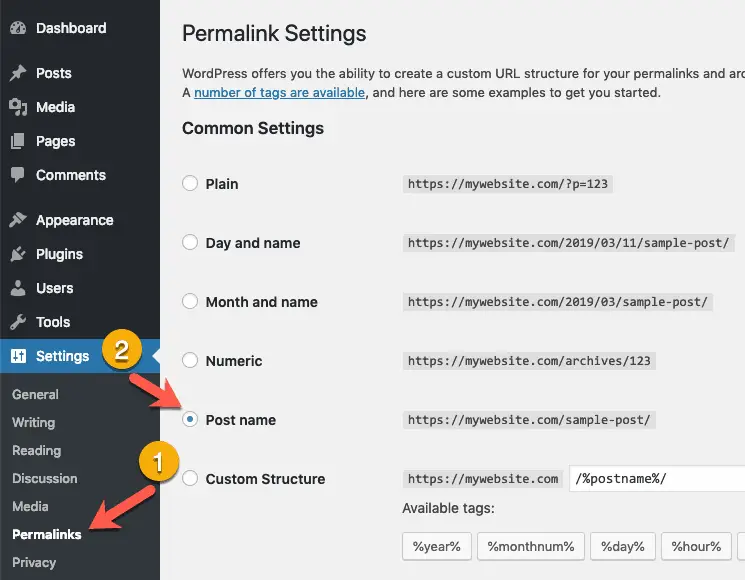
Then go to Settings > Permalinks and make sure that “Post name” is selected. If it is not selected, then select it and save your changes.
Once you have done these settings, move on to the next step…
STEP 4: Install WordPress Theme
I highly recommend that you use the Astra theme for making your website.
It is a free theme and can be easily extended to add a lot of configurable features.
I will talk about these features later in the guide.
But for now, let’s install the Astra theme.
Here is a small little tutorial to walk you through the steps needed to install and activate the Astra theme.
Just follow these steps, and you should have the Astra theme installed and ready to go.
You might have noticed that this little tutorial is part of a mega guide on how to make a WordPress website. But because you want to make a WordPress website for an IT company, you should follow this guide and not that one.
With that said, let’s move on to the next step…
STEP 5: Install WordPress Plugins
Now it is time to install the WordPress Plugins needed to build your website.
However, instead of installing all the plugins one-by-one, you will install just one plugin which will install all the other necessary plugins and build the website for you.
That plugin is Astra Starter Sites plugin.
It is a free plugin.
And the best part about this plugin is that it will help you import a clean, professional, and a ready-made site directly into your WordPress installation.
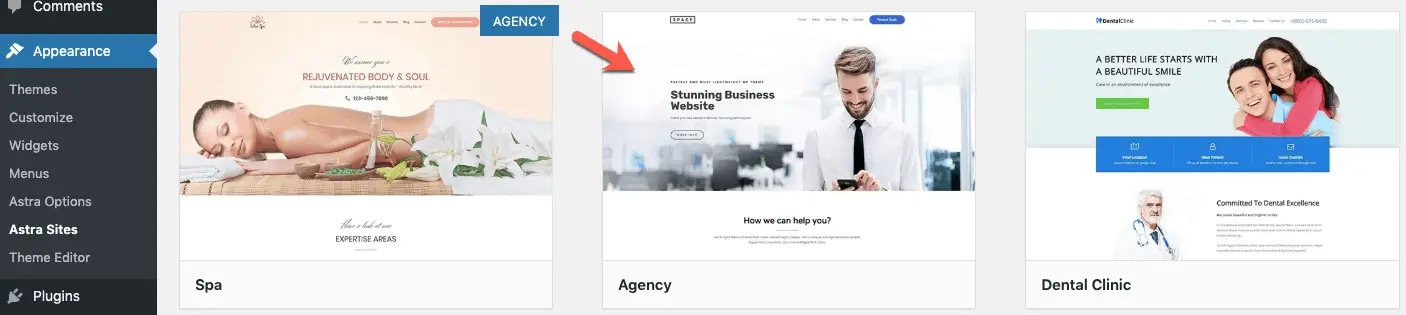
Take a look at all the ready-made sites that you can import using this plugin…
Some of these sites are free while some are premium sites for which you will need to pay.
But for this tutorial, you will be importing one of the free sites called Agency.
Take a look at the Agency Starter Site…
I know that this is not a site specifically designed for an IT company.
But if you look closely, you will realize that it is just a matter of changing text and images to make it specific to an IT company.
That is the reason; I chose this site.
Besides that, changing text and images or even adding and removing various design elements of this site is going to be just a matter of dragging-and-dropping things around.
This means you will get immense flexibility in building your website.
So go ahead and install the Astra Starter Sites plugin.
Here is a small tutorial that will show you how to install the Astra Starter Sites plugin.
Okay!
Now it’s time for the last step…
STEP 6: Import A Ready-Made Site
Once Astra Starter Sites plugin is installed and activated, click the See Library link on the Plugins page…

You will then be asked to select the Page Builder for building your website. Select Beaver Builder as your page builder and click the Next button…

Then scroll down and select the Agency Starter Site…
You will then see the preview of the Agency Starter Site. On the left-hand side, you will see a panel listing everything that is needed to build the site. Click the Import Site button in this panel.
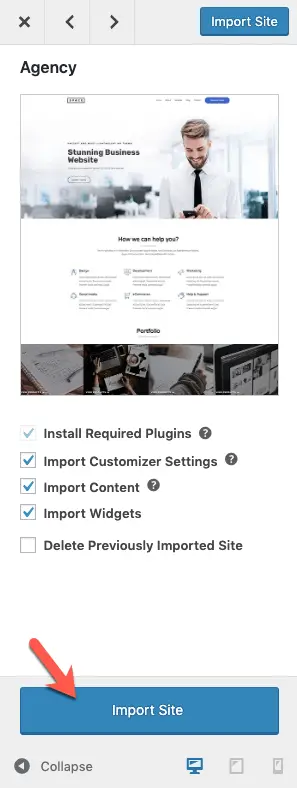
It might take some time to import the site, so be patient.
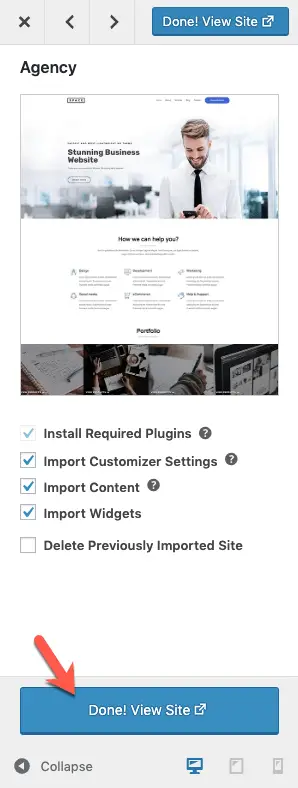
Once the import process is complete, you will see the View Site button. Click it to view your newly imported site…
Congrats!
You have successfully built your site.
Now the only thing remaining is to change the text and images to make this site specific to an IT company.
To do this, go to the page that you want to edit and click the Beaver Builder link in the top admin bar…

You can then edit the entire page by just dragging-and-dropping things around.
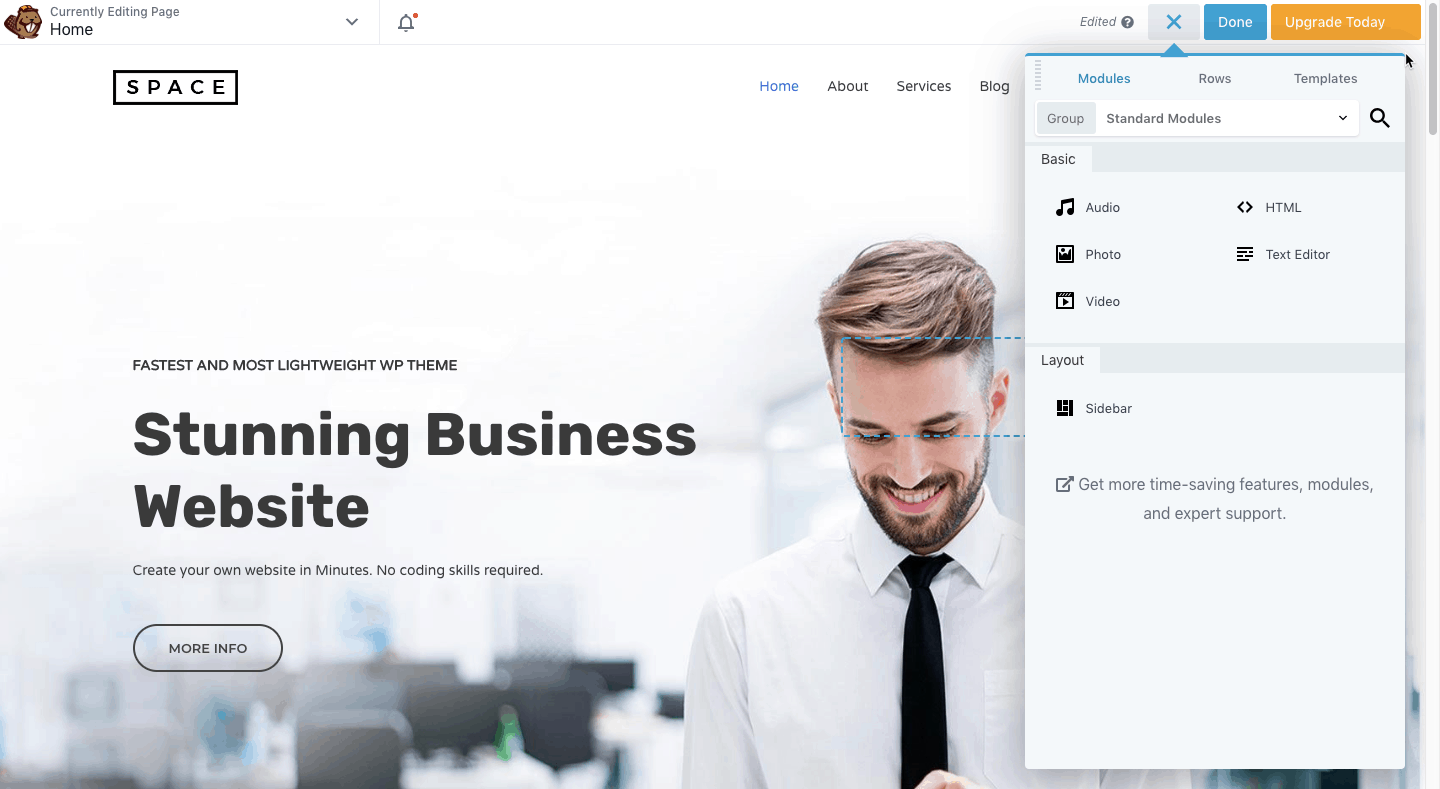
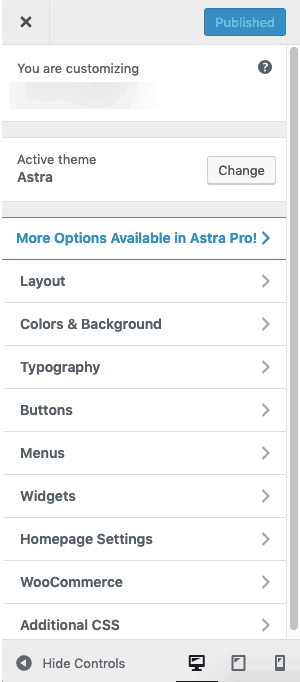
However, you will not be able to set up site-wide settings like the logo, menu, fonts, colors, etc.
To set these, click the Customize link in the top admin bar…

This will open the WordPress Customizer Panel where you can set all of the site-wide settings…
Okay! That’s It!
You have successfully built a clean and professional-looking WordPress website for an IT company.
Now it is time to optimize it for search engines like Google, Bing, etc.
Optimize Your IT Website For Search Engines
Search Engine Optimization (SEO) is an incredibly huge topic.
I just cannot cover it in one section.
I guess you know that already.
However, when it comes to WordPress websites, you can use specific plugins to help you in performing SEO for your site.
Plugins like Yoast SEO and All in One SEO Pack are quite popular in the WordPress ecosystem.
You can use one of these plugins to optimize your website pages.
Just read through the Knowledge Base articles of these plugins to understand how to set them up properly.
Alright, let’s talk about website speed and security now…
Optimize Your IT Website For Speed And Security
Website Speed is again a vast topic in itself.
There are a number of factors that can affect website speed.
The two main ones are your Web Host and Theme.
This is why I recommended that you use either Kinsta or BigScoots as your Web Host earlier in this guide.
Both of these companies understand that website speed is important and have the necessary mechanisms in place to speed up your website.
Even the Astra theme that you used to build your website by following this guide is developed with speed in mind.
So with these two taken care off, your website speed should not suffer as much.
However, as I said earlier, website speed can be impacted by many different factors.
So always keep that in mind.
Now, coming to security…
It is another huge topic!
There are many articles written on how to secure a WordPress website.
But frankly, I am a firm believer that it is the responsibility of the Web Host to make sure that your website is always secure.
Your Web Host should make sure that your website does not get infected and even if it does get infected, then they should remove that infection without charging you anything.
This is why I like Kinsta so much.
It is by far the most stable and secure Web Host that I have found till now.
So do take a good hard look at it for hosting your website.
Okay!
What else?
Enhance Your IT Website Even Further
When you imported Astra’s Agency Starter Site, you installed a number of plugins.
One of them was Beaver Builder Lite.
Beaver Builder is a fantastic WordPress page-builder plugin. I am using it for a number of years now, and I absolutely love it. Take a look at my Beaver Builder Review to know why this plugin is so good.
So I will recommend that you upgrade to the premium version of Beaver Builder.
It will help you to design your website any way you want to.
Apart from Beaver Builder, I would also recommend that you get the Astra Pro plugin.
Astra Pro plugin adds a lot of features to the Astra theme.
Take a look at all the features that Astra Pro plugin adds to the Astra theme…
Astra Pro plugin along with the Astra theme will give you all the flexibility that you will need to tweak your website any way you want to.
Alright!
With that said…
Let’s Wrap Up Quickly!
I hope you have got a good idea about how to build a WordPress website for an IT company.
And I hope that you will now be able to build your website on your own.
If you run into issues or have any questions, then just ask them in the comments below. I would love to answer them.
And if you know someone who would benefit from this guide, then please share this guide with them.
I would really appreciate that.