Ever since I wrote the tutorial on how to create a WordPress single Post template without writing any code, I got a lot of questions on how to create a custom blog layout in WordPress.
If you have ever tried to create a custom blog page design, then you know how difficult and frustrating it is because you have to write a good amount of code or find someone who can write it.
This can get even more frustrating because you not only have to write the code but also make sure that it does not break with every update of WordPress, themes, or plugins that you have installed.
But there is a better way to create a custom blog layout. That is by using Beaver Themer plugin which does not force you to write code for creating a custom blog page layout.
So in this tutorial, you will learn how you can create a custom blog page design without touching a single line of code using Beaver Themer plugin.
Good enough?
Great!
Let’s get started…
What Are You Going To Learn In This Tutorial?
You are going to learn how to change a blog layout that looks like this….
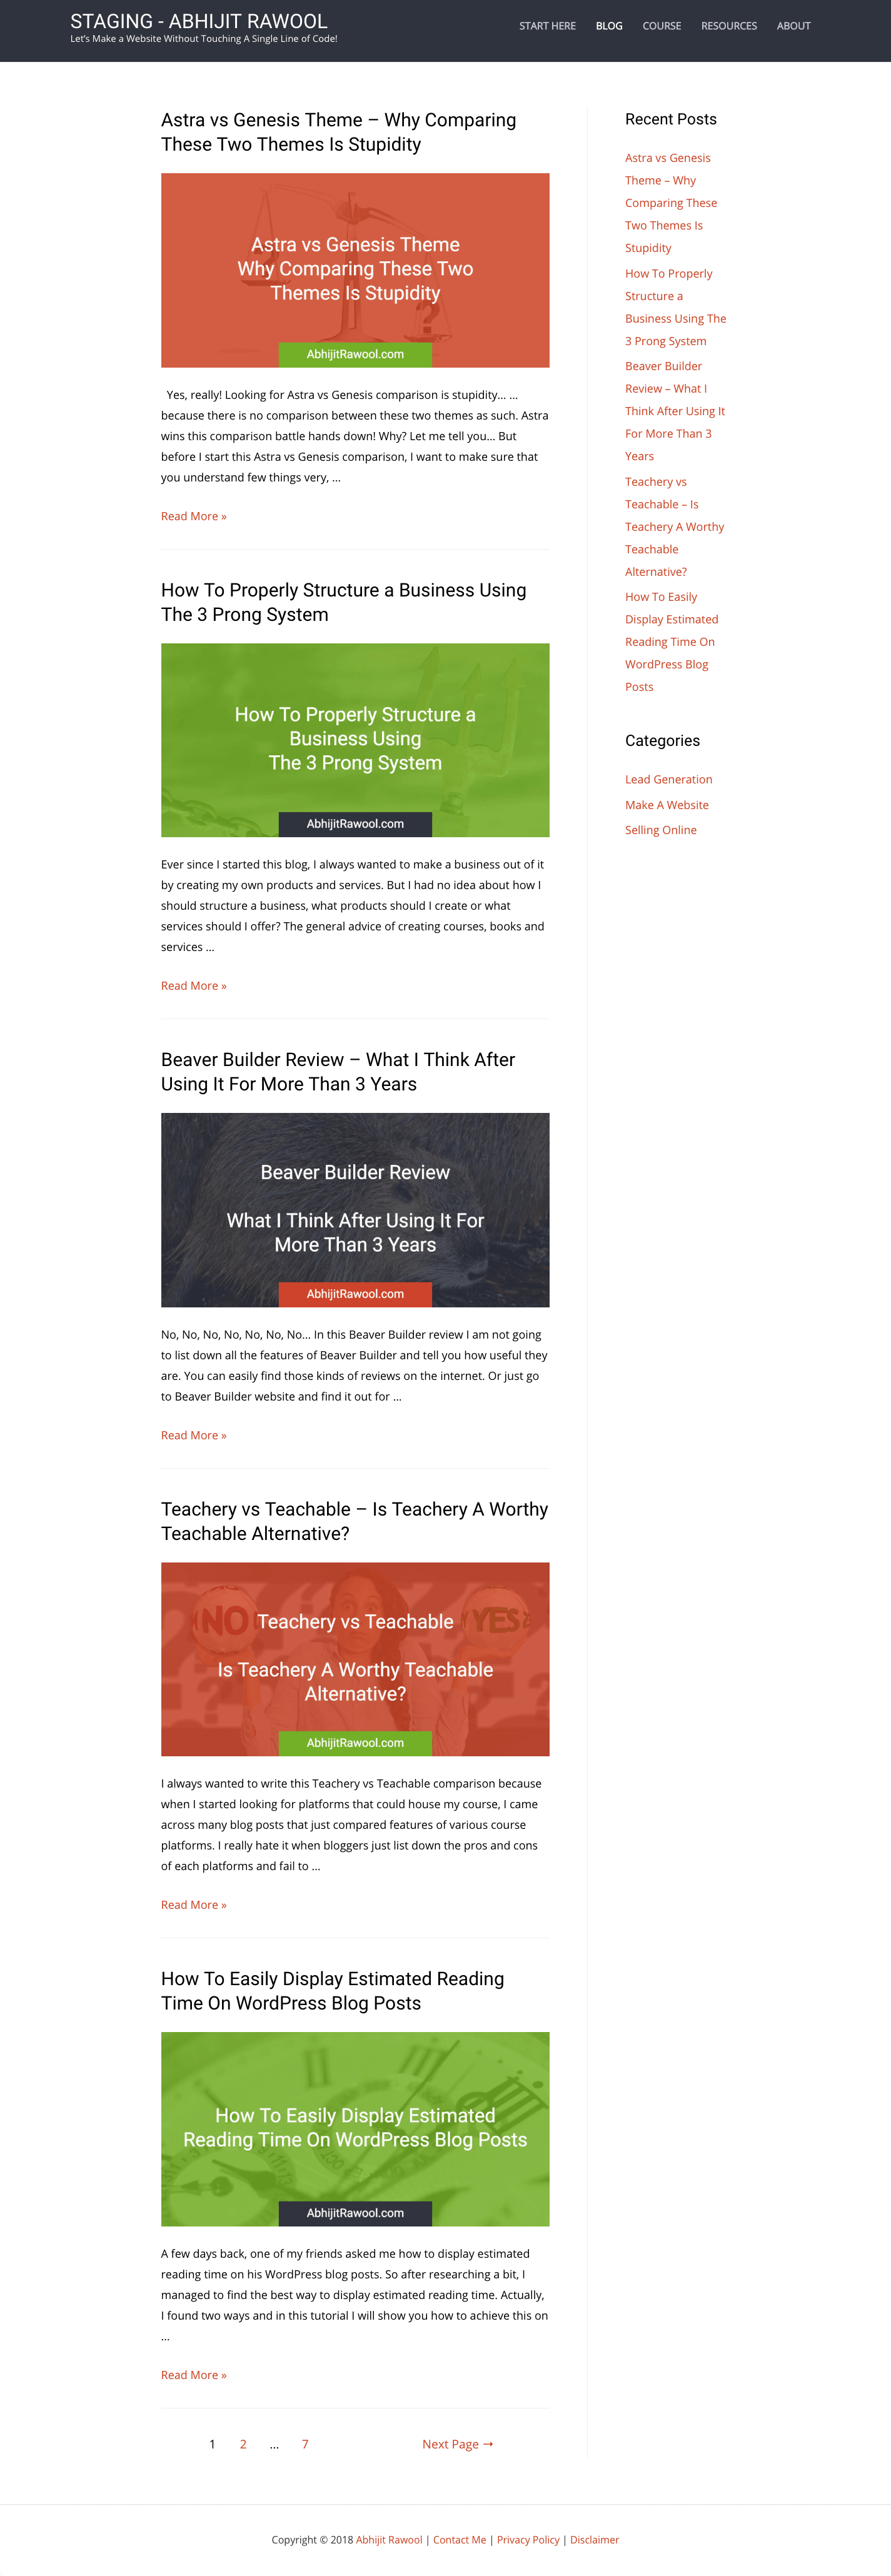
…into a blog layout that looks like this…
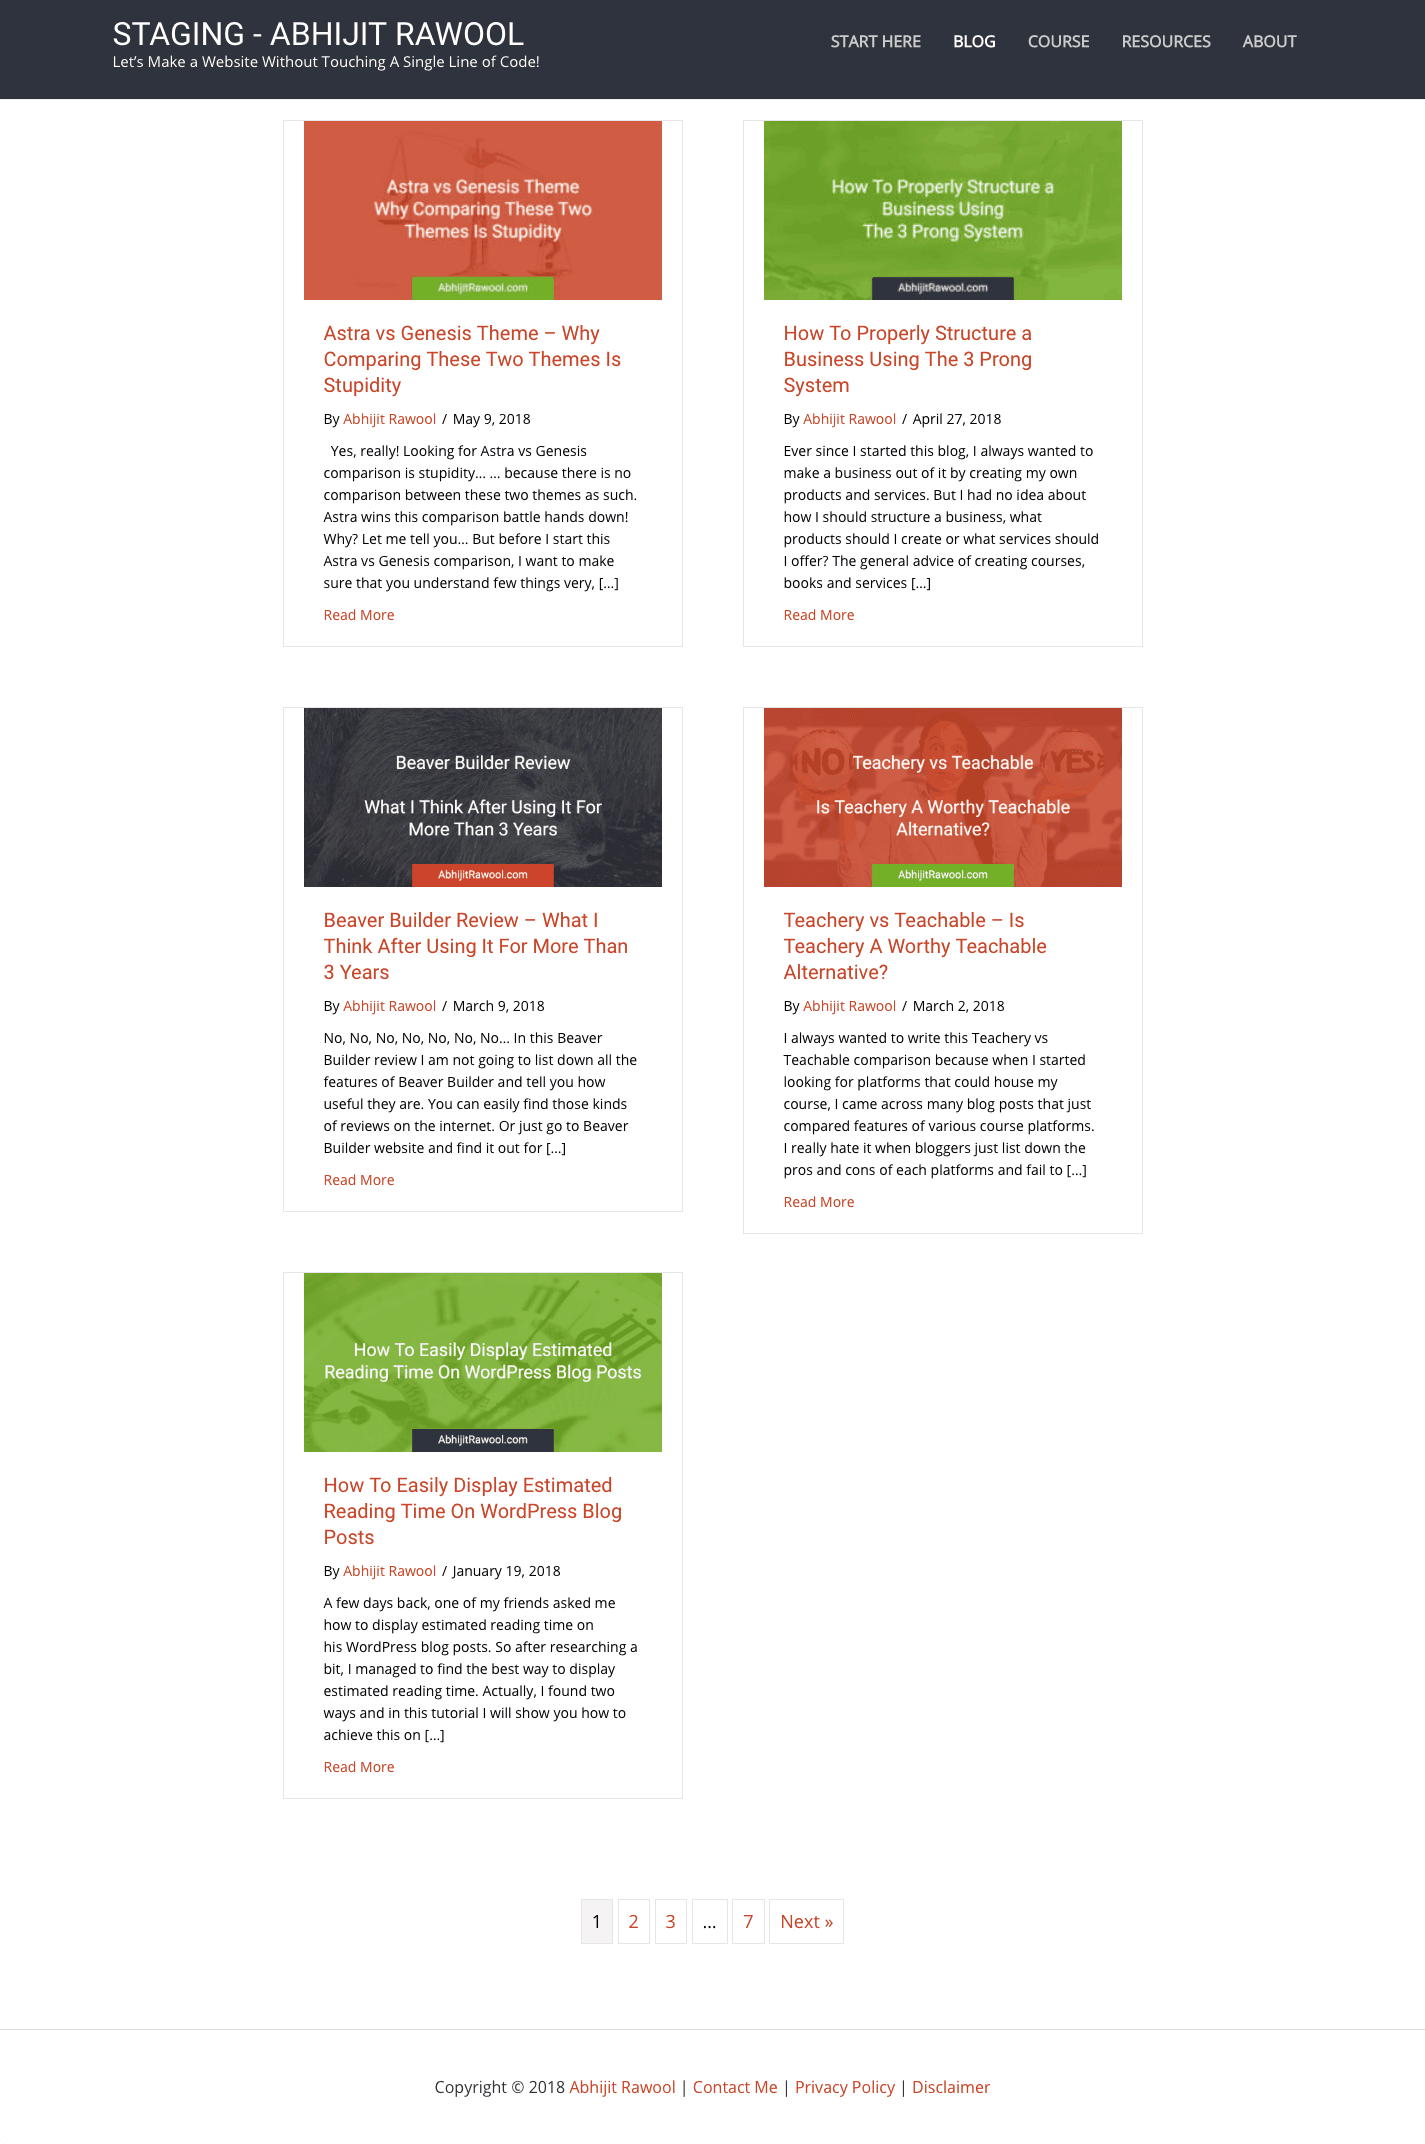
…and you will do this without writing any code.
I know that this new blog layout is not a piece of art, but for the purposes of this tutorial, let’s stick with this new blog layout. Once you know how to create this layout, you will be able to create any blog layout that you want.
Sounds good?
Alright, let’s get started.
But first…
What Tools Will You Need To Create A Custom Blog Layout?
You will need Beaver Builder plugin to create the actual layout of the blog page and you will need Beaver Themer plugin to apply the new blog layout to the blog page.
For this tutorial I am going to use Astra Theme, but you can use any theme that is supported by Beaver Themer plugin. To know if Beaver Themer is supported by your theme, just ask your theme developer or check out this official help documentation on Beaver Builder website.
Want to understand why I chose these tools? Read these articles to understand why:
- Beaver Builder Review – What I Think After Using It For More Than 4 Years
- Astra vs Genesis Theme – Why Comparing These Two Themes Is Stupidity
If you are wondering why do you need a theme that is supported by Beaver Themer plugin then the reason is that almost all traditional WordPress themes give you limited control over the design of your blog page as well as single Post pages. It means, to make your blog look the way you want it to look, you will need to write a ton of PHP and CSS code.
Beaver Themer solves this problem by giving you a lot of control over these parts of your website. So there is really no reason to not use Beaver Themer plugin.
After all, why should you restrict yourself to only the design options provided by your theme?
There is no reason to restrict yourself.
Also, the time that you invest in writing code to customize your theme can easily be saved using Beaver Themer plugin. You can then utilize this time to promote your website and your business.
Okay, now that you have got that sorted out, let’s get on with the tutorial.
Steps To Create Custom Blog Layout In WordPress
Before you start, make sure that you have set the page that you want to be the blog page as the Posts Page in Reading Settings of WordPress.
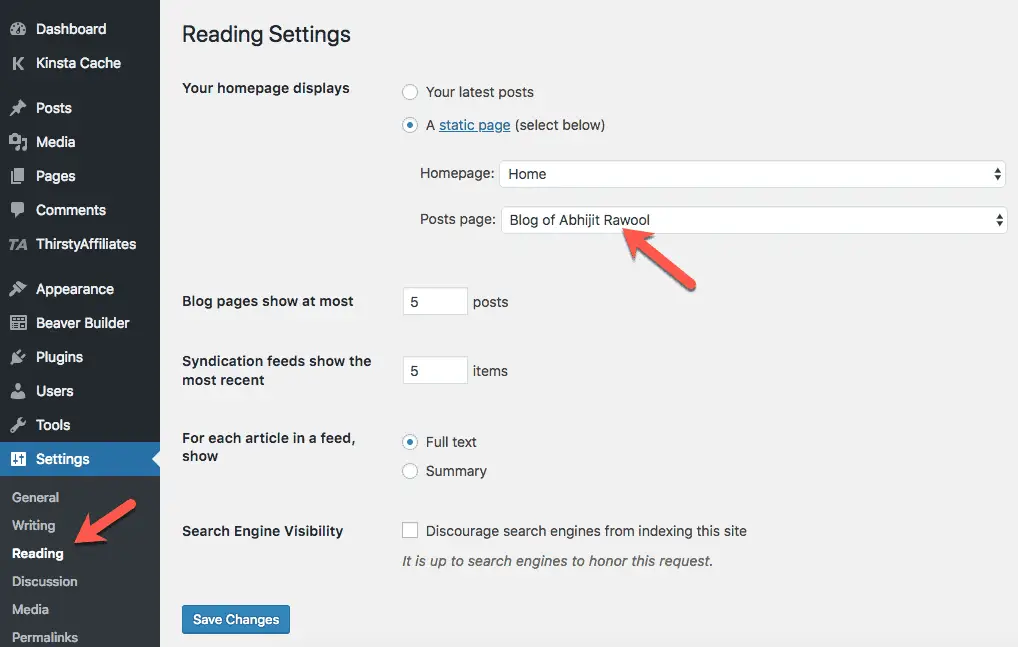
At this point if you go to the front-end of your website, you should see the default blog layout design that is provided by your theme.
Now to customize this layout, install Beaver Builder and Beaver Themer plugins.
Once you have these plugins installed, you can follow the below three steps to customize your blog layout design:
- Create the Blog Layout Template using Beaver Themer plugin
- Build the Blog Layout Template using Beaver Builder plugin
- Apply the Blog Layout Template to the Blog Page using Beaver Themer plugin
Alright, let’s get started with the first step.
Step 1: Create The Blog Layout Template Using Beaver Themer Plugin
To create a Blog Layout Template using Beaver Themer plugin, go to Beaver Builder > Themer Layouts page from your WordPress Admin Panel Menu.

You should now see the Themer Layouts page. On this page, click the Add New button.
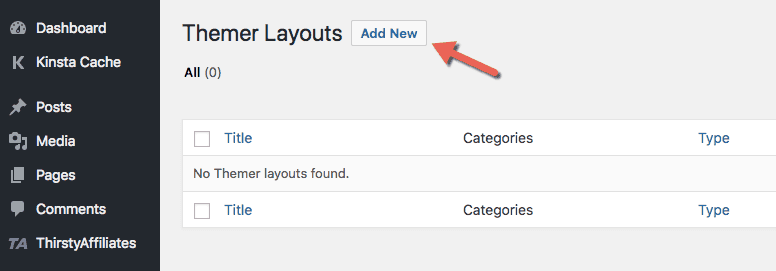
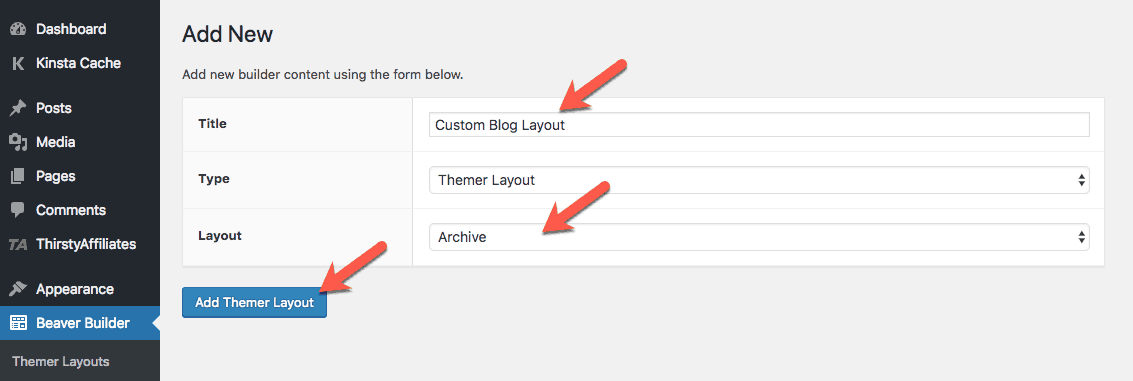
You should then see the Add New page. On this page, enter a Title for the Layout and select Archive in the Layout field. Then click the Add Themer Layout button to create the Archive Layout.
You will now see the Edit Themer Layout page. Click the Publish button so that you don’t lose your work.
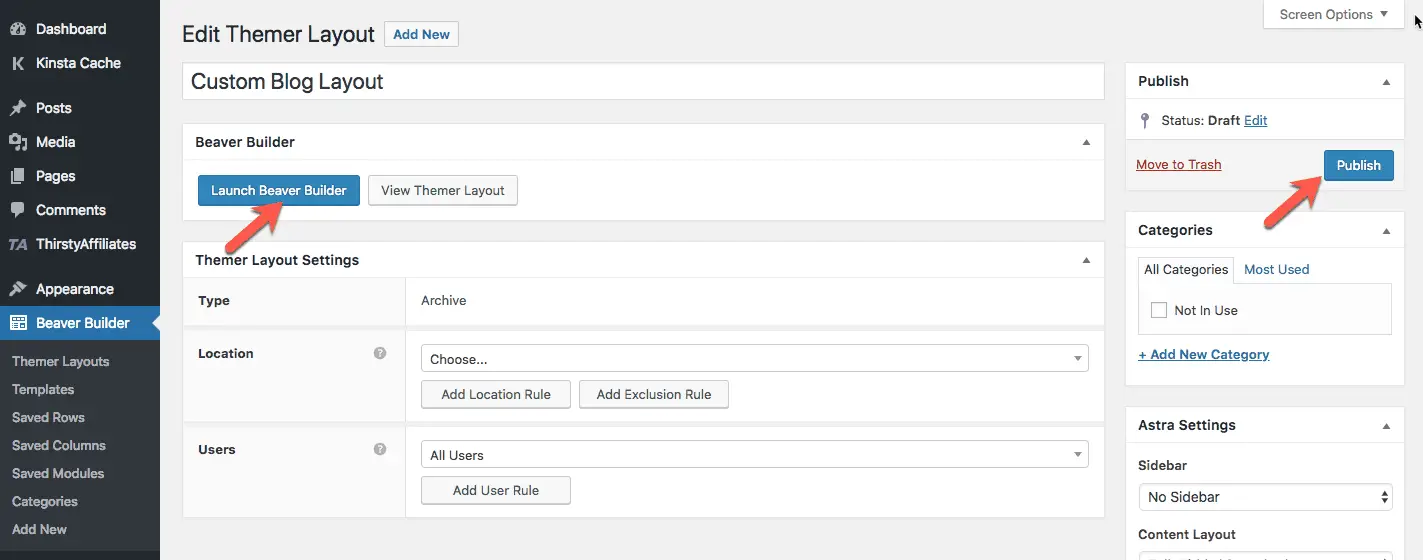
Then click the Launch Beaver Builder button to start the next step.
Step 2: Build The Blog Layout Template Using Beaver Builder Plugin
Once you click the Launch Beaver Builder button, you will see the front-end of your website where you can start building your new blog layout.
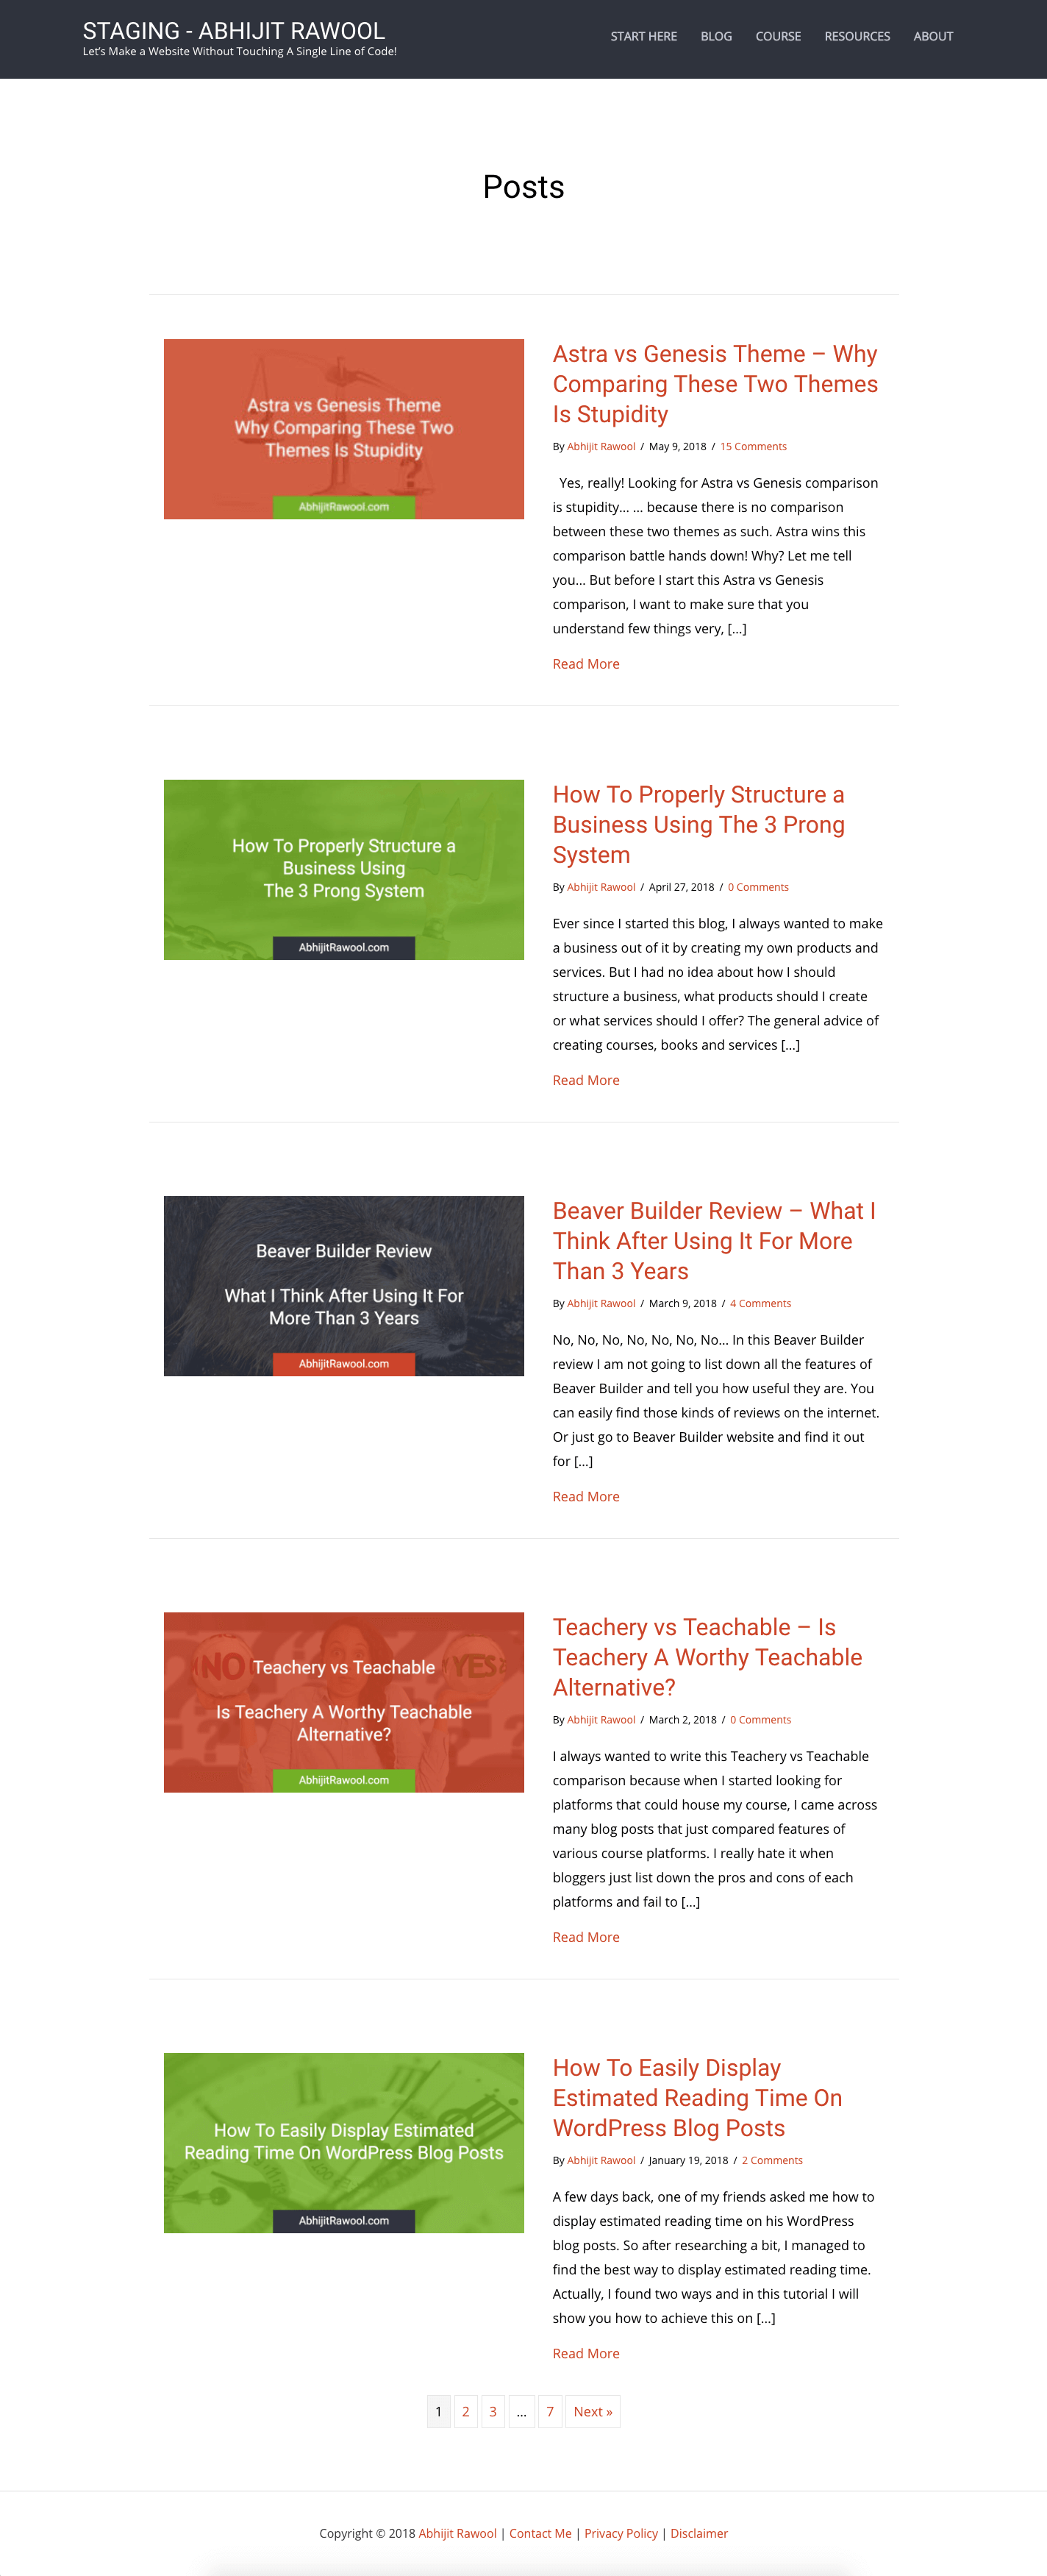
You will notice that Beaver Themer has intelligently detected that you are building a custom blog layout and so it has created a layout out-of-the-box for you.
You can easily change this layout using the Settings box of the Posts module of Beaver Builder.
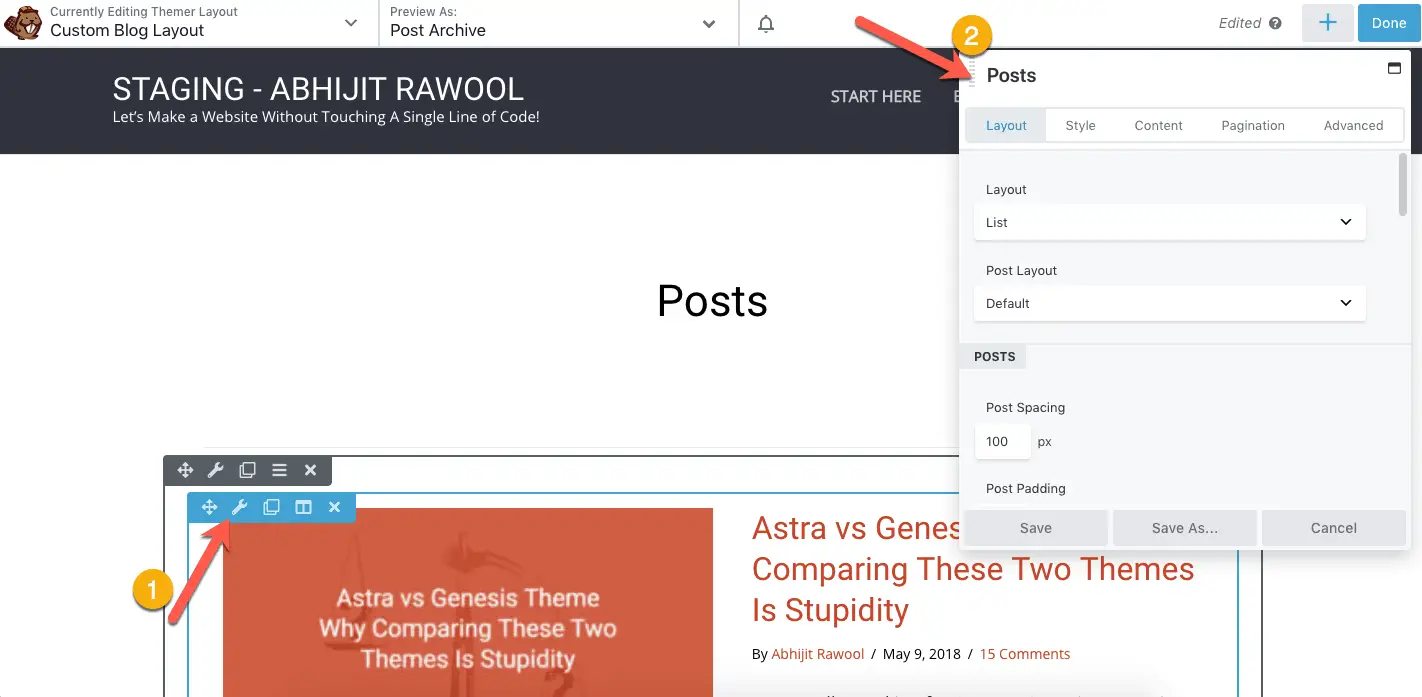
I don’t like that all Posts are listed one below the other. So I changed the Layout to Masonry and increased the Post Width to 400 px. I also deleted the top Posts Heading section.
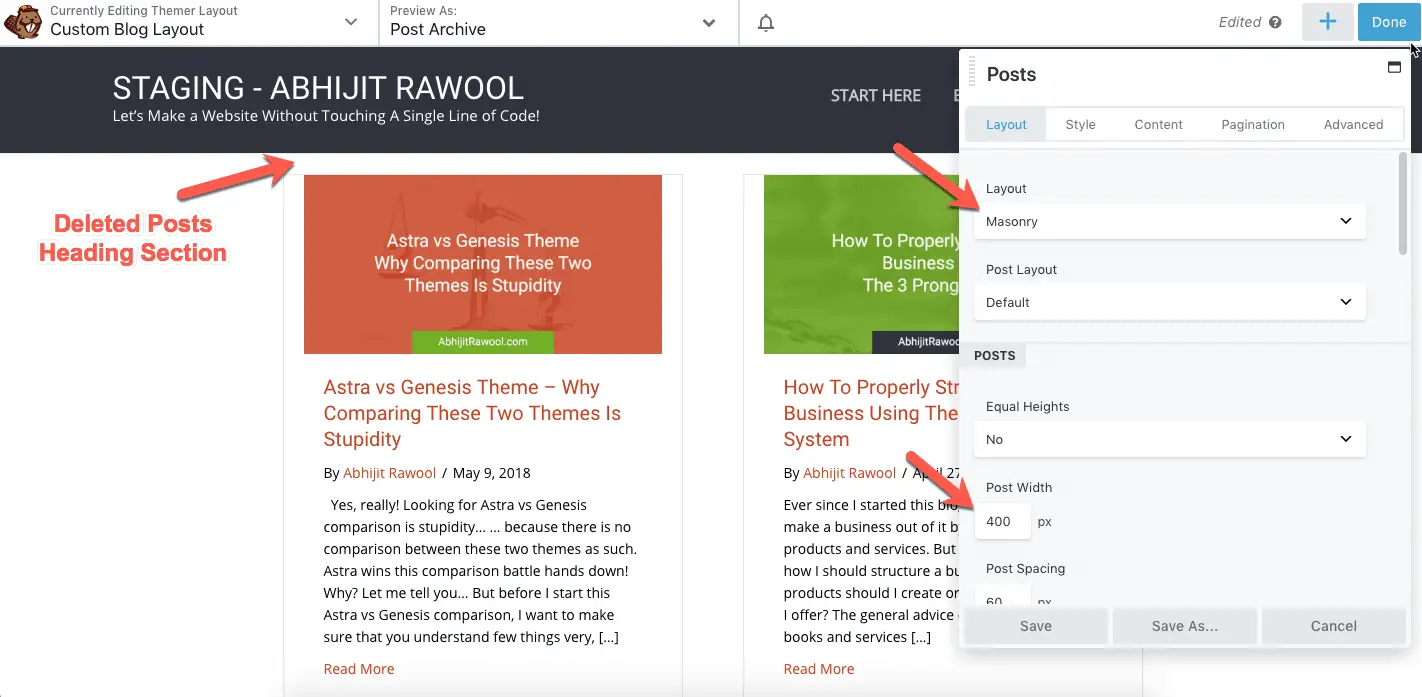
You can play with the other settings to design the blog layout exactly as you want. The Posts Module has a lot of settings to make your blog layout look the way you want it to look.
You can check out this official documentation of Beaver Builder to learn about everything else that the Posts Module can do for you.
Similar to the Posts module, Beaver Themer adds a few more additional modules to the core Beaver Builder modules that you can use to build your blog layout.
You can see these additional Beaver Themer Archive modules by going to Themer Modules Group.
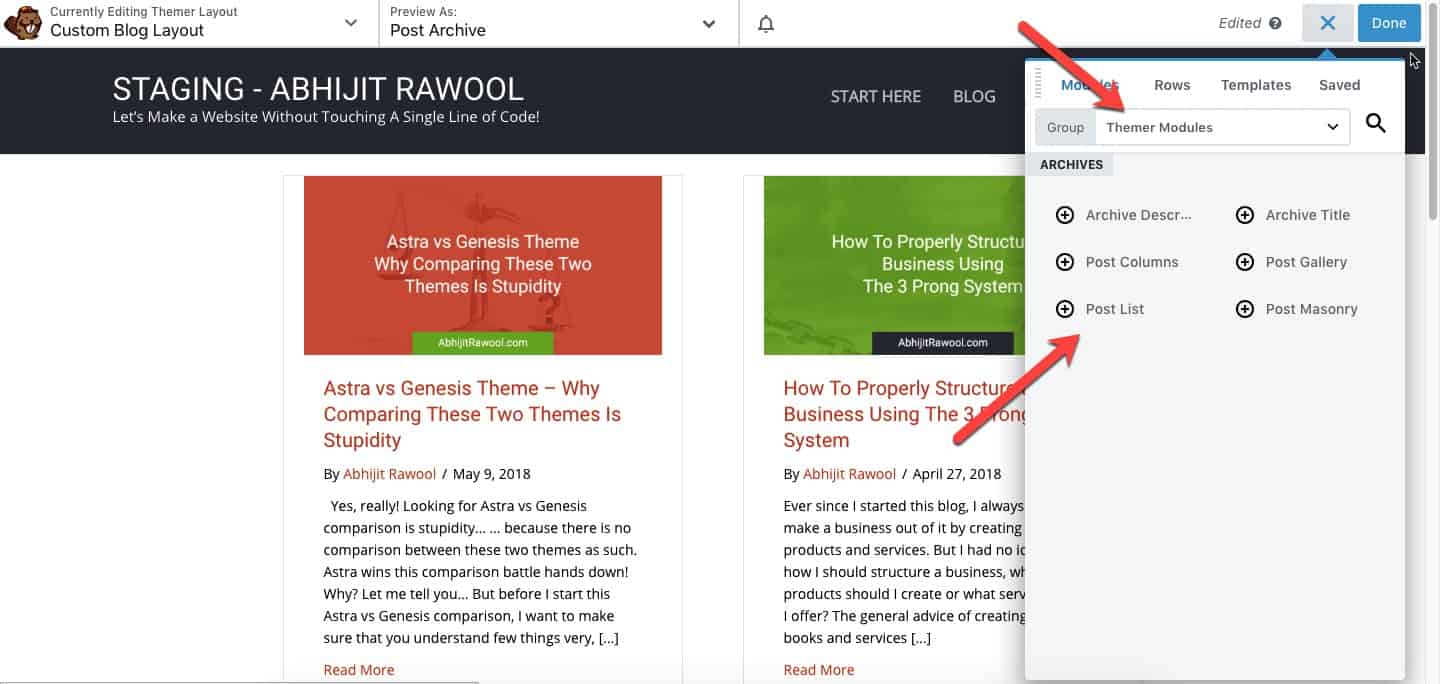
You can drag-and-drop these modules while building your blog layout or even while building any other WordPress Archive page layouts like the Category page layouts, Tag page layouts, etc.
You can check out the details of the other Archive modules of Beaver Themer in this official documentation.
I am not going to add modules to this layout right now. But you can try out various modules and their settings while building your blog layout.
For now, let’s move on…
Click the Done button and then click the Publish button to publish the layout.


Now that the blog layout is built, let’s apply this layout to the blog page.
Step 3: Apply The Blog Layout Template To The Blog Page Using Beaver Themer Plugin
To apply the custom blog layout that you have just created to your blog page, click the Edit Themer Layout action in the top Admin Panel bar.

You should now see the Edit Themer Layout page. On this page, select Post Archive in the Location field.
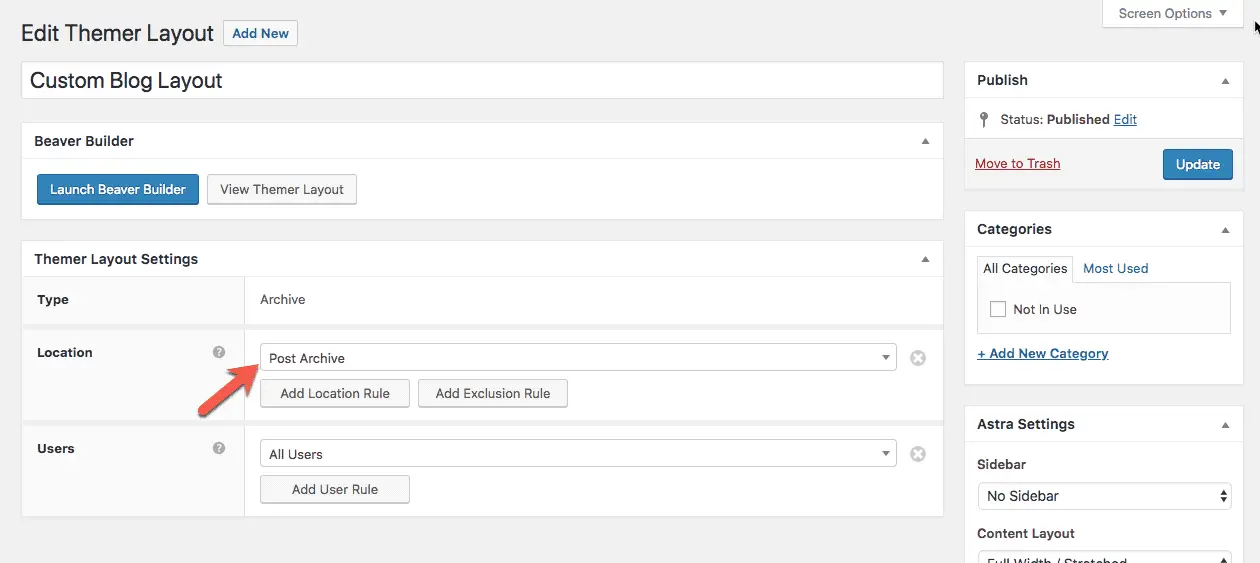
This will apply the new layout to your blog page.
You can also apply this layout to other Archive pages, like the Category pages, Tag pages, Date Archive pages, etc. by selecting them in the Location Field.
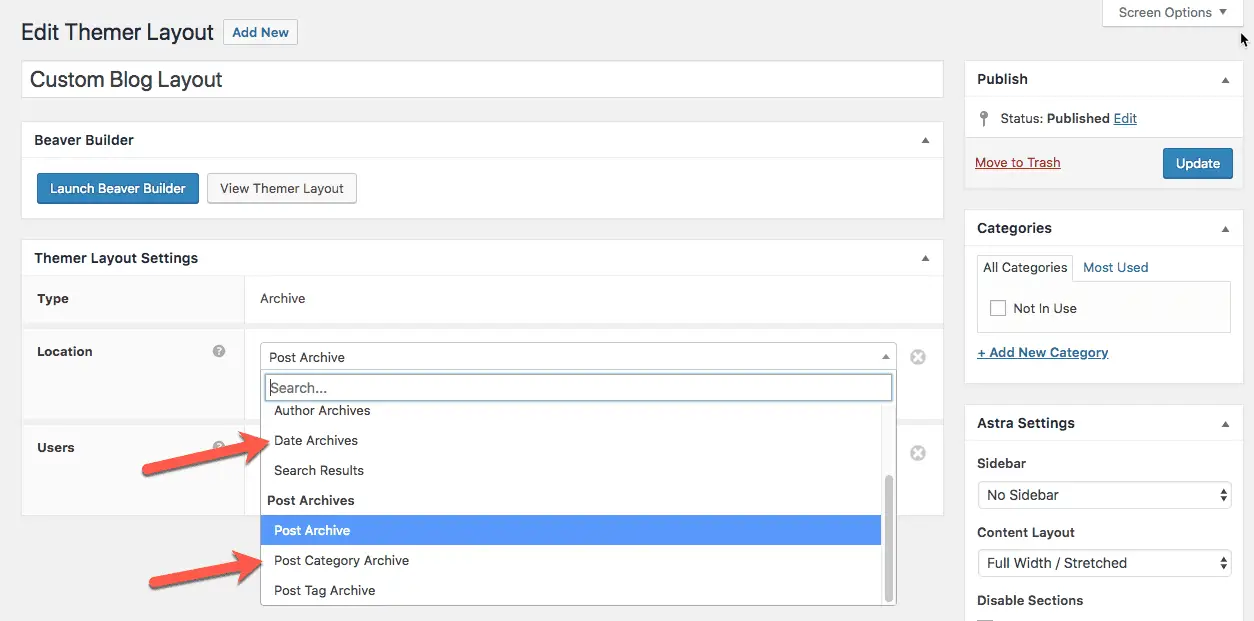
I think you have now got an idea of how useful the Beaver Themer plugin is. It really makes it easy to design all WordPress Archive pages, not just the blog page.
Once you are done with choosing all the settings that you want to use, click the Update button to save your changes.
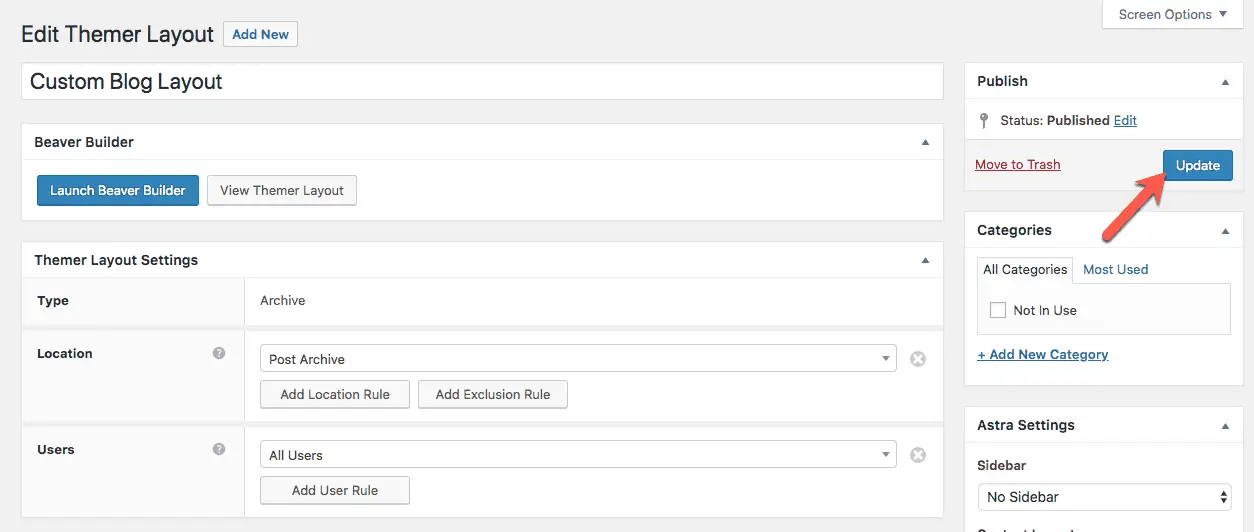
If you now view your blog page on the front-end of your website, you will see that the default blog layout provided by your theme has got replaced by the new blog layout that you just created using the Beaver Themer plugin.
And…
That’s It!
You now know how to create a custom blog layout in WordPress without using any code.
And the best part is that you can easily tweak it or change it at any time you want to.
You don’t have to depend on anyone else to write another piece of code or have to pay anyone for it.
You can pretty much do whatever you want to by using the Beaver Themer plugin.
Check out what else Beaver Themer plugin can do for you.
And if you have any questions or doubts, just ask them in the comments below. I reply to every comment.
Also, please do share this tutorial on Pinterest, Facebook, Twitter, or with anyone else you know who might find it useful.